Esta versão pode conter edições incorretas. Mude para o último instantâneo verificado.
O que você precisa
-
Este passo não foi traduzido. Ajude a traduzi-lo
-
Unscrew the Phillips screw securing the battery cover to the lower case.
-
Pry the battery cover upward with a spudger or fingernail, and lift out of the lower case.
-
-
Este passo não foi traduzido. Ajude a traduzi-lo
-
Wedge the edge of a spudger in between the side of the battery and the lower case housing and pry upward to dislodge the battery.
-
Remove the battery from the DS Lite.
-
-
Este passo não foi traduzido. Ajude a traduzi-lo
-
Use the tip of a spudger to pry both rubber feet off the DS Lite.
-
-
Este passo não foi traduzido. Ajude a traduzi-lo
-
Remove the following screws securing the lower case to the body of the DS Lite:
-
Two 4.3 mm gold Phillips screws
-
One 3.9 mm black Tri-Wing screw
-
One 3.3 mm silver Phillips screw
-
Three 5.5 mm silver Tri-Wing screws
-
-
Este passo não foi traduzido. Ajude a traduzi-lo
-
Insert the edge of a spudger in between the lower and upper case near the top right corner of the DS Lite.
-
Carefully run the spudger along the right edge of the DS Lite, creating an opening in the process.
-
Continue running the spudger along the backside of the DS Lite until the majority of the lower case has been separated from the upper case.
-
-
Este passo não foi traduzido. Ajude a traduzi-lo
-
Lift the lower case away from the rest of the DS Lite.
-
-
-
Este passo não foi traduzido. Ajude a traduzi-lo
-
Use the flat edge of a spudger to pry the Wi-Fi antenna connector straight up from its socket on the Wi-Fi board.
-
-
Este passo não foi traduzido. Ajude a traduzi-lo
-
Use the flat edge of a spudger to pry the Wi-Fi board connector straight up from its socket on the motherboard.
-
-
Este passo não foi traduzido. Ajude a traduzi-lo
-
Use the flat edge of a spudger to separate the right edge of the Wi-Fi board from the motherboard.
-
Remove the Wi-Fi board from the DS Lite.
-
-
Este passo não foi traduzido. Ajude a traduzi-lo
-
Use the flat edge of a spudger to pry the microphone connector straight up from its socket on the motherboard.
-
-
Este passo não foi traduzido. Ajude a traduzi-lo
-
Position the antenna cable with its connector facing up and away from the motherboard using a spudger to hold it down lightly in the gap between chips on the motherboard.
-
Slowly and carefully pull the antenna cable until the cable connector is under the DS Lite game cartridge reader.
-
Continue pulling the cable until the cable connector comes out from under the game cartridge reader on the right side.
-
-
Este passo não foi traduzido. Ajude a traduzi-lo
-
Use your fingernail or the edge of a spudger to carefully flip up the touchscreen ribbon cable retaining flap.
-
Use the tip of a spudger to pull the touchscreen ribbon cable straight out of its socket.
-
-
Este passo não foi traduzido. Ajude a traduzi-lo
-
Remove the two 3.4 mm Phillips screws securing the motherboard to the upper case.
-
-
Este passo não foi traduzido. Ajude a traduzi-lo
-
Open the display enough to use your finger to push the front edge of the motherboard up and away from the upper case.
-
-
Este passo não foi traduzido. Ajude a traduzi-lo
-
Use your fingernail or the flat edge of a spudger to carefully flip up the upper LCD ribbon cable retaining flap.
-
Pull the motherboard away from the DS Lite to separate the upper LCD ribbon cable from its socket on the motherboard.
-
Remove the motherboard from the DS Lite.
-
Now you may open the retaining flap for the lower LCD screen in the same way and separate the lower LCD screen from the motherboard.
-
-
Este passo não foi traduzido. Ajude a traduzi-lo
-
Use your fingernail or the edge of a plastic opening tool to carefully flip up the lower LCD ribbon cable retaining flap.
-
Pull the lower LCD assembly straight away to separate the lower LCD ribbon cable from its socket on the motherboard.
-
Remove the lower LCD assembly from the motherboard.
-
-
Este passo não foi traduzido. Ajude a traduzi-lo
-
Insert a plastic opening tool between the touchscreen and top right corner of the display.
-
Slide the opening tool down the right side of the display to free the edge of the touchscreen.
-
-
Este passo não foi traduzido. Ajude a traduzi-lo
-
Continue sliding the plastic opening tool along the bottom and up the left edges of the LCD to separate the touchscreen from the LCD.
-
-
Este passo não foi traduzido. Ajude a traduzi-lo
-
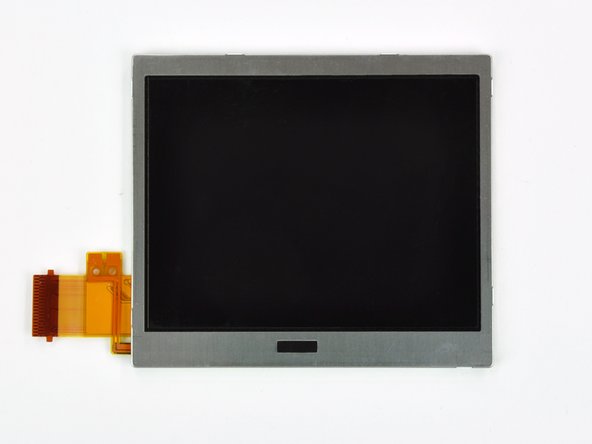
Lift the touchscreen away from the LCD.
-
LCD remains.
-


Cancelar: não concluí este guia.
38 outras pessoas executaram este guia.

Um comentário
This guide recommends a Y1 Tri point scredriver. I bought one to try this repair and it's marginally too big :(
It does begin to bite the screw, then slips and fails. I daren't keep trying for fear of rounding the screws off, so
I'm going to try again with a Y0 and see how that goes.