Ir para o conteúdo principal

Nintendo 64 Motherboard Replacement

O que você precisa

  1. Nintendo 64 Motherboard Replacement, Top Cover: passo 1, imagem 1 %32
    • Remove the expansion pack cover by pushing in the tab and pulling out.

  2. Nintendo 64 Motherboard Replacement: passo 2, imagem 1 %32
    • If your system uses a jumper pack, the same procedure applies to remove it.

    • A small spoon can be used in place of a spudger.

    • Lever the expansion pack out using a metal spudger.

  3. Nintendo 64 Motherboard Replacement: passo 3, imagem 1 %32
    • Remove the six screws on the bottom side indicated in the example with a gamebit head or screwdriver.

  4. Nintendo 64 Motherboard Replacement: passo 4, imagem 1 %32
    • Remove the two front feet of the N64.

  5. Nintendo 64 Motherboard Replacement: passo 5, imagem 1 %32
    • Rotate to top side up and lift off top cover.

  6. Nintendo 64 Motherboard Replacement, Metal Plate: passo 6, imagem 1 %32 Nintendo 64 Motherboard Replacement, Metal Plate: passo 6, imagem 2 %32
    • Remove the fourteen screws indicated in the example using the larger Phillips screwdriver.

    I’m not entirely certain if it's a common difference, but my nintendo 64 doesn’t have fourteen screws, but rather, 8 screws, and instead of 3 heat sinks, it only has the one separate heat sink on the chip close to the memory expansion pack. additionally, aside from the 6 screws closest to the expansion pack, the two other screws are held on by nuts under the metal piece.

    Avery Duncan - Responder

  7. Nintendo 64 Motherboard Replacement: passo 7, imagem 1 %32 Nintendo 64 Motherboard Replacement: passo 7, imagem 2 %32
    • Remove the metal plate indicated in the example by sliding it back and then lifting it up.

  8. Nintendo 64 Motherboard Replacement: passo 8, imagem 1 %32
    • Remove the two screws indicated in the example using the smaller Phillips screwdriver.

  9. Nintendo 64 Motherboard Replacement: passo 9, imagem 1 %32
    • Remove the screw to the right of the LED light using the larger Phillips screwdriver.

  10. Nintendo 64 Motherboard Replacement: passo 10, imagem 1 %32
    • Remove the small metal bracket from the back of the expansion pack slot.

  11. Nintendo 64 Motherboard Replacement: passo 11, imagem 1 %32 Nintendo 64 Motherboard Replacement: passo 11, imagem 2 %32
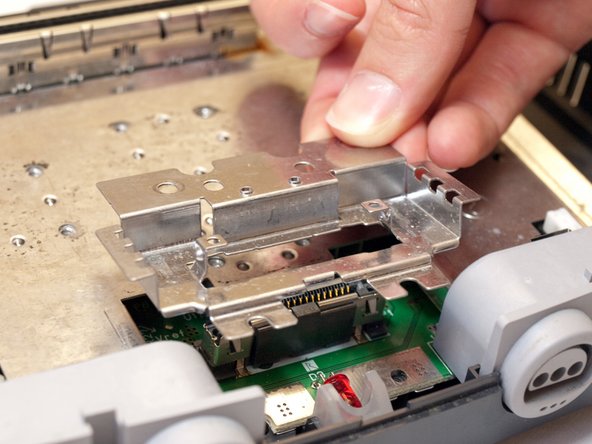
    • Remove the small metal bracket from the front of the expansion pack slot with the metal spudger.

    I have noticed this is not in Australian Pal versions of the N64.

    at First i thought i was missing a bit on my N64 and now have looked a second one and its also not there.

    Darren Welch - Responder

  12. Nintendo 64 Motherboard Replacement: passo 12, imagem 1 %32 Nintendo 64 Motherboard Replacement: passo 12, imagem 2 %32
    • Remove the small metal bracket behind the expansion slot using the spudger.

  13. Nintendo 64 Motherboard Replacement: passo 13, imagem 1 %32 Nintendo 64 Motherboard Replacement: passo 13, imagem 2 %32
    • Remove the seven screws indicated in the example using the larger Phillips screwdriver.

    The two screws next to the cartridge slot are longer

    Michael - Responder

  14. Nintendo 64 Motherboard Replacement: passo 14, imagem 1 %32
    • Lift off and remove the metal plate as indicated in the example.

  15. Nintendo 64 Motherboard Replacement, Motherboard: passo 15, imagem 1 %32
    • Remove the four screws indicated using the #1 Phillips screwdriver.

    I found the #2PH to work a bit better here

    Rand Avary - Responder

  16. Nintendo 64 Motherboard Replacement, Motherboard removal: passo 16, imagem 1 %32
    • Lift up and remove the motherboard.

Conclusão

To reassemble your device, follow these instructions in reverse order.

36 outras pessoas executaram este guia.

tonymag28

Membro desde: 10/28/09

2.154 Reputação

Autoria de 3 guias

Equipe

Cal Poly, Team 5-4, Regan Fall 2009 Membro de Cal Poly, Team 5-4, Regan Fall 2009

CPSU-REGAN-F09S5G4

Membros da 7

Autoria de 15 guias

2 comentários

4.2mm doesn't seem right. When I looked to purchase all I saw was 4.5mm and now that I have one in my hand it seems to fit very precisely on the screws on my N64.

negroslim - Responder

i got the second comment :whyy:

Sqwerks - Responder

Adicione um comentário

Exibir estatísticas:

Últimas 24 horas: 26

Últimos 7 dias: 183

Últimos 30 dias: 467

Duração total: 63,532