Vídeo de Apresentação
-
-
私たちは夜通し、地元のゲーム店の前で発売前の列に加わり、この分解を皆さんにお届けします。 これで皆さんが楽しむためのお金は残されていません。
-
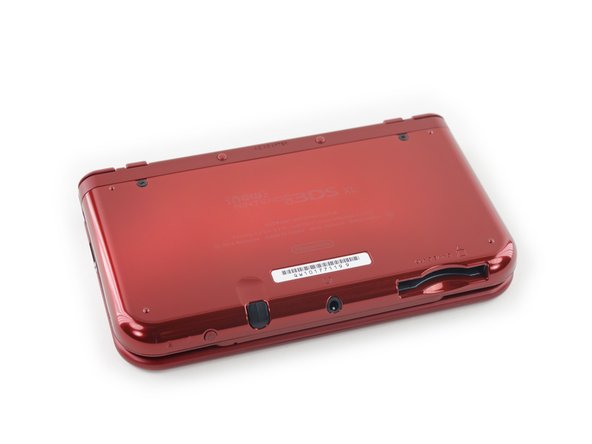
ニンテンドー3DS XL 2015には、次のような技術仕様があります。
-
顔追跡をする"超安定3D"
-
新しくZLとZRボタンと共にCスティックの追加
-
内蔵のNFCリーダー
-
改善されたCPUパフォーマンス
-
アップグレードされたリアカメラとマイクロSDサポート
-
-
-
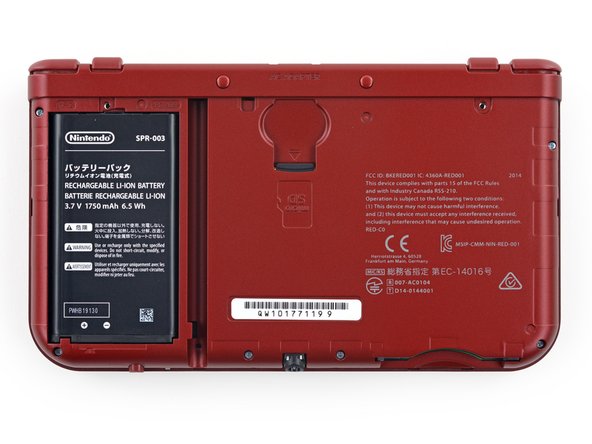
そうです、ここで(今はマイクロ)SDカードを交換するための専用ドライバーが必要です。 簡単にドアへアクセスできる時代は過ぎ去りました。
-
そしてドアを開口できれば、カードとバッテリーに簡単にアクセスできます。
-
そして取り外しは非常に簡単です...
-
-
-
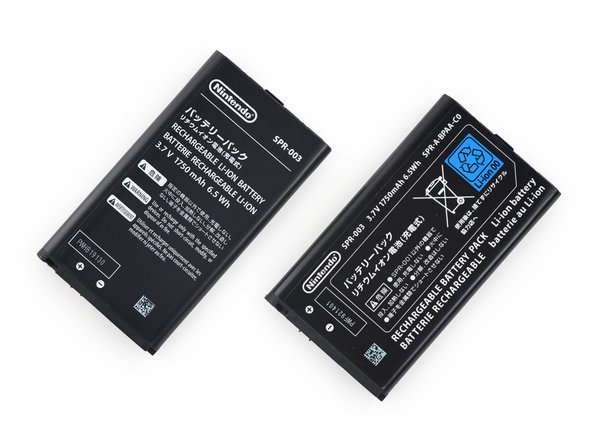
1度で2度美味しい分解です! 今までオリジナル3DS XLの分解を披露したことはありません(しかし、素晴らしい修理ガイドは沢山あります)。せめて、ここではバッテリーだけでもお見せしましょう。
-
左側に新3DS XLのバッテリー、右側には”旧”3DS XLバッテリーです。
-
任天堂は新3DS XLのバッテリーのアップグレードには関心がなかったようです。 どちらのモデルも3.7V、1750mAh、6.5Whです。
-
-
-
必要な作業は、爪をプッシュして小さなケースからマイクロSDカードを取り出します。 ほんの少しの努力でカードが出てきます。
-
マイクロSDカードの取り外しについて、3DS、2DS、3DS XLからアップグレードする場合は、データの転送方法についての(および任天堂の)ガイドをチェックしてください。
-
任天堂は2本のゴム足の下に2本のネジを隠しています。 他の6本のネジはボトムカバーを取り外したときに露出していました。 この隠されたねじのトリックを探すのに少々てこづりました。
-
それらの小さなゴムを3DSから抜き出すと…ジャジャーン、ケースが開きました!
i think they are jis #000
I unfortunately have a stripped screw on my refurbished console, and I’ve no idea how I’m going to get it out. Could you please show some steps on solving this issue? Thank you very much if so.
-
-
-
新3DS XLの中には、どんな "新しい"魔法が待っているのでしょうか? 確認してみましょう!
-
緩くなったショルダーバンパーボタンは底ケースに付いています。さらに分解を進めるため、ケーブルをスパッジャーで引き抜きながら少し踏み込んでいます。
-
任天堂は、内部の外観にはあまり気にしないように見えます。未硬化のパウダーコートが底ケースの内部に残されたままなのです。
-
-
-
-
一度内部に入ると、いつも期待に応えてくれるプラスネジドライバーのはずが、なぜか私たちを失望させ始めました。 ここに留められたネジが2つのサイズのちょうど中間のようです。
-
サプライズ、これはJIS規格のネジです! さて、私たちはどこでJIS規格のビットを準備できるでしょうか…
-
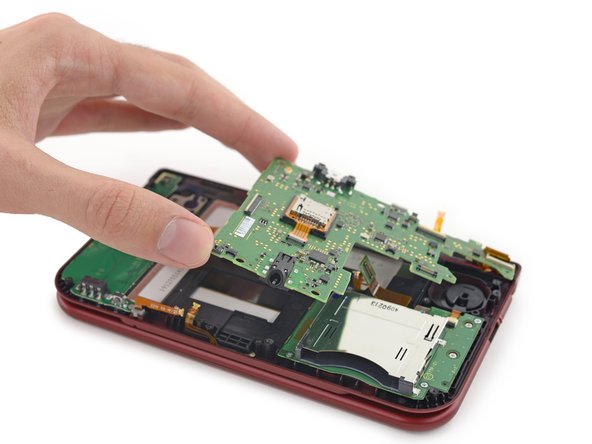
ドライバーを正しく装備できれば、マザーボードは計画通り取り出せます...
-
...のはずですが?マザーボードの背面になんと2本のケーブルが接続されています。そのため作業には少し手こずります。
Regarding Step 11's attached photo: exactly how ARE those cables supposed to be attached?
Perchance someone could take a photo of their nN3DS XL and show me? 'Cause I was attempting to replace my D-Pad, and now either I hooked something up wrong or (far worse) I broke like ALL of the black ZIF connectors, 'cause my nN3DS XL isn't booting anymore. :(
We do have guides on this device, this is a teardown and not meant to be followed as a disassembly guide. Check out the directional pad guide, it has more in-depth photos for those connectors. If you only broke the locking tabs on the ZIF connector you should be fine, you can use tape to secure the ribbon cables if they slide out. If you broke connectors off the board, you might be out of luck. Hope this helps!
Well, I HAD followed that guide when I disassembled my nN3DS XL. :)
None of the connectors have been physically separated from the board (unless you count the top half of the Circle Pad's connector — the bit that locks down), and as far as I can tell, I've got everything hooked up correctly. :/ But for some reason, it just won't turn on anymore.
I think I'll ask how to get my nN3DS XL working again on that particular guide; it'd probably be more on-topic. :)
Oh good! You can also post in our Answers forum, there's more traffic there, so you may have better luck =)
In the photo attached to “Oh boy reassembly’s gonna be fun”, the ribbon cable that the tweezers are closest to, I have some small dents in the ribbon cable and want to know either if that’s fine or just possibly where to get that ribbon cable from. The reason is because everytime I try to turn it on it has a blue light on and then turns off, nothing, just a black screen.
-
-
-
マザーボードを取り出すと、microSDHCリーダーを自由に取り外せます。
I have added 200gb micro SD card and it is reading/writing it just fine. It shows 999,999 fre blocks.
Any 3ds family system can use up to a 128gb card just fine, as long as it's formatted to FAT32
-
-
-
さて、マザーボードのアクションタイムです!
-
Nintendo 1446 17 CPU LGR A(カスタムCPU、おそらくARMコアベース)
-
Atheros AR6014G-AL1C Wi-Fi SoC
-
Samsung KLM4G1YEMD-B031 4 GB eMMC NANDフラッシュ
-
富士通 82MK9A9A 7LFCRAM 1445 962 FCRAM(FCRAM)
-
Texas Instruments 93045A4 49AF3NW G2(おそく電源管理IC)
-
ルネサスエレクトロニクス UC KTR 442KM13 TK14
Any sound chip information?
New 3DS CPU: ARM946 x1 (@134MHz, Frequency down when runs GBA VC) +ARM 11 x4 (@804 MHz on supported title and home menu 268MHz on other)
Anyone know where I can get one of the wifi chips (Atheros AR6014G-AL1C Wi-Fi SoC) for cheap?
the 3ds gpu is dmp pica200
Is there a sound chip information?
-
-
-
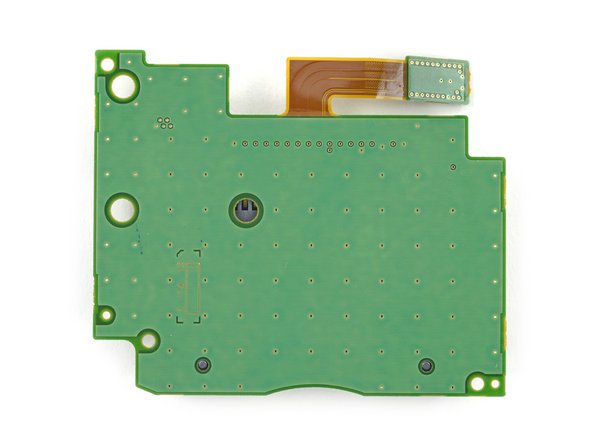
マザーボードの背面にも幾つかおまけがあります。
-
Texas Instruments AIC3010D 48C01JW(おそらくコーデックIC)
-
NXP S750 1603 TSD438C 赤外線IC
-
Texas Instruments PH416A I / Oエキスパンダー
20791, this is the Broadcom NFC chip BCM20791.
Where is it on the board??
-
-
-
一旦休憩:懐かしさにかられて、素早く再組み立てをしてしまいました。
-
テックライターたちはもう疲れてきたのでコーヒーでも飲みながら作業に戻りましょうかね...
-
-
-
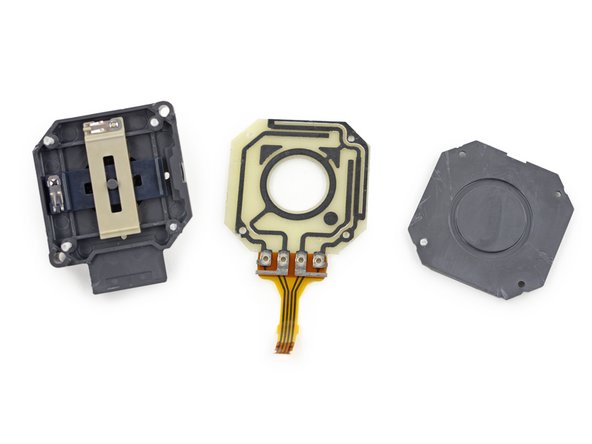
スライドパッドは、トレース付きの小型のドーナツ型PCB、バッキングプレート、およびバネ付きのX-Yスライダで構成されています。
-
X-Yスライダには、それぞれPCBに常に接触している2箇所の金属接点があります。
-
スライダを上下左右に動かすことで、金属製の接点によってPCB上の回路の抵抗が調整されます。
-
つまり、この作動により、あなたがゲームをしている時の動きとして認識されるのです。
-
スプリング式スライダーについて:このメカニズムの内側にあるバネは、常に"スティック"を中央に戻します。 もしスライドパッドを"スロットル"タイプのジョイスティックに変えたい場合 (つまり自動的にセンターに戻らないタイプ) は、スライドパッドを解体して、その中にあるバネを取り除かなければなりません。
-
-
-
さて、ゲームカートリッジリーダーに移りましょう。 これはまさに、カートリッジリーダーの底に息を吹きかけて埃を払うという、古き良き時代を思い起こさせます。
-
-
-
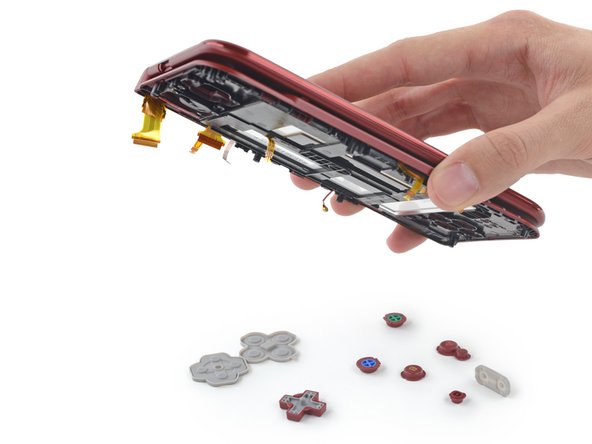
皆さん、ボタンボードが外れます!
-
ABXYボタンはボードのすぐ上にありますが、Cスティックは自由に出入りできます。
-
このCスティックは実際には何も動かしたり押したりしないので、魔法によって動かされるようです。
-
Cスティックを指で軽くたたくと、3DSはこれを感知します。 実際にはひずみゲージを使って、あなたがどれだけ強く押しているかを感知するのではないかと推定します。
Don't try to dissasemble it! I've tried, then I had to glue it back and it is not functioning now :(
It looks as if the circle pad and c stick use the same connectors would it be possible to replace the c stick with the circle pad and move said circle pad under the buttons?
-
-
-
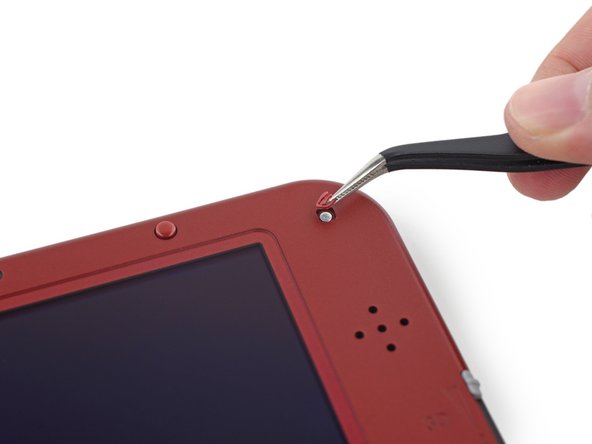
デバイスの四方に沿って4本のネジとプラスチックのクリップが付けられており、ここに作業の手が入らないようひっそりと隠されています。
-
私たちの開口ピックは上部のケースを2つに分離できる完璧なツールです。
-
iFixitで飼っている猫の写真を見たいですか? (アメリカ人の多くは財布の中に子供やペットの写真を入れているのです。) 3番目の画像を見てください。これは決してお財布ではありません。LCDの裏側です。
Does anyone know what size screws these are?
You should explain that the cover needs to be pulled down before lifting it. I messed up mine thinking that it needed to be lifted only.
This is a teardown meant for an entertaining look at the interior, not a repair guide. Be sure to check out the step by step guides found on the 3DS XL repair manual for specific details and procedures!
-
-
-
3DS XLは基本的に巨大な折りたたみ式携帯電話のように作られています。
-
ヒンジの一方の側はピンで固定され、もう一方の側はディスプレイ、オーディオ、カメラ、およびアンテナケーブルを通すために空洞になっています。
-
ヒンジピンが飛び出すと、下部アセンブリが中空ピンから滑り落ち、ケーブルがスロットに入り込み、分離できるようになります。
You need to put an extreme, (did I say extreme?) CAUSE I MEANT EXTREME amount of force, to push the pin out of the hinge assembly.
If anyone is still using this tutorial… I heard that uh it’s “keyed”, just like the original DS and DS Lite I believe. I suppose different revisions of the New 3DS XL may be very slightly different in how they are disassembled, but this is what worked for my two units…
.
The correct way to do it is to open the console up to the second ‘click’, most of the way open, but not such that the top and bottom half are flat with one another. It’s open at about a 150 degree angle.
.
From here, you can use your favorite small tool (possibly a small enough screwdriver, tweezers, or even a paperclip can work!) and it should come out without too much hassle.
.
I was applying all the force I possibly could trying to get out the barrel hinge with the console fully closed, slightly opened, and fully opened, and it didn’t work.
.
Do note that the top LCD screen will slightly block the barrel hinge from coming out all the way. If it’s still attached, either lift it slightly at that corner or remove it.
.
Hope this helps!
-
-
-
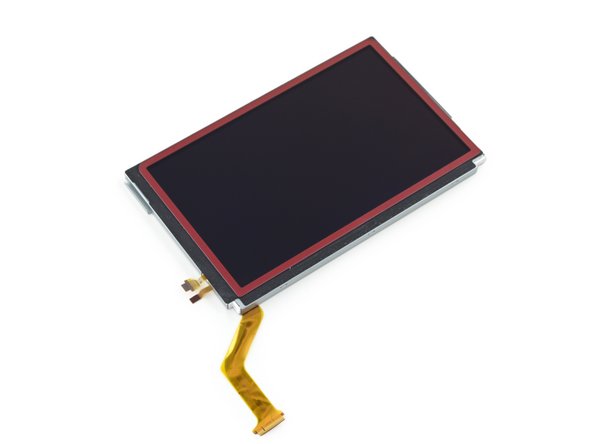
カメラバーを外してみましょう。 あっ、ちょっとその前に。
-
ディスプレイアセンブリの側面にケーブル数本が接続しています。これらのケーブルが、3Dメガネなしで実現する素晴らしい3D効果を生み出す視差バリアを制御しているのではないかと考えています。
-
視差バリアとは何でしょうか? スクリーンの前に極小の縦格子フェンスが置かれていると想像してください。ディスプレイを見るとき、フェンスボード周辺が見えながらも、右目左目は異なる映像を捉えるのです。
-
そして、幾何学がなすマジックと新しい顔追跡システムによる"超安定3D"の組み合わせで、3DSはそれぞれの目がどの映像を見ているか識別し、同じシーンであっても左右の目に合わせて2タイプの重複する映像を作り出すのです。そしてこれらが脳内で1つの映像として組み合わさると、迫力のある高度な立体3D画像に変身するのです。
-
-
-
良いニュース:ディスプレイアセンブリはフレームに軽く接着されているだけなので、比較的簡単にフレームを開けることができます。
-
残念なニュース:そのリボンケーブルと他の2本のケーブルはヒンジを通って配線されており、これを巻き戻すには大変骨の折れる、危険が潜んでいる作業です。
-
でも、なんとか無事にケーブルを外せました!
Does anyone knows if the upper LCD screen is the same of the 3DS XL? If I substitute a New 3DS XL broken upper LCD for a working LCD from a 3DS XL will it work (plus the eye tracking)?
-
-
-
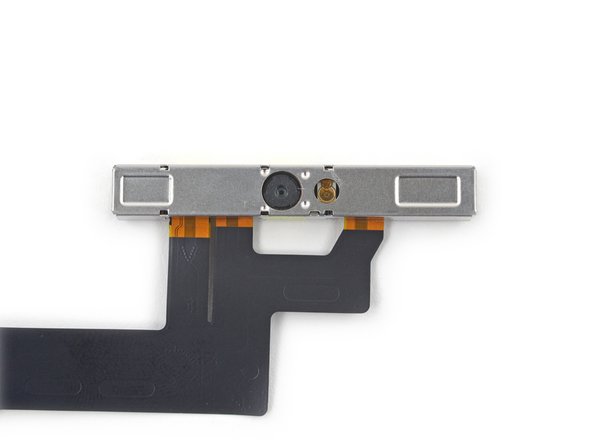
フロントとリアのカメラバーを見てみましょう! 任天堂は、3台のカメラすべてを1本のバーとケーブルに搭載しました。
-
フロントカメラはあなたのあらゆる動きを監視し、可能な限り少ないジッタ(デジタル信号を処理する際に、時間軸の遅れによって発生する信号のゆらぎ)で、できるだけ最高の3D画像をつくりだしています。
-
2つの背面カメラはAR(拡張現実)カードを追跡し、そして明らかに改良されたローライトの画像をキャプチャします。
-
残念ながら、ここではコンポーネント情報が僅かです。"3600 4C11 03YG"と表記されている不明瞭なQRコードラベルを除けば、カメラボードにもケーブルにも明確な情報がありません。
-
-
-
Nintendo 3DS XL 2015のリペアビリティのスコアは10中5点です。(修理が最もしやすい指標が10点)
-
2本のネジを外して背面カバーを取り外すと、バッテリを簡単に交換できます。
-
接着剤ではなく、ネジやプラスチック製のクリップが主な留め具です。 またメーカー独自のネジは使用されていません - プラスとJIS規格のみです。
-
ディスプレイ上部のケーブル配線は、切断なしで取り外せないほど複雑です。またデバイス本体を再組み立てする際には、ケーブルを正しく装着するのも同様に困難です。
-
3DSの内部には小さなコンポーネントが沢山ありますが、修理中にパーツを紛失すると、問題が発生する可能性があります。
-
コネクタの大部分はZIFです。そして、全体を再組み立てして、デバイスを起動しなければ、各コネクタが正しく接続されているか確認できません。
-
ヘッドフォンジャックと充電コネクタはマザーボードにはんだ付けされています。アクシデントでダメージを与えてしまった場合、はんだごてを使う必要があります。
-


Um agradecimento especial a esses tradutores:
96%


Estes tradutores estão nos ajudando a consertar o mundo! Quer contribuir?
Comece a traduzir ›

41 comentários
Anyone know if some 3rd party will make case bottoms with a SD card slot on the side via a simple cable?
Not until someone knows how to reverse engineer the motherboard and the MicroSDHC card slot PCB parts. After that, 3rd party components will be available, but it's still risky business/corporate-wise.
Looking at console replacement cases theres not much to do other than match up screw holes and the MICROSD card itself is done via a ribbon/super flat cable connected to A MICRO or normal SD port on the side of the replacement case, no need to rebuild the electronics since its just an extension to the MICROSD port. The replacement case would be a slightly different size but exterior size is not that big of an issue.
********Note: If your top or bottom screen was working before disassembly and doesn't work after reassembly, then it's likely that the connector is loose or dirty or damaged or not clipped or PLACED UPSIDE-DOWN. I had this issue with my Super3DS XL(2015 New3DS XL) and it turns out that the reason why my top screen wasn't working after put together, was because I had the top LCD connector upside-down. After I correctly put the connector in, It worked again! :) ********
On step 23: All portable Nintendo's since the original DS have "sliding clips" for the top screen, ie. you have to slide the outer cover slightly up to open it. This way, no efforts or tools are needed (assuming the "hidden" screws are already out). From the pictures, it looks like it's still the same for the new 3DS XL you opened, or am I wrong?
Step 24. HOW THE HECK DO YOU GET THE TOP SCREEN OUT OF THE HINGE!!?? THIS GUIDE DOESN'T EXPLAIN HOW.... I'VE BEEN PUSHING WITH A FLAT HEAD ON THE SMALL WHITE PART BUT NOTHING IS HAPPENING! PLEASE HELP SOMEONE!! PLEASE!!
Nevermind about step 24.... You just need to apply an extreme amount of force on the white hinge to pop it back and take out the screen. They should have mentioned this; it was probably THEE MOST difficult thing to do of all the steps.
Teardowns provide a look inside a device and should not be used as disassembly instructions.
********Note: If your top or bottom screen was working before disassembly and doesn't work after reassembly, then it's likely that the connector is loose or dirty or damaged or not clipped or PLACED UPSIDE-DOWN. I had this issue with my Super3DS XL(2015 New3DS XL) and it turns out that the reason why my top screen wasn't working after put together, was because I had the top LCD connector upside-down. After I correctly put the connector in, It worked again! :) *********
You have no idea how much I love you right now. I thought I'd broken a friend's DS after reassembling it, so I swapped out myt motherboard for his only to find neither of them worked anymore after reassembly. What I thought was a $400 mistake was just both top display connectors being upside-down! Someone should really note this in the guide, as it's very easy to do as that's how it sits naturally.
kaise123 -
Broken can anyone guide me the lcd cables I think I messed up cause I hear pop sound and it turns off.
did a LL to XL case swap and I'm having problems with the home button and mic.? Has anyone ran into this? And as for that ZIF connector on them is there a right way and wrong way to connect/disconnect?(specifically talking about mic and the one next to it since this breakdown doesn't label what connector is to what)
I'm also having this problem with my home button and microphone. Very frustrating. If anyone can shed some light on how to properly get this fix, it would be very much appreciated.
Blair -
Its the black ZIF connectors that i'm talking about. they dont lock down all the way.
What are those new ZIF connectors called? Old ZIF had a white tab and locked into place. these new ones are black and doesnt go all the way up or lock back down. What am I doing wrong?
FYI, This *New* 3DS motherboard appears to be a mix of old ZIF and new ZIF connectors. the black ZIF connectors are for the Homebutton and LCD brightness and others.
They should call this the Ibreakit 3ds teardown. Reassembly will never happen because the zifs lifted will result in the home button not working and other problems. Extra care should be taken if you are to remove any of the black zif connectors. I might recommend not lifting them at all.
Hi guys, after I open my New3DSXL the 3D effect slider does´t work anymore. Its like its at 30% or so. When I slide the slider up and down, nothing changes. Any idea what could be wrong?
Sorry for my bad english guys.
I just want that Optimus Prime Transformers coffee mug!!! But anyway I just attempted a repair of the Top LCD screen, did that without many issues, aside from the fact that the area where you have to wrap the display connectors and push them through the hinge. But that all turned out fine. The real problem I ran into was when I got it all back together and was testing the device. The 3D does not work on the top screen, the mic is not picking up any sound, and the home button no longer works. What a mess I've gotten myself into with this one. Any advice? I reconnected everything and double checked everything. And those 3 things are still not working! Ugh!
What is the long red cable with the gold connector that travels between both top and bottom shells?
I think I kinked mine and I really can't tell what it was even supposed to do.
Thanks!
Lol blowing into the game cartridge holder thats what I did with my ds lite
hello..i want know what is the flat related to the 3d slider? cause my 3ds have always that turned on..
So I am half way through replacing and 3ds xl top screen and have had a piece fall out that I don't know where it came from. Is there a CAD drawing or parts list I can reference? Or at least some company that replaces these things that I can ask a question to?
Hi Landon, you might have better luck posting in our Answers forum, our users are more responsive there. Be sure to post a photo of the part that fell out, to help us identify it!
please do one for the new 3ds regular!
This guide doesn't show how to take the R, L, ZR, and ZL buttons out. It also doesn't show the flex cables for these buttons. I was hoping to see the cables in this guide so I would know for sure that I'm ordering the right replacements without having to take apart my system again.... I just put it back together and realized I forgot to take a pic of the cables :(
Hi there
I have a question here I know this post is old and all but I want to know something about the onboard wifi card I tear mine apart and want to know the pin layout of the wifi card to use on a project any idea’s where to find it
Thanks
Anyone know where I can get a replacement connector for my digitizer? It appears to be the same connector used by the joystick. Even if you don’t know where I can get one, just tell me if you know the connector type/name, and I can try to find it on sale.
Used this guide to disassemble my new 3ds xl, but the smallest cables on the motherboard, the holders don’t seem to close down properly.
how repair the microphone?
Follow the guide for the motherboard replacement until step 8 (included). Then jump to step 13 (only). You need to disconnect one ribbon which is the one marked by a red square on the most lower left part of the picture. Do not lift the flap as it will break if you try to. You only need to pull it gently. You can find replacement on ebay or amazon. Be careful to choose the right model as there are different kind of microphones.
bojano -
I mean hear me out. The dpad, joystick, game card slot, even sd card slot, all are modular and replaceable. also the speakers and cameras etc. I think this is super repairable, like anything can break but the probability of needing to change the whole mainboard is really really low
If anyone is having trouble with the Barrel Hinge, I commented under Step 24.
For fixing the ZIF connector problem (Black ones for Home botton, NFC antenna etc…) disconnect the cable and press softly down the “moveable” part . Then just plug in the cable without any lifting . IMHO this connector hasn't any moveable parts so no lifting at all, just heave the cable a little if you want to disconnecting it.