Ir para o conteúdo principal

Nintendo 3DS Cartridge Reader Replacement

O que você precisa

  1. Nintendo 3DS Cartridge Reader Replacement, Opening the Cover: passo 1, imagem 1 %32
    • Use a JIS #00 screwdriver to loosen the four screws along the top of the back cover. These screws stay in the cover after loosing them.

    • JIS (Japanese Industrial Standards) screws are not the same as Phillips. To avoid stripping these screws, make sure you are using a JIS #00 screwdriver and not a PHILLIPS #00 screwdriver. You can use a PHILLIPS #00 with a lot of downwards force but be warned this will deform the screw head and you risk stripping it.

    • iFixit's Phillips head screwdriver is designed to reduce damage on JIS head screws so it should be fine to use, still apply more force. Make sure it's iFixit's official Phillips screwdriver as we are unaware of any other manufacturer who does this.

  2. Nintendo 3DS Cartridge Reader Replacement, Opening the Case: passo 2, imagem 1 %32 Nintendo 3DS Cartridge Reader Replacement, Opening the Case: passo 2, imagem 2 %32
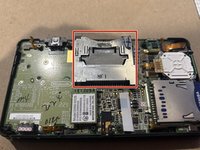
    • Remove all 10 screws to access the third layer and the motherboard of the 3DS. Don't forget the one near the game card slot, it is silver, not black.

    • Carefully open up the next layer of the 3DS pulling from the bottom, this way you won't rip any of the ribbon wires located at the top.

    • Leave screws to the side for later reassembly.

  3. Nintendo 3DS Cartridge Reader Replacement, Release the Cartridge Reader: passo 3, imagem 1 %32 Nintendo 3DS Cartridge Reader Replacement, Release the Cartridge Reader: passo 3, imagem 2 %32 Nintendo 3DS Cartridge Reader Replacement, Release the Cartridge Reader: passo 3, imagem 3 %32
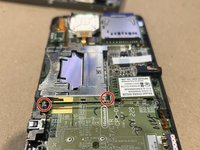
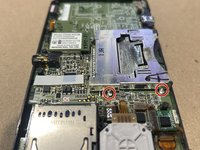
    • To release the cartridge reader look for 4 solder points, 2 on each side of the reader (see image).

    • Apply heat to them with a soldering iron to melt the solder and take out the reader. Use a spludger to lift the reader out of the board as you apply heat.

    • You can apply some solder flux or even some new solder wire to form an alloy between the old and new metals, this would ease the task.

    • CAUTION: Soldering iron can cause severe burns if not used properly, proceed with caution and have an adult in the room with you if underage.

  4. Nintendo 3DS Cartridge Reader Replacement, Solder the New Cartridge Reader: passo 4, imagem 1 %32
    • Now that the game cartridge reader is out, lets get the new one in. Line it up with the previous one and re-solder it using a soldering wire.

  5. Nintendo 3DS Cartridge Reader Replacement, Cleaning up: passo 5, imagem 1 %32
    • Before closing off the device use Isopropyl alcohol and a q-tip and clean the surrounding area, removing all flux residues.

    • After cleaning you are good to reassemble your device.

    • Use isopropyl alcohol in a well ventilated room.

Conclusão

To reassemble your device, follow these instructions in reverse order.

Abraham Zapata

Membro desde: 03/05/24

145 Reputação

Autoria de 1 guia

Equipe

CSU Los Angeles, Team 8-10, Grodsky Spring 2024 Membro de CSU Los Angeles, Team 8-10, Grodsky Spring 2024

CSULA-GRODSKY-S24S8G10

Membros da 2

Autoria de 3 guias

Um comentário

It might help to utilize a prerequisite guide up until the actual replacement of the cartridge slot. The IR board replacement is short and similar in step number in this regard.

Russ9876 - Responder

Adicione um comentário

Exibir estatísticas:

Últimas 24 horas: 6

Últimos 7 dias: 40

Últimos 30 dias: 183

Duração total: 1,580