Ir para o conteúdo principal

Nikon Coolpix S6800 Button Assembly Replacement

O que você precisa

  1. Nikon Coolpix S6800 Button Assembly Replacement, Midframe: passo 1, imagem 1 %32
    • Turn the camera upside down and locate the two, black screws.

    • Using the Philips #00 Screwdriver, remove each screw.

  2. Nikon Coolpix S6800 Button Assembly Replacement: passo 2, imagem 1 %32
    • Rotate the camera to the left side and remove the two, black, #00 Philips screws.

  3. Nikon Coolpix S6800 Button Assembly Replacement: passo 3, imagem 1 %32
    • Rotate the camera to the right side and remove the two, black, #00 Philips screws.

    • The last screw that you remove will catch as the cover is trying to pop off. Try to keep the cover in place to allow for the screw to just fall out. Once you remove the screws, be careful not to lose the screws for reassembly.

  4. Nikon Coolpix S6800 Button Assembly Replacement: passo 4, imagem 1 %32
    • Carefully remove the back plate from the body of the camera.

    • All of the external screws are black with rounded heads.

  5. Nikon Coolpix S6800 Button Assembly Replacement: passo 5, imagem 1 %32
    • Using the Philips #00 Screwdriver, remove the two screws that are holding the keypad.

  6. Nikon Coolpix S6800 Button Assembly Replacement: passo 6, imagem 1 %32 Nikon Coolpix S6800 Button Assembly Replacement: passo 6, imagem 2 %32
    • Flip the keypad away from the camera

    • Be careful with the electric ribbon. Do not crease it or tug on it. Gently flip it away from the camera.

  7. Nikon Coolpix S6800 Button Assembly Replacement: passo 7, imagem 1 %32 Nikon Coolpix S6800 Button Assembly Replacement: passo 7, imagem 2 %32
    • Gently pull the display away from the camera body.

    • Fold the display away from the camera

    • Be careful with the electric ribbon. Do not crease it or tug on it. Gently flip it away from the camera.

    • Be careful with the display. Do not press on it or drop it.

  8. Nikon Coolpix S6800 Button Assembly Replacement: passo 8, imagem 1 %32 Nikon Coolpix S6800 Button Assembly Replacement: passo 8, imagem 2 %32
    • Remove the visible midframe screws.

    • There is a screw beneath the foam square that must be removed as well.

    • The screw holding the silver wrist-strap loop on the side of the camera must also be removed.

    • Gently lift the midframe up and out of the device.

    • Be careful moving the midframe away from the ribbons don't force it, gently slide the plate away from the ribbons.

  9. Nikon Coolpix S6800 Button Assembly Replacement, Button Assembly: passo 9, imagem 1 %32 Nikon Coolpix S6800 Button Assembly Replacement, Button Assembly: passo 9, imagem 2 %32
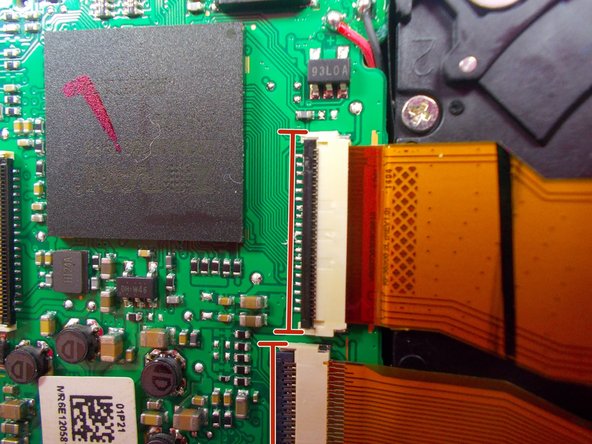
    • Flip up the little tan tab on the connecter of the button pad's ribbon.

    • Don't use a metal object for this step. A fingernail will do. Simply slide your fingernail under the lip and lift slowly. You may need to lift in different areas along the tab to get it all the way up.

    • In the second image the top tab is open while the bottom is closed as an example of what the two positions look like.

    • The tab is reversed for the button pad, the tan part is the tab while the black is the connector

  10. Nikon Coolpix S6800 Button Assembly Replacement: passo 10, imagem 1 %32
    • Gently pull out the ribbon. It should come out easily, don't force it.

  11. Nikon Coolpix S6800 Button Assembly Replacement: passo 11, imagem 1 %32
    • Take the new button pad and orient it the same way as the old pad before it was removed.

    • Gently slide the end of the electric ribbon into the connector.

    • To make sure that the ribbon is completely in the connector give it a firm push but don't force anything. The ribbon should slide in with only a little resistance.

    • The ribbon is flexible so it may bend but take care NOT to crease it.

Conclusão

To reassemble your device, follow these instructions in reverse order.

Uma outra pessoa concluiu este guia.

sam ford

Membro desde: 03/30/15

518 Reputação

Autoria de 4 guias

Equipe

UMass Dartmouth, Team 1-2, Shastany Spring 2015 Membro de UMass Dartmouth, Team 1-2, Shastany Spring 2015

UMASSD-SHASTANY-S15S1G2

Membros da 4

Autoria de 8 guias

Um comentário

Where can I purchase the button assembly for this model? Does this assembly also control the lens function? When I depress the button, sometimes the lens open then closes. Thank you for your wonderful clear instructions.

Elegant - Responder

Adicione um comentário

Exibir estatísticas:

Últimas 24 horas: 1

Últimos 7 dias: 4

Últimos 30 dias: 6

Duração total: 662