Ir para o conteúdo principal
Participe da comunidade de reparos - Criar conta

Nikon Coolpix S4100 Functional Button Plate Replacement

O que você precisa

  1. Nikon Coolpix S4100 Functional Button Plate Replacement, External Casing: passo 1, imagem 1 %32 Nikon Coolpix S4100 Functional Button Plate Replacement, External Casing: passo 1, imagem 2 %32 Nikon Coolpix S4100 Functional Button Plate Replacement, External Casing: passo 1, imagem 3 %32
    • Using a Philips #000 head screwdriver, remove the 8 screws (3.30 mm) visible on the external part of the camera.

    • There are 2 on each side, and 4 on the bottom.

    Pergunte ao FixBot

    Comentar

  2. Nikon Coolpix S4100 Functional Button Plate Replacement: passo 2, imagem 1 %32
    • Remove the black casing on the back of the camera that runs around the LCD screen.

    Pergunte ao FixBot

    Comentar

  3. Nikon Coolpix S4100 Functional Button Plate Replacement: passo 3, imagem 1 %32
    • Using the Philips #000 head screwdriver, remove the 1.90 mm internal screw located just above the lanyard mount.

    Pergunte ao FixBot

    Comentar

  4. Nikon Coolpix S4100 Functional Button Plate Replacement: passo 4, imagem 1 %32 Nikon Coolpix S4100 Functional Button Plate Replacement: passo 4, imagem 2 %32 Nikon Coolpix S4100 Functional Button Plate Replacement: passo 4, imagem 3 %32
    • Pry off the front shell casing.

    • If you find this difficult, use a prying tool to help gently remove the casing.

    Pergunte ao FixBot

    Comentar

  5. Nikon Coolpix S4100 Functional Button Plate Replacement: passo 5, imagem 1 %32
    • Using the Philips #000 head screwdriver, remove the 3.30 mm screw located on the side of the camera near the lanyard mount.

    Pergunte ao FixBot

    Comentar

  6. Nikon Coolpix S4100 Functional Button Plate Replacement: passo 6, imagem 1 %32 Nikon Coolpix S4100 Functional Button Plate Replacement: passo 6, imagem 2 %32
    • Using the Philips #000 head screwdriver, remove 2 additional 3.30 mm screws holding the lanyard mount in place.

    Pergunte ao FixBot

    Comentar

  7. Nikon Coolpix S4100 Functional Button Plate Replacement: passo 7, imagem 1 %32 Nikon Coolpix S4100 Functional Button Plate Replacement: passo 7, imagem 2 %32 Nikon Coolpix S4100 Functional Button Plate Replacement: passo 7, imagem 3 %32
    • Remove the lanyard mount and accompanying side shell casing off of the camera.

    Pergunte ao FixBot

    Comentar

  8. Nikon Coolpix S4100 Functional Button Plate Replacement: passo 8, imagem 1 %32
    • Using the Philips #000 head screwdriver, remove the 3.30 mm screw securing the top shell casing.

    Pergunte ao FixBot

    Comentar

  9. Nikon Coolpix S4100 Functional Button Plate Replacement: passo 9, imagem 1 %32
    • Using the Philips #000 head screwdriver, remove the 3.40 mm screw located on the front of the camera in the upper corner by the LED light.

    Pergunte ao FixBot

    Comentar

  10. Nikon Coolpix S4100 Functional Button Plate Replacement: passo 10, imagem 1 %32
    • Remove the remaining side shell casing.

    Pergunte ao FixBot

    Comentar

  11. Nikon Coolpix S4100 Functional Button Plate Replacement: passo 11, imagem 1 %32
    • Remove the top shell casing.

    Pergunte ao FixBot

    Comentar

  12. Nikon Coolpix S4100 Functional Button Plate Replacement, Functional Button Plate: passo 12, imagem 1 %32
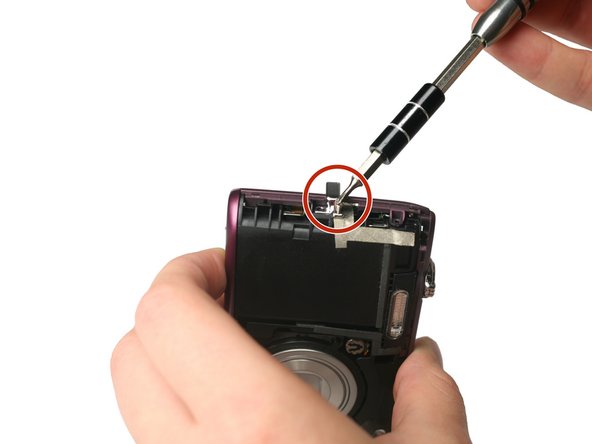
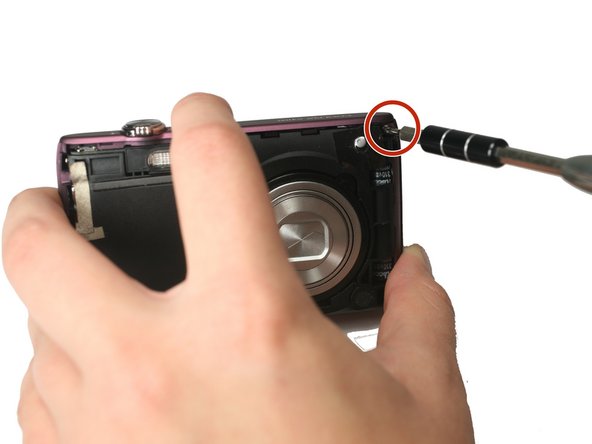
    • Using the Philips #000 head screwdriver, remove the 3.40 mm screw located near the functional buttons.

    Pergunte ao FixBot

    Comentar

  13. Nikon Coolpix S4100 Functional Button Plate Replacement: passo 13, imagem 1 %32
    Ferramenta utilizada neste passo:
    Tweezers
    $4.99
    • Using precision tweezers, remove the ribbon cable that runs from the functional buttons plate to the under side of the motherboard.

    Pergunte ao FixBot

    Comentar

  14. Nikon Coolpix S4100 Functional Button Plate Replacement: passo 14, imagem 1 %32
    • Using precision tweezers, lift up the bottom of the functional buttons plate and remove the metal plate.

    Pergunte ao FixBot

    Comentar

Conclusão

To reassemble your device, follow these instructions in reverse order.

Cancelar: não concluí este guia.

Uma outra pessoa concluiu este guia.

Equipe

Baylor, Team 4-2, Williams Fall 2015 Membro de Baylor, Team 4-2, Williams Fall 2015

BU-WILLIAMS-F15S4G2

4 Membros

Autoria de 8 guias

0Comentários do guia

Comentar

Visualizações:

Últimas 24 horas: 2

Últimos 7 dias: 6

Últimos 30 dias: 35

Ao todo: 648