Ir para o conteúdo principal

Nikon Coolpix L330 LCD Screen Replacement

O que você precisa

  1. Nikon Coolpix L330 LCD Screen Replacement, Back Housing: passo 1, imagem 1 %32 Nikon Coolpix L330 LCD Screen Replacement, Back Housing: passo 1, imagem 2 %32 Nikon Coolpix L330 LCD Screen Replacement, Back Housing: passo 1, imagem 3 %32
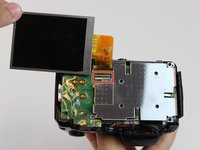
    • There are six screws attaching the back housing to the camera. Remove the screws from the body with a PH000 screw head.

    • Two 1.5x2.5mm screws on the right side.

    • Two 1.5x2.5mm screws on the underside.

    • Two 1.5x2.5mm screw on the left side.

  2. Nikon Coolpix L330 LCD Screen Replacement: passo 2, imagem 1 %32 Nikon Coolpix L330 LCD Screen Replacement: passo 2, imagem 2 %32
    • After removing the screws, use a metal spudger or plastic opening tool to push the back cover out.

    • The metal spudger can damage the plastic housing, so use caution when applying any pressure to it. Use a plastic opening tool to reduce the risk of damage to the housing.

    • Remove the back housing of the camera by lifting it directly up.

    • The back cover may be slightly tight, therefore more force may be needed to lift it up.

  3. Nikon Coolpix L330 LCD Screen Replacement, LCD Screen: passo 3, imagem 1 %32 Nikon Coolpix L330 LCD Screen Replacement, LCD Screen: passo 3, imagem 2 %32
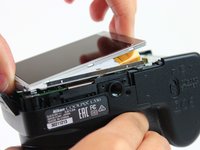
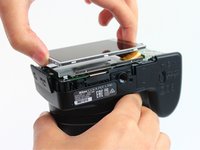
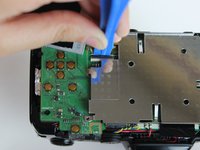
    • Insert the tips of your fingers into the space between the screen and back-plate.

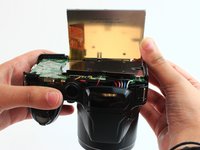
    • Gently lift the screen up and out of the frame.

    • The screen is still held by a flexible display cable, therefore only lift the screen 0.5'' out of the back-plate.

  4. Nikon Coolpix L330 LCD Screen Replacement: passo 4, imagem 1 %32 Nikon Coolpix L330 LCD Screen Replacement: passo 4, imagem 2 %32
    • Tilt the screen so that the display cable forms a hinge with the backplate.

    • Rotate the display 180 degrees so that it faces you.

  5. Nikon Coolpix L330 LCD Screen Replacement: passo 5, imagem 1 %32 Nikon Coolpix L330 LCD Screen Replacement: passo 5, imagem 2 %32 Nikon Coolpix L330 LCD Screen Replacement: passo 5, imagem 3 %32
    • The display cable has a ZIF (zero insertion force) connector on the end. This has a tab that has to be pushed out before the cable can be safely removed.

    • Using a plastic opening tool or fingernail, pop up the black clip holding the display cable. This will release the cable.

    • Slide the display cable out of the connector.

    • The display cable can be damaged due to excessive bending, therefore avoid putting unnecessary strain on it.

Conclusão

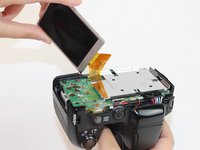
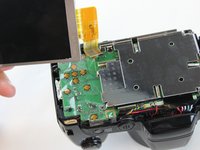
To reassemble your device, follow these instructions in reverse order.

5 outras pessoas executaram este guia.

Rajeev

Membro desde: 02/09/16

623 Reputação

Autoria de 4 guias

Equipe

USF Tampa, Team 2-10, Cagle Spring 2016 Membro de USF Tampa, Team 2-10, Cagle Spring 2016

USFT-CAGLE-S16S2G10

4 Membros

Autoria de 14 guias

1Comentário do guia

Thank you, saved me money and time

Mihai Alexandru Fustos - Responder

Comentar

Visualizações:

Últimas 24 horas: 1

Últimos 7 dias: 11

Últimos 30 dias: 27

Ao todo: 2,189