Esta versão pode conter edições incorretas. Mude para o último instantâneo verificado.
O que você precisa
-
Este passo não foi traduzido. Ajude a traduzi-lo
-
Remove the batteries from the battery compartment by sliding the white battery compartment switch up and then move the panel toward the right.
-
-
Este passo não foi traduzido. Ajude a traduzi-lo
-
Using the Phillips #000 screwdriver, unscrew the two 2mm screws next to the battery compartment on the right side of the camera.
-
-
Este passo não foi traduzido. Ajude a traduzi-lo
-
Flip over the rubber AV cover at the bottom of the camera. Unscrew the last two 2mm screws on the bottom of the camera.
-
-
-
Este passo não foi traduzido. Ajude a traduzi-lo
-
Using your hands, open the camera slightly by using the indentation above the camera compartment.
-
-
Este passo não foi traduzido. Ajude a traduzi-lo
-
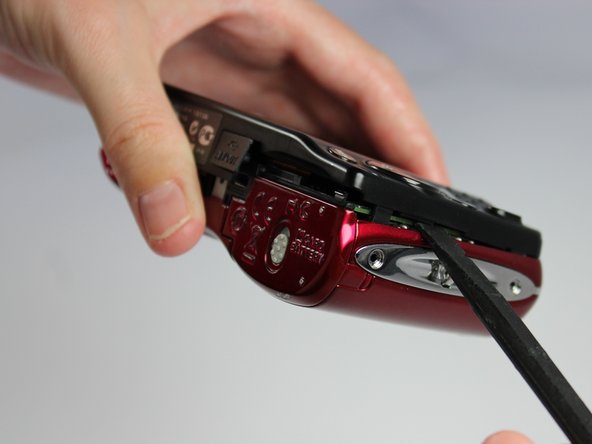
Wedge the flat end of the spudger in between the front and back cover. Carefully push the spudger downward, which will lift the back cover off the camera.
-
-
Este passo não foi traduzido. Ajude a traduzi-lo
-
Carefully flip over the LCD screen onto its front. Pull the top of the LCD screen toward you keeping the bottom of it inside the camera.
-
-
Este passo não foi traduzido. Ajude a traduzi-lo
-
Gently hold the LCD screen down, so the ribbon lays flat against the back of the camera.
-
-
Este passo não foi traduzido. Ajude a traduzi-lo
-
Gently wedge the spudger underneath the white latch and lift the latch open.
-
-
Este passo não foi traduzido. Ajude a traduzi-lo
-
Use the flat side of the spudger to flip the white switch on the motherboard. You should hear a light click.
-


Cancelar: não concluí este guia.
3 outras pessoas executaram este guia.

Equipe

San Diego State, Team 1-3, Sheppard Winter 2015 Membro de San Diego State, Team 1-3, Sheppard Winter 2015
SDSU-SHEPPARD-W15S1G3
Membros da 2
Autoria de 6 guias