Ir para o conteúdo principal

Nexus S Speaker Replacement

O que você precisa

  1. Nexus S Speaker Replacement, Rear Panel: passo 1, imagem 1 %32
    • Gently insert a plastic opening tool between the rear panel and the inner rear frame near the rear-facing camera.

    • Use your plastic opening tool to pry up the rear case around the perimeter of the Nexus S.

  2. Nexus S Speaker Replacement: passo 2, imagem 1 %32
    • Remove the rear panel from the Nexus S.

  3. Nexus S Speaker Replacement, Battery: passo 3, imagem 1 %32
    • Using the edge of a plastic opening tool, lift the battery from the end closest to the headphone jack.

    • Remove the battery from the Nexus S.

  4. Nexus S Speaker Replacement, SIM Card: passo 4, imagem 1 %32 Nexus S Speaker Replacement, SIM Card: passo 4, imagem 2 %32
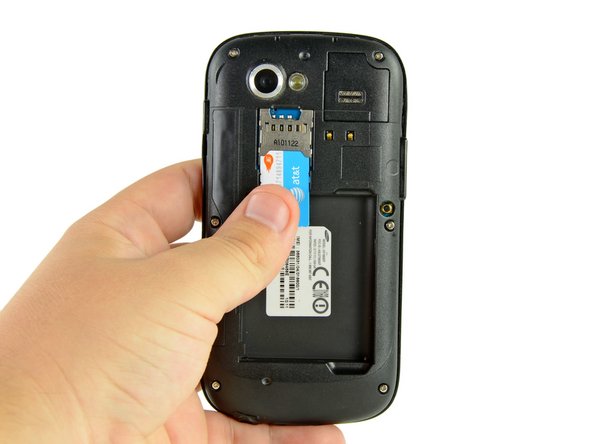
    • Use your thumb to slide the SIM card downwards from the SIM card slot.

    • Remove the SIM card.

  5. Nexus S Speaker Replacement, Rear Inner Frame: passo 5, imagem 1 %32
    • Remove the six Phillips screws securing the rear inner frame to the inner case.

  6. Nexus S Speaker Replacement: passo 6, imagem 1 %32
    • Insert the flat edge of a plastic opening tool in between the rear inner frame and the top left corner of the Nexus S.

    • Pry the opening tool upwards to pop the top right corner from the clips securing it to the inner assembly.

  7. Nexus S Speaker Replacement: passo 7, imagem 1 %32 Nexus S Speaker Replacement: passo 7, imagem 2 %32
    • Insert the plastic opening tool to the right of the power button.

    • Slide the plastic opening tool downwards along the perimeter of the Nexus S to release the clips on the right side.

  8. Nexus S Speaker Replacement: passo 8, imagem 1 %32 Nexus S Speaker Replacement: passo 8, imagem 2 %32
    • In the same manner as previously described, release the bottom clips located near the bottom of the Nexus S.

  9. Nexus S Speaker Replacement: passo 9, imagem 1 %32
    • Insert and pry the plastic opening tool to release the final clip securing the rear inner frame to the inner assembly.

  10. Nexus S Speaker Replacement: passo 10, imagem 1 %32
    • Lift and remove the rear inner frame from the Nexus S.

  11. Nexus S Speaker Replacement, SIM Card Board: passo 11, imagem 1 %32
    • Use the flat edge of a plastic opening tool to pry the SIM Board connector off its socket on the motherboard.

  12. Nexus S Speaker Replacement: passo 12, imagem 1 %32 Nexus S Speaker Replacement: passo 12, imagem 2 %32 Nexus S Speaker Replacement: passo 12, imagem 3 %32
    • Wedge the edge of a plastic opening tool underneath the SIM Card board and motherboard.

    • Pry the clips located near the right bottom edge of the SIM Card board up off the motherboard.

    • Repeat the process all along the bottom perimeter of the SIM Card board until all clips have been disengaged.

  13. Nexus S Speaker Replacement: passo 13, imagem 1 %32
    • Lift and remove the SIM Card board out of the Nexus S.

  14. Nexus S Speaker Replacement, Motherboard: passo 14, imagem 1 %32
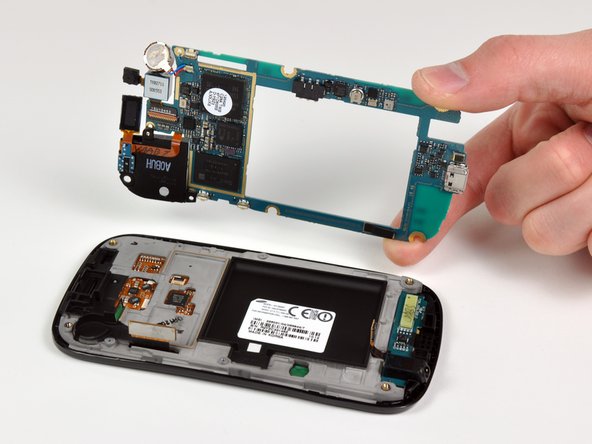
    • Disconnect the following cables from their respective sockets on the motherboard:

    • Headphone jack cable

    • Digitizer cable connector

    • Camera/SIM board connector

  15. Nexus S Speaker Replacement: passo 15, imagem 1 %32 Nexus S Speaker Replacement: passo 15, imagem 2 %32 Nexus S Speaker Replacement: passo 15, imagem 3 %32
    • Insert the flat edge of a plastic opening tool underneath the headphone jack connector and pry upwards.

    • Make sure to pry on the connector and not the socket itself. Prying the socket may cause severe damage.

    • Repeat the procedure for the digitizer and rear camera/SIM board connectors.

  16. Nexus S Speaker Replacement: passo 16, imagem 1 %32
    • Remove the three Phillips screws securing the motherboard to the front display assembly.

  17. Nexus S Speaker Replacement: passo 17, imagem 1 %32 Nexus S Speaker Replacement: passo 17, imagem 2 %32
    • Wedge the plastic opening tool near the bottom right corner of the motherboard and pry upwards to dislodge it from its recess.

    • Lift and remove the motherboard.

  18. Nexus S Speaker Replacement, Speaker: passo 18, imagem 1 %32
    • Speaker remains.

    • Be careful, the earpiece part is united with the speaker, you could cut the flex.

Conclusão

To reassemble your device, follow these instructions in reverse order.

7 outras pessoas executaram este guia.

3 comentários

Where can I buy the speaker?

Fergal Daly - Responder

Hi, I bought a replacement for my speaker(it's dead) but, the replacement did not come with an earpiece. Can I take the earpiece from my old one and attach it to the new one. I have some soldering experience.

makenova - Responder

hey makenova,

I have the same problem. Did the soldering worked for you ?

Geert Meeusen -

Adicione um comentário

Exibir estatísticas:

Últimas 24 horas: 0

Últimos 7 dias: 0

Últimos 30 dias: 5

Duração total: 6,742