Ir para o conteúdo principal

Nexus S Rear Inner Frame Replacement

O que você precisa

  1. Nexus S Rear Inner Frame Replacement, Rear Panel: passo 1, imagem 1 %32
    • Gently insert a plastic opening tool between the rear panel and the inner rear frame near the rear-facing camera.

    • Use your plastic opening tool to pry up the rear case around the perimeter of the Nexus S.

  2. Nexus S Rear Inner Frame Replacement: passo 2, imagem 1 %32
    • Remove the rear panel from the Nexus S.

  3. Nexus S Rear Inner Frame Replacement, Battery: passo 3, imagem 1 %32
    • Using the edge of a plastic opening tool, lift the battery from the end closest to the headphone jack.

    • Remove the battery from the Nexus S.

  4. Nexus S Rear Inner Frame Replacement, SIM Card: passo 4, imagem 1 %32 Nexus S Rear Inner Frame Replacement, SIM Card: passo 4, imagem 2 %32
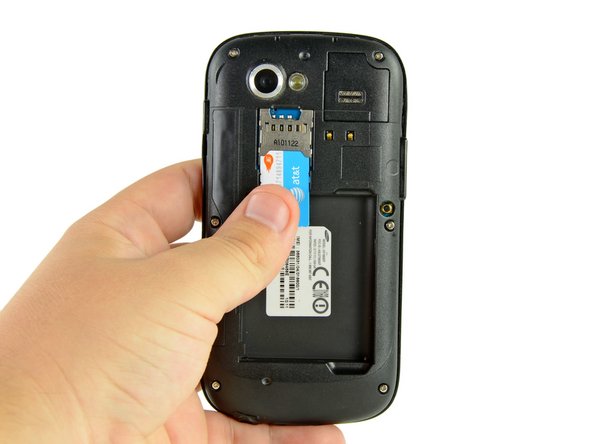
    • Use your thumb to slide the SIM card downwards from the SIM card slot.

    • Remove the SIM card.

  5. Nexus S Rear Inner Frame Replacement, Rear Inner Frame: passo 5, imagem 1 %32
    • Remove the six Phillips screws securing the rear inner frame to the inner case.

  6. Nexus S Rear Inner Frame Replacement: passo 6, imagem 1 %32
    • Insert the flat edge of a plastic opening tool in between the rear inner frame and the top left corner of the Nexus S.

    • Pry the opening tool upwards to pop the top right corner from the clips securing it to the inner assembly.

  7. Nexus S Rear Inner Frame Replacement: passo 7, imagem 1 %32 Nexus S Rear Inner Frame Replacement: passo 7, imagem 2 %32
    • Insert the plastic opening tool to the right of the power button.

    • Slide the plastic opening tool downwards along the perimeter of the Nexus S to release the clips on the right side.

  8. Nexus S Rear Inner Frame Replacement: passo 8, imagem 1 %32 Nexus S Rear Inner Frame Replacement: passo 8, imagem 2 %32
    • In the same manner as previously described, release the bottom clips located near the bottom of the Nexus S.

  9. Nexus S Rear Inner Frame Replacement: passo 9, imagem 1 %32
    • Insert and pry the plastic opening tool to release the final clip securing the rear inner frame to the inner assembly.

  10. Nexus S Rear Inner Frame Replacement: passo 10, imagem 1 %32
    • Lift and remove the rear inner frame from the Nexus S.

  11. Nexus S Rear Inner Frame Replacement, Rear Inner Frame: passo 11, imagem 1 %32
    • Rear inner frame remains.

Conclusão

To reassemble your device, follow these instructions in reverse order.

4 outras pessoas executaram este guia.

0 comentários

Adicione um comentário

Exibir estatísticas:

Últimas 24 horas: 0

Últimos 7 dias: 0

Últimos 30 dias: 5

Duração total: 3,013