Ir para o conteúdo principal

Nexus 7 2nd Generation Speakers Replacement

O que você precisa

  1. Nexus 7 2nd Generation Speakers Replacement, Back Cover: passo 1, imagem 1 %32 Nexus 7 2nd Generation Speakers Replacement, Back Cover: passo 1, imagem 2 %32
    • Power down your device.

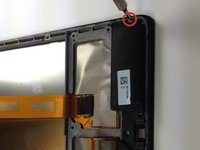
    • Use your plastic opening tool to wedge between the seams around the sides of the device. Pry open each side, one at a time. For some a finger nail may be best. The case comes up quite high to the glass.

    • Do not pry near the USB port at the base of the device as you may crack the rear panel.

  2. Nexus 7 2nd Generation Speakers Replacement: passo 2, imagem 1 %32
    • Work fingers around the seam between device and back cover. Use your plastic opening tool and fingers to separate each side until device and back cover are completely apart.

    • Be careful around the corners. The body of the device can be fragile.

  3. Nexus 7 2nd Generation Speakers Replacement, Battery: passo 3, imagem 1 %32
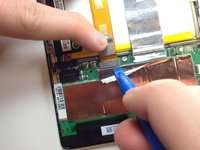
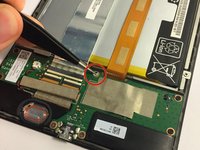
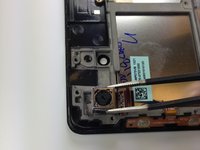
    • Insert the plastic opening tool under the side edge of the battery connector, and gently pry upward to disconnect it.

  4. Nexus 7 2nd Generation Speakers Replacement: passo 4, imagem 1 %32 Nexus 7 2nd Generation Speakers Replacement: passo 4, imagem 2 %32 Nexus 7 2nd Generation Speakers Replacement: passo 4, imagem 3 %32
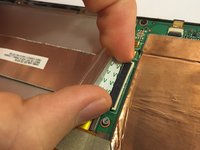
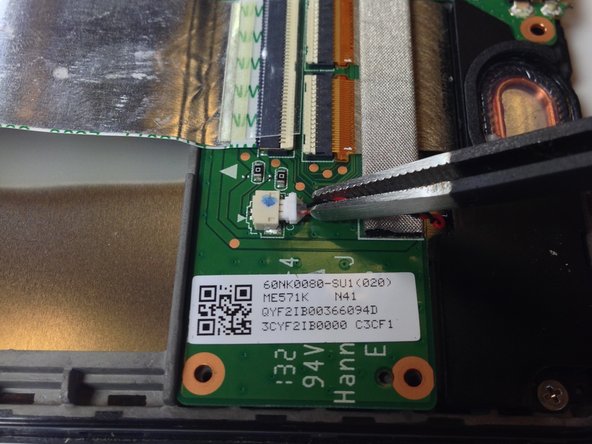
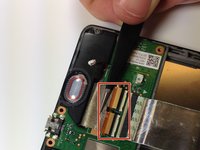
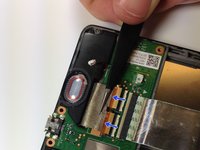
    • Use the flat end of a spudger or your fingernail to flip up the clear protective flap on the ribbon cable ZIF socket.

    • Using the flat end of a spudger or your fingernail, flip up the thin portion of the connector (the white part, opposite of the side where the cable inserts) to release the cable from its socket.

    • DO NOT PRY the socket on the side where the cable inserts, or you may break the entire socket off the motherboard.

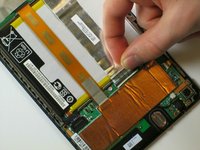
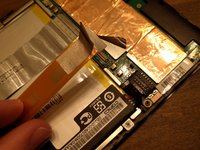
    • Slide the cable out of the ZIF socket.

    • For more info on how to disconnect ZIF connectors, check out the Recognizing & Disconnecting Cable Connectors guide.

  5. Nexus 7 2nd Generation Speakers Replacement: passo 5, imagem 1 %32
    • Peel protective foil cover back top of mother board to expose orange ribbon connection.

    • The ribbon connections should now be fully visible, with the plastic tabs exposed.

  6. Nexus 7 2nd Generation Speakers Replacement: passo 6, imagem 1 %32 Nexus 7 2nd Generation Speakers Replacement: passo 6, imagem 2 %32 Nexus 7 2nd Generation Speakers Replacement: passo 6, imagem 3 %32
    • Using the tweezers, peel back the silver protective foil on top of the orange ribbon connector.

    • Using the plastic opening tool, pry upward under the orange ribbon connector. It will pop right out of place.

  7. Nexus 7 2nd Generation Speakers Replacement: passo 7, imagem 1 %32 Nexus 7 2nd Generation Speakers Replacement: passo 7, imagem 2 %32
    • Now that the two main ribbons are disconnected, fold and hold them back with your fingers, or place the tweezers or a light object on the ribbons to keep them in place.

  8. Nexus 7 2nd Generation Speakers Replacement: passo 8, imagem 1 %32
    • Use the #0 Phillips Screwdriver to remove the four silver 3 mm Philips #0 screws from around the battery housing.

  9. Nexus 7 2nd Generation Speakers Replacement: passo 9, imagem 1 %32
    • Remove the battery from your device by applying pressure at the base of the battery and lifting it out.

  10. Nexus 7 2nd Generation Speakers Replacement, Micro USB/Daughterboard: passo 10, imagem 1 %32 Nexus 7 2nd Generation Speakers Replacement, Micro USB/Daughterboard: passo 10, imagem 2 %32
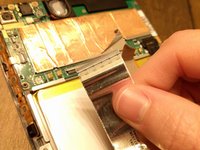
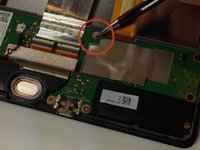
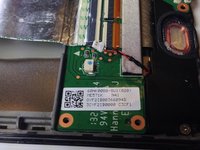
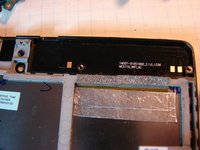
    • Remove the gray seal covering the top center screw on the daughterboard.

    • Be aware that this action will void your warranty.

    • Be sure to store the seal in a place where it will not get dirty and can retain its stickiness.

  11. Nexus 7 2nd Generation Speakers Replacement: passo 11, imagem 1 %32
    • Using the Phillips #0 screwdriver, unscrew the 5 black 2 mm sized screws from around the edge of the daughterboard.

    • Use the same Phillips #0 screwdriver to remove the two silver 3 mm sized screws from either side of the micro USB.

  12. Nexus 7 2nd Generation Speakers Replacement: passo 12, imagem 1 %32 Nexus 7 2nd Generation Speakers Replacement: passo 12, imagem 2 %32
    • Use the tweezers to unplug the speaker connector from the daughterboard by pulling sideways.

    • Be gentle in this step as this connector can be fragile. Do not pull upwards.

  13. Nexus 7 2nd Generation Speakers Replacement: passo 13, imagem 1 %32
    • Slowly peel off the EMI gasket over the ribbon cable assembly. This will expose the ribbon cable which can be removed from the connectors.

  14. Nexus 7 2nd Generation Speakers Replacement: passo 14, imagem 1 %32 Nexus 7 2nd Generation Speakers Replacement: passo 14, imagem 2 %32
    • Use the flat end of a spudger or your fingernail to carefully flip up both retaining flaps one each of the ZIF sockets.

    • When disconnecting the ZIF sockets flip them outwards to the edge of the board/towards the cables respectively.

    • Be careful not to damage the pin connector. Pull parallel to the device, not up.

    • For more info on how to disconnect ZIF connectors, check out the Recognizing & Disconnecting Cable Connectors guide.

  15. Nexus 7 2nd Generation Speakers Replacement: passo 15, imagem 1 %32
    • The daughterboard will now lift easily up and out of the device.

    • Use care during reassembly. This daughter board is a very sensitive part. It is easy to fry the digitizer part of this board if connections are made in the wrong order. Complete all other cable connections before connecting battery power.

  16. Nexus 7 2nd Generation Speakers Replacement, Motherboard: passo 16, imagem 1 %32
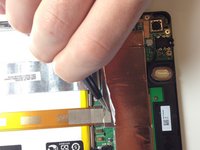
    • Use the tweezers to peel the seal sticker off of the center screw that is closest to the battery.

    • Make sure to store the seal in a place where it will not get dirty and will retain its stickiness.

  17. Nexus 7 2nd Generation Speakers Replacement: passo 17, imagem 1 %32
    • Using the tweezers, or carefully with your fingers, disconnect the speaker from its motherboard connection by pulling directly sideways.

    • Do not pull upwards. Doing so may warp or damage the connector.

  18. Nexus 7 2nd Generation Speakers Replacement: passo 18, imagem 1 %32
  19. Nexus 7 2nd Generation Speakers Replacement: passo 19, imagem 1 %32
    • Using the #0 Philips head screwdriver, remove the three black 2 mm screws holding the inner edge of the motherboard in place.

    • Using the #0 Philips head screwdriver, remove the five silver 3 mm screws holding the outer edge of the motherboard in place.

  20. Nexus 7 2nd Generation Speakers Replacement: passo 20, imagem 1 %32 Nexus 7 2nd Generation Speakers Replacement: passo 20, imagem 2 %32 Nexus 7 2nd Generation Speakers Replacement: passo 20, imagem 3 %32
    • Carefully lift the motherboard up from its edge and remove it from the tablet casing.

    • While the camera is connected directly to the motherboard from the bottom and might lift out of the tablet with the motherboard, it also might not. In this case, as shown, you'll need to use the tweezers to pry the camera out of its spot.

    • Removing the motherboard will reveal the top speaker that was being held down. If you are planning on replacing the top speaker, you may now simply pick it up out of the device.

  21. Nexus 7 2nd Generation Speakers Replacement, Speakers: passo 21, imagem 1 %32 Nexus 7 2nd Generation Speakers Replacement, Speakers: passo 21, imagem 2 %32
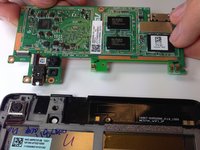
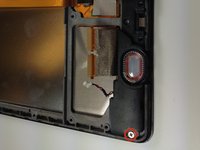
    • Use Phillips #0 screwdriver to remove two screws from either end of the speaker.

  22. Nexus 7 2nd Generation Speakers Replacement: passo 22, imagem 1 %32
    • Carefully lift bottom speaker from the device.

Conclusão

To reassemble your device, follow these instructions in reverse order.

2 outras pessoas executaram este guia.

Jillian Brown

Membro desde: 01/22/15

2.343 Reputação

Autoria de 2 guias

Equipe

Cal Poly, Team 20-16, Maness Winter 2015 Membro de Cal Poly, Team 20-16, Maness Winter 2015

CPSU-MANESS-W15S20G16

Membros da 4

Autoria de 24 guias

0 comentários

Adicione um comentário

Exibir estatísticas:

Últimas 24 horas: 0

Últimos 7 dias: 0

Últimos 30 dias: 6

Duração total: 3,185