Introdução
Use this guide to replace the battery in your Nexus 7.
O que você precisa
-
-
Power down your device.
-
Use your plastic opening tool to wedge between the seams around the sides of the device. Pry open each side, one at a time. For some a finger nail may be best. The case comes up quite high to the glass.
-
-
-
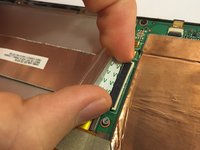
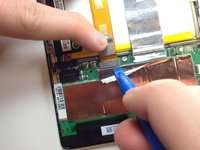
Insert the plastic opening tool under the side edge of the battery connector, and gently pry upward to disconnect it.
-
-
-
-
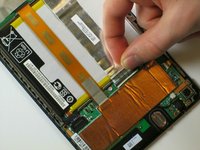
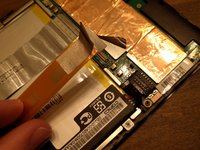
Use the flat end of a spudger or your fingernail to flip up the clear protective flap on the ribbon cable ZIF socket.
-
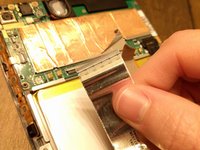
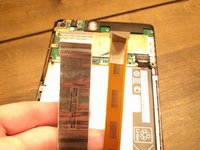
Using the flat end of a spudger or your fingernail, flip up the thin portion of the connector (the white part, opposite of the side where the cable inserts) to release the cable from its socket.
-
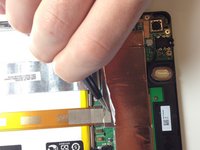
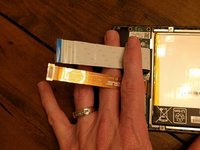
Slide the cable out of the ZIF socket.
-


To reassemble your device, follow these instructions in reverse order.
To reassemble your device, follow these instructions in reverse order.
Cancelar: não concluí este guia.
73 outras pessoas executaram este guia.
Equipe

Cal Poly, Team 20-16, Maness Winter 2015 Membro de Cal Poly, Team 20-16, Maness Winter 2015
CPSU-MANESS-W15S20G16
Membros da 4
Autoria de 24 guias
20 comentários
Don't be a goof like me and spend seven minutes trying to pry in the gap between the screen glass and the plastic. I thought that the plastic cover wrapped around the whole of the side and met the unit just under the glass. Nope...find the seam near the halfway point of the case side, between plastic and plastic. (The first photo here is not sufficiently clear to make this obvious.)
1 If you look closely, you'll see that at the edge of the glossy, black screen there is a glossy, black, 1mm hard plastic band going all the way around the screen. This provides the beveling on the edge of the screen. Around that is the dull, black plastic case. Insert your spunger or fingernail between these two plastic bands. It is easiest to do near the middle both of the long sides. Gently slide up toward the corners popping each little snap. When you get near the corner, keep one fingernail/spunger in the gap you've created on the side, near the corner, then use another nail/spunger to go around the corner. Be careful here. This is the easiest place to damage.
Once the corners have popped, the end/short top edge is easy. The bottom edge is different since the micro-USB port is also there. I did not pry it open but lifted the other three sides and just slid the screen out from that end. I inserted the USB end first also when reassembling, snapping the other edges then corners in afterward.
2 I did crack that hard plastic band in two spots on the top left corner of my Nexus 7 (opposite the camera). On spot a tiny piece broke out, but the band is still continuous at the glass edge. Around the corner, the band actually appears to have broken in two. If I rub my finger there, I can begin to peel it up. I hope my case will keep it protected.
I had trouble with the stupid ribbon cable zif socket. Everything went well until the very end when I was reassembling and I had to stick that sucker in. It was really difficult, and the plastic tab came off. Then the end I pulled out at the beginning wasn't going back in. After trying to glue the plastic pulling-flap back on (hint: don't do that) I gave up, but then I had an idea. I pulled out the entire ribbon from both ends and just flipped them. Put in the troubled end in the bottom socket (it was easier than wrestling with it), and the better end in near the top of the tablet next to that orange ribbon, and it worked! I'm so relieved...! Now my tablet is back to working condition!