Ir para o conteúdo principal

Nest Dropcam Pro Micro-USB Port Replacement

O que você precisa

  1. Nest Dropcam Pro Micro-USB Port Replacement, Outer Case: passo 1, imagem 1 %32
    • Press in the mounting clips on each side of the case to remove the camera from the mount.

  2. Nest Dropcam Pro Micro-USB Port Replacement: passo 2, imagem 1 %32 Nest Dropcam Pro Micro-USB Port Replacement: passo 2, imagem 2 %32
    • Using a Philips #0 screwdriver, remove the four 3 mm screws.

  3. Nest Dropcam Pro Micro-USB Port Replacement: passo 3, imagem 1 %32 Nest Dropcam Pro Micro-USB Port Replacement: passo 3, imagem 2 %32
    • Lift the front of the case slowly, as there is an antenna cable attached to the motherboard.

    • Carefully disconnect the antenna cable from the motherboard. You will feel this cable "pop" out of place when disconnected.

  4. Nest Dropcam Pro Micro-USB Port Replacement, Motherboard: passo 4, imagem 1 %32 Nest Dropcam Pro Micro-USB Port Replacement, Motherboard: passo 4, imagem 2 %32
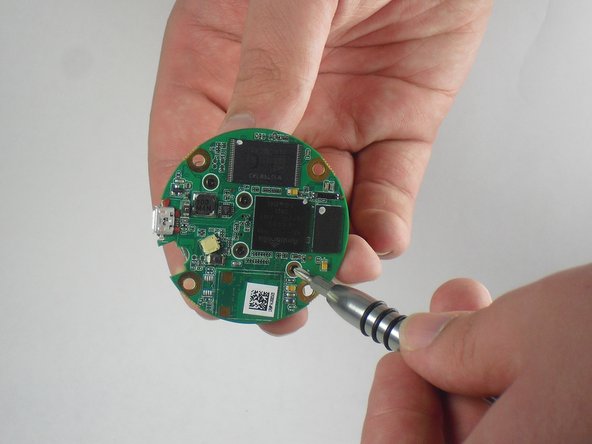
    • Insert a spudger tool under the micro-USB port and lift to separate the motherboard from the back case.

  5. Nest Dropcam Pro Micro-USB Port Replacement: passo 5, imagem 1 %32 Nest Dropcam Pro Micro-USB Port Replacement: passo 5, imagem 2 %32
    • Pull the motherboard away from the back case.

    • Unplug the red and black cable connecting the motherboard to the back case.

  6. Nest Dropcam Pro Micro-USB Port Replacement: passo 6, imagem 1 %32 Nest Dropcam Pro Micro-USB Port Replacement: passo 6, imagem 2 %32
    • Using a Philips #0 screwdriver, remove the four 2 mm screws.

  7. Nest Dropcam Pro Micro-USB Port Replacement: passo 7, imagem 1 %32 Nest Dropcam Pro Micro-USB Port Replacement: passo 7, imagem 2 %32
    • Lift the lens and LED assembly away from the motherboard.

    • Unplug the yellow and white cable from the motherboard.

  8. Nest Dropcam Pro Micro-USB Port Replacement, Micro-USB Port: passo 8, imagem 1 %32 Nest Dropcam Pro Micro-USB Port Replacement, Micro-USB Port: passo 8, imagem 2 %32
    • Using a soldering station and desoldering braid, desolder the four points surrounding the Micro-USB port.

    • Lift the Micro-USB port away from the motherboard.

Conclusão

To reassemble your device, follow these instructions in reverse order.

4 outras pessoas executaram este guia.

David Foens

Membro desde: 09/03/15

893 Reputação

Autoria de 6 guias

Equipe

USF Tampa, Team 15-4, Blackwell Fall 2015 Membro de USF Tampa, Team 15-4, Blackwell Fall 2015

USFT-BLACKWELL-F15S15G4

Membros da 3

Autoria de 12 guias

4 comentários

I don't have the soldering tools but I used lazerbond to reattach the old port. I hope all the conductors are touching their counter parts. I haven't plugged it back in yet. Wish me luck.

Kreschendalyn Backus - Responder

Did it work for you?

Michael Candy -

Where can you order the micro-usb charge port for this cam?

Danny Acevedo - Responder

Not sure where you get them but according to one site it uses a Micro USB 2.0 Type B Receptacle.

https://bit.ly/2Kg01z6

Debbie - Responder

Adicione um comentário

Exibir estatísticas:

Últimas 24 horas: 2

Últimos 7 dias: 9

Últimos 30 dias: 16

Duração total: 5,659