Ir para o conteúdo principal

Nerf N-Strike Maverick Trigger Repair

O que você precisa

  1. Nerf N-Strike Maverick Trigger Repair, Nerf N-Strike Maverick Trigger Repair: passo 1, imagem 1 %32
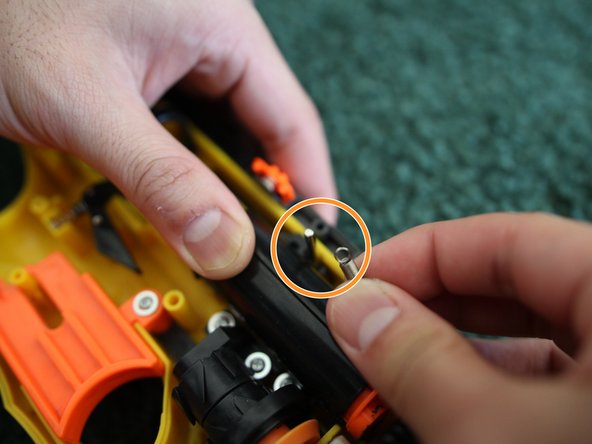
    • Remove the 10 screws on the outer shell of the Maverick.

    • Make sure to keep all the screws in a cup or container so they don't get lost.

  2. Nerf N-Strike Maverick Trigger Repair: passo 2, imagem 1 %32 Nerf N-Strike Maverick Trigger Repair: passo 2, imagem 2 %32
    • After removing all of the screws, slowly lift the gray top left piece.

    • The other side of the top left piece can also be taken off.

  3. Nerf N-Strike Maverick Trigger Repair: passo 3, imagem 1 %32
    • Remove the top left screw.

  4. Nerf N-Strike Maverick Trigger Repair: passo 4, imagem 1 %32 Nerf N-Strike Maverick Trigger Repair: passo 4, imagem 2 %32
    • While holding the Maverick down slowly lift the outer shell.

    • Make sure the orientation of the Maverick matches the picture shown.

  5. Nerf N-Strike Maverick Trigger Repair: passo 5, imagem 1 %32 Nerf N-Strike Maverick Trigger Repair: passo 5, imagem 2 %32
    • Remove the screw holding the trigger to the body.

    • When screwing everything back together, remember to re hook the trigger spring.

  6. Nerf N-Strike Maverick Trigger Repair: passo 6, imagem 1 %32 Nerf N-Strike Maverick Trigger Repair: passo 6, imagem 2 %32 Nerf N-Strike Maverick Trigger Repair: passo 6, imagem 3 %32
    • Check the inner chassis around the trigger area. Make sure the springs and parts can move freely.

    • If a part is broken, a replacement will need to be bought or taken from another Maverick.

  7. Nerf N-Strike Maverick Trigger Repair: passo 7, imagem 1 %32 Nerf N-Strike Maverick Trigger Repair: passo 7, imagem 2 %32
    • After examining and fixing the chassis, screw the trigger back onto the body.

    • Hook the upper spring to the metal rod.

  8. Nerf N-Strike Maverick Trigger Repair: passo 8, imagem 1 %32 Nerf N-Strike Maverick Trigger Repair: passo 8, imagem 2 %32 Nerf N-Strike Maverick Trigger Repair: passo 8, imagem 3 %32
    • Replace the outer shell of the Maverick and the top left screw.

    • When reattaching the outer shell, make sure to hold the top left piece as shown in the first picture. This ensures that the spring remains connected to the rod.

    • Screw the top left piece back onto the Maverick.

    • Replace the 10 screws on the Maverick.

Linha de Chegada

Uma outra pessoa concluiu este guia.

David Lim

Membro desde: 09/27/15

110 Reputação

Autoria de 1 guia

Equipe

Cal Poly, Team 10-3, Green Fall 2015 Membro de Cal Poly, Team 10-3, Green Fall 2015

CPSU-GREEN-F15S10G3

Membros da 4

Autoria de 4 guias

0 comentários

Adicione um comentário

Exibir estatísticas:

Últimas 24 horas: 1

Últimos 7 dias: 7

Últimos 30 dias: 17

Duração total: 2,212