Ir para o conteúdo principal
Participe da comunidade de reparos - Criar conta

Motorola i560 Keypad Replacement

O que você precisa

  1. Motorola i560 Keypad Replacement, Battery: passo 1, imagem 1 %32
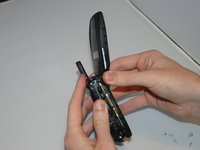
    • Place thumb on the rubber tab on the lower back of the phone.

    • Push away from the phone to release back panel.

    Pergunte ao FixBot

    Comentar

  2. Motorola i560 Keypad Replacement: passo 2, imagem 1 %32
    • Lift the back panel of the phone to expose battery (not shown here).

    Pergunte ao FixBot

    Comentar

  3. Motorola i560 Keypad Replacement, Motherboard: passo 3, imagem 1 %32
    • Pull the antenna up to reveal two of the six screws.

    Pergunte ao FixBot

    Comentar

  4. Motorola i560 Keypad Replacement: passo 4, imagem 1 %32
    • Unscrew all six screws on the back side of the phone using a T-6 bit.

    Pergunte ao FixBot

    Comentar

  5. Motorola i560 Keypad Replacement: passo 5, imagem 1 %32 Motorola i560 Keypad Replacement: passo 5, imagem 2 %32
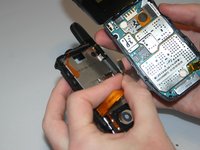
    • Gently separate the front and back sides of the phone, as shown in the picture.

    • Be careful not to break or bend the ribbon cables.

    Pergunte ao FixBot

    Comentar

  6. Motorola i560 Keypad Replacement: passo 6, imagem 1 %32 Motorola i560 Keypad Replacement: passo 6, imagem 2 %32
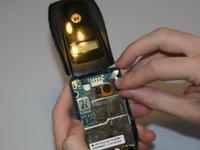
    • Detach the first ribbon cable by unplugging it from the motherboard.

    Pergunte ao FixBot

    Comentar

  7. Motorola i560 Keypad Replacement: passo 7, imagem 1 %32 Motorola i560 Keypad Replacement: passo 7, imagem 2 %32
    • Detach the speaker ribbon cable from the motherboard.

    Pergunte ao FixBot

    Comentar

  8. Motorola i560 Keypad Replacement: passo 8, imagem 1 %32
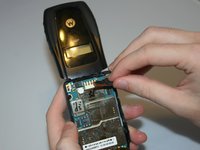
    • Remove the motherboard from the front half of the phone by gently shaking it loose. It should come out with little to no trouble.

    Pergunte ao FixBot

    Comentar

  9. Motorola i560 Keypad Replacement, Keypad: passo 9, imagem 1 %32
    • Push lightly from the front of the keypad to remove it.

    Pergunte ao FixBot

    Comentar

Conclusão

To reassemble your device, follow these instructions in reverse order.

Cancelar: não concluí este guia.

Uma outra pessoa concluiu este guia.

Haley S

Membro desde: 03/11/13

10 Reputação

Autoria de 4 guias

Equipe

Clemson, Team 13-6, Benson Spring 2013 Membro de Clemson, Team 13-6, Benson Spring 2013

CLEM-BENSON-S13S13G6

3 Membros

Autoria de 10 guias

0Comentários do guia

Comentar

Visualizações:

Últimas 24 horas: 0

Últimos 7 dias: 2

Últimos 30 dias: 24

Ao todo: 347