Introdução
Replacing the touch screen requires the use of a heat gun. Mishandling a heat gun can cause serious burns so use caution while handling it.
Before you begin, download the Rescue and Smart Assistant app to backup your device and diagnose whether your problem is software or hardware related.
O que você precisa
-
-
-
Using the small plastic opening tool, pry and slide all the way around the phone while carefully lifting up on the display.
-
-
-
Once display is fully unglued from the frame, carefully lift it up and locate the display connector.
-
Using the same small plastic tool, carefully remove the yellow tape off the connector.
-
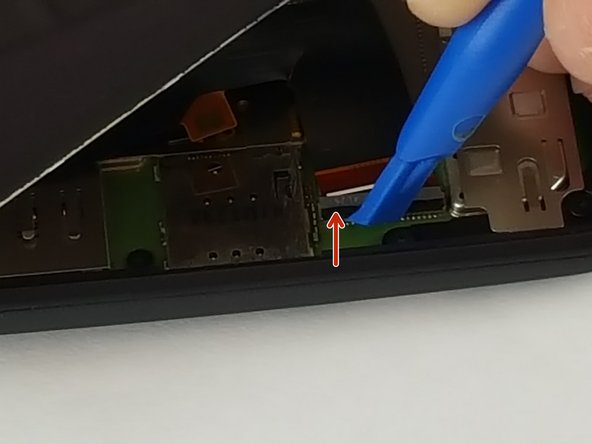
Now carefully undo the black connector lock by lifting it up in the direction of the red arrow.
-
Lastly slide the display cable off the connector. It should easily slide off, if not make sure the black lock is fully unlatched.
Very well put together. Worked fine for me.
A guitar pick will work as well as the plastic tool, but it might be a little harder to work with.
-


To reassemble your device, follow these instructions in reverse order.
To reassemble your device, follow these instructions in reverse order.
Cancelar: não concluí este guia.
37 outras pessoas executaram este guia.
Equipe

USF Tampa, Team 12-3, Eyestone Spring 2016 Membro de USF Tampa, Team 12-3, Eyestone Spring 2016
USFT-EYESTONE-S16S12G3
Membros da 3
Autoria de 14 guias
5 comentários
Will the glue work againg when reassambling?
Rodolfo, no - the glue cannot be reused during reassembly. There should be a step 4.
Step 4: enclosed you will find a rectangle of double-sided adhesive. Use scissors/knife to trim off thin strips of adhesive, and place these around the edge of the housing where the glue was previously bonded (remove any residual glue from the housing before placing the adhesive).
You can get the gist of it by watching from 9:52 on this youtube video on replacing a Moto G screen (different phone, same principle): https://www.youtube.com/watch?v=zdRJsQUl...
Now reverse the first 3 steps.
what if the black strip behind display get torn off while lifting the screen?