Ir para o conteúdo principal

Esta versão pode conter edições incorretas. Mude para o último instantâneo verificado.

O que você precisa

  1. Este passo não foi traduzido. Ajude a traduzi-lo

    : passo 1, imagem 1 %32 : passo 1, imagem 2 %32 : passo 1, imagem 3 %32
    • In order for the keyboard to be detached with the Detach buttons, both batteries must be charged above 10 percent. If your device doesn't power on and you can't use the Detach buttons, skip to the next step.

    • Press and hold the Detach button on the keyboard.

    • Once pressed, the Detach button it will light up red. After a second, it’ll turn green and you’ll hear an audible clicking sound.

    • Alternatively, click the Detach icon on the right-hand side of the Windows 10 taskbar.

    • Remove the display.

  2. Este passo não foi traduzido. Ajude a traduzi-lo

    : passo 2, imagem 1 %32 : passo 2, imagem 2 %32
    • The next six steps show how to detach the display manually if you’re unable to power on the Surface Book.

    • Flip open the display as far as it will go.

    • Lift the device up and place it on its side, with the display facing away from you and the SurfaceConnect port facing up.

  3. Este passo não foi traduzido. Ajude a traduzi-lo

    : passo 3, imagem 1 %32 : passo 3, imagem 2 %32
    • Straighten out one section of a paper clip.

  4. Este passo não foi traduzido. Ajude a traduzi-lo

    : passo 4, imagem 1 %32 : passo 4, imagem 2 %32 : passo 4, imagem 3 %32
    • The Surface Book has an internal lever arm mechanism that can be manually actuated through an access hole in the vents on side of the display.

    • Insert the straight end of the paper clip at a 45 degree angle into the sixth hole from the left.

  5. Este passo não foi traduzido. Ajude a traduzi-lo

    : passo 5, imagem 1 %32 : passo 5, imagem 2 %32 : passo 5, imagem 3 %32
    • Firmly push the paper clip into the hole.

    • This may take a considerable amount of force.

    • Once the internal lever arm is fully depressed, you can disconnect the display.

    • Pull the base away from the display to detach it.

    • If you are unable to detach the display from the base on this side, release pressure on the paper clip and try again.

  6. Este passo não foi traduzido. Ajude a traduzi-lo

    : passo 6, imagem 1 %32 : passo 6, imagem 2 %32 : passo 6, imagem 3 %32
    • The magnetic connections are prone to snap back into place, so hold the two halves apart.

    • With one side detached, pull firmly to pivot the display out to disconnect the second side.

    • If the magnetic connection feels extra strong and the display won't detach on the second side, keep the detached side separated with a spudger, pen, or pencil, and repeat the paper clip process on the other side of the display.

  7. Este passo não foi traduzido. Ajude a traduzi-lo

    : passo 7, imagem 1 %32
    • Remove the display.

    • Completely power down your Surface Book before opening it up for any repairs.

  8. Este passo não foi traduzido. Ajude a traduzi-lo

    : passo 8, imagem 1 %32
    • Flip the keyboard over so you can see the back panel.

  9. Este passo não foi traduzido. Ajude a traduzi-lo

    : passo 9, imagem 1 %32 : passo 9, imagem 2 %32
    • Insert the plastic opening tool in the crevice between the panel and the keyboard.

    • Apply some pressure and lift up so that the back panel is pried away from the keyboard.

    • The panel is glued down on the inside so this may require some force to lift away the panel.

    • Continue to lift until the panel is completely separated from the keyboard.

    • The panel is still attached to the keyboard by a ribbon cable so only lift the panel a few inches.

  10. Este passo não foi traduzido. Ajude a traduzi-lo

    : passo 10, imagem 1 %32
    • Lift the panel away with the ribbon cable still attached and set aside the panel so that you can work on other components.

  11. Este passo não foi traduzido. Ajude a traduzi-lo

    : passo 11, imagem 1 %32
    • Orient your keyboard with the internals facing up and the USB ports on the right.

  12. Este passo não foi traduzido. Ajude a traduzi-lo

    : passo 12, imagem 1 %32
    • Use the T3 screwdriver to remove the two 4 mm screws on the right side of the SD Card Reader.

  13. Este passo não foi traduzido. Ajude a traduzi-lo

    : passo 13, imagem 1 %32 : passo 13, imagem 2 %32
    • Remove the black ribbon cable tab on the SD card reader from the chip with a plastic opening tool. Place the tool underneath the tab and pry it off.

    • Removing this tab can be a little difficult. Be sure that you have a good angle and do not get discouraged if removing the tab takes you multiple tries.

    • Lift the SD card reader away from the keyboard to replace it.

  14. Este passo não foi traduzido. Ajude a traduzi-lo

    : passo 14, imagem 1 %32
    • Remove the larger, black ribbon cable located on the USB card with a plastic opening tool by lifting the tab away from its connector. Again, place the tool underneath the tab and pry it off.

    • This may require some force. Do not get discouraged if it does not detach on the first try.

  15. Este passo não foi traduzido. Ajude a traduzi-lo

    : passo 15, imagem 1 %32 : passo 15, imagem 2 %32
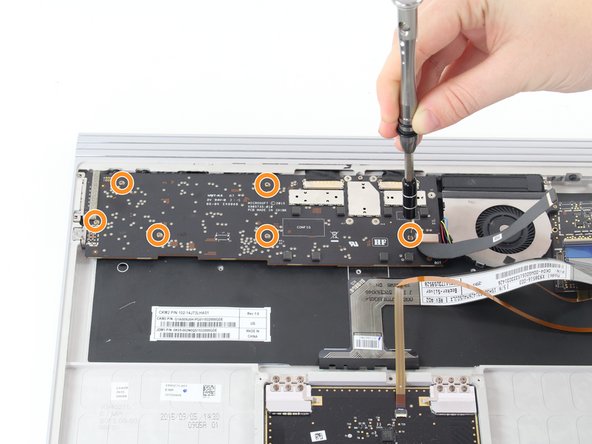
    • Use the T3 screwdriver to remove three 4 mm screws located on the black bar towards the bottom of the board.

    • Use the T3 Torx Screwdriver to remove the remaining six 4 mm screws.

  16. Este passo não foi traduzido. Ajude a traduzi-lo

    : passo 16, imagem 1 %32 : passo 16, imagem 2 %32 : passo 16, imagem 3 %32
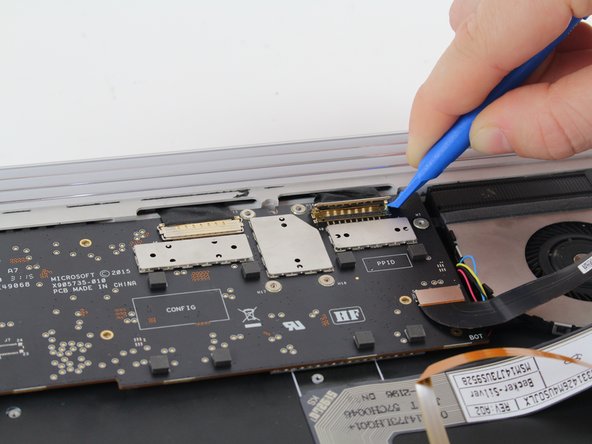
    • Lift both clamps with the blue plastic opening tool. Place the tool underneath the clamps and pry them open.

    • Use the plastic opening tool to slide ribbon cable toward the wall of the keyboard until the ribbon cables come loose.

  17. Este passo não foi traduzido. Ajude a traduzi-lo

    : passo 17, imagem 1 %32
    • Wiggle the the GPU board out away from the keyboard.

    • This may require some force to remove.

Linha de Chegada

3 outras pessoas executaram este guia.

Equipe

Cal Poly, Team 20-3, Livingston Fall 2016 Membro de Cal Poly, Team 20-3, Livingston Fall 2016

CPSU-LIVINGSTON-F16S20G3

Membros da 4

Autoria de 12 guias

3 comentários

Where can I buy a replacement gpu board?

Brandon Woodland - Responder

where can l find A Replacement gpu board?

Ted Balderas - Responder

Is there some space to put screw nuts inside the base?

It would make sense to put some and drill holes in back panel to make further teardowns easier, e.g. to clean the dust on a regular basis.

dimithras - Responder

Adicione um comentário

Exibir estatísticas:

Últimas 24 horas: 3

Últimos 7 dias: 26

Últimos 30 dias: 101

Duração total: 9,567