Esta versão pode conter edições incorretas. Mude para o último instantâneo verificado.
O que você precisa
-
Este passo não foi traduzido. Ajude a traduzi-lo
-
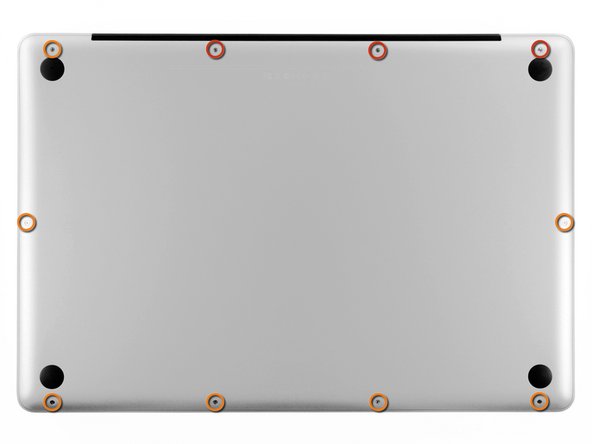
Remove the following ten screws securing the lower case to the upper case:
-
Three 13.5 mm Phillips screws.
-
Seven 3 mm Phillips screws.
-
-
Este passo não foi traduzido. Ajude a traduzi-lo
-
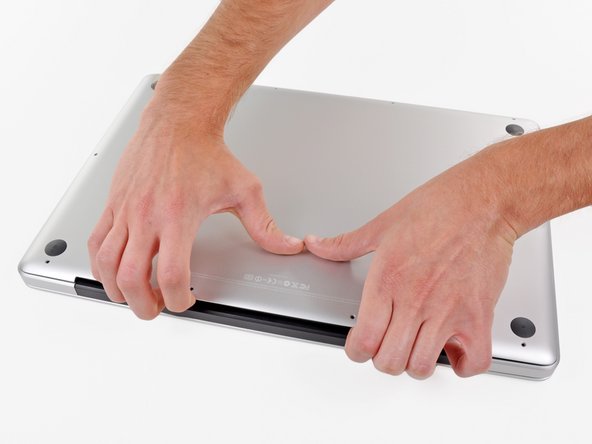
Wedge your fingers between the lower case and the vent, and lift upward to release the two clips holding the lower case to the upper case.
-
Remove the lower case.
-
-
Este passo não foi traduzido. Ajude a traduzi-lo
-
Remove any broken or damaged feet.
-
Remove any pieces from the old foot that may have broken off in the foot hole.
-
Use tweezers to peel up and remove the old adhesive tape from the foot pad.
-
-
-
Este passo não foi traduzido. Ajude a traduzi-lo
-
Scrub the foot pad with adhesive remover to remove any remaining adhesive.
-
-
Este passo não foi traduzido. Ajude a traduzi-lo
-
Wipe the foot pad with an alcohol prep pad to remove any residue left by the cleaner.
-
-
Este passo não foi traduzido. Ajude a traduzi-lo
-
Align the new foot inside the foot pad.
-
Make sure the alignment nub on the foot is lined up with the small hole near the perimeter of the pad.
-
Lay the foot down while keeping it properly aligned.
-
Check for proper alignment from the inside of the lower case. Use tweezers to slide the alignment nub so it lines up with the hole.
-
-
Este passo não foi traduzido. Ajude a traduzi-lo
-
Press the new foot down firmly with your finger and maintain pressure for 30 seconds to set the pressure sensitive adhesive. Support the other side of the cover while you press the foot down.
-
Repeat the last six steps for any broken or damaged feet.
-
Cancelar: não concluí este guia.
9 outras pessoas executaram este guia.


