Ir para o conteúdo principal

Este guia tem alterações mais recentes. Mudar para a última versão não verificada.

MacBook Pro 15" Unibody Mid 2009 Upper Case Replacement

O que você precisa

  1. MacBook Pro 15" Unibody Mid 2009 Upper Case Replacement, Lower Case: passo 1, imagem 1 %32
    • Remove the following ten screws securing the lower case to the upper case:

    • Seven 3 mm Phillips screws.

    • Three 13.5 mm Phillips screws.

  2. MacBook Pro 15" Unibody Mid 2009 Upper Case Replacement: passo 2, imagem 1 %32 MacBook Pro 15" Unibody Mid 2009 Upper Case Replacement: passo 2, imagem 2 %32
    • Using both hands, lift the lower case near the vent to pop it off two clips securing it to the upper case.

    • Remove the lower case and set it aside.

  3. MacBook Pro 15" Unibody Mid 2009 Upper Case Replacement, Battery: passo 3, imagem 1 %32
    Ferramenta utilizada nesse passo:
    P6 Pentalobe Screwdriver 2009 15" MacBook Pro Battery
    $5.49
    Comprar
    • Remove the two 5-Point Pentalobe screws along the top edge of the battery.

    • You do not necessarily have to follow steps 3-6 to remove the battery in order to replace the hard drive. However it is recommended to remove all power sources from electronics before working on them.

  4. MacBook Pro 15" Unibody Mid 2009 Upper Case Replacement: passo 4, imagem 1 %32
    • Use the tip of a spudger to bend back the finger of the "Warning: Do not remove the battery" sticker while you remove third five-point Pentalobe screw hidden underneath.

  5. MacBook Pro 15" Unibody Mid 2009 Upper Case Replacement: passo 5, imagem 1 %32 MacBook Pro 15" Unibody Mid 2009 Upper Case Replacement: passo 5, imagem 2 %32
    • Lift the battery by its plastic pull tab and slide it away from the long edge of the upper case.

    • Do not try to completely remove the battery just yet.

  6. MacBook Pro 15" Unibody Mid 2009 Upper Case Replacement: passo 6, imagem 1 %32
    • Tilt the battery back enough to access the battery cable connector.

    • Pull the battery cable connector away from its socket on the logic board and remove the battery from the upper case.

    • If you're installing a new battery, you should calibrate it after installation.

  7. MacBook Pro 15" Unibody Mid 2009 Upper Case Replacement, Logic Board: passo 7, imagem 1 %32 MacBook Pro 15" Unibody Mid 2009 Upper Case Replacement, Logic Board: passo 7, imagem 2 %32 MacBook Pro 15" Unibody Mid 2009 Upper Case Replacement, Logic Board: passo 7, imagem 3 %32
    • Use a spudger to pry the fan connector straight up off the logic board.

    • It is useful to twist the spudger axially from beneath the fan cable wires to release the connector.

    • The fan socket and the fan connector can be seen in the second and third pictures. Be careful not to break the plastic fan socket off the logic board as you use your spudger to lift the fan connector straight up and out of its socket. The layout of the logic board shown in the second picture may look slightly different than your machine but the fan socket is the same.

  8. MacBook Pro 15" Unibody Mid 2009 Upper Case Replacement: passo 8, imagem 1 %32 MacBook Pro 15" Unibody Mid 2009 Upper Case Replacement: passo 8, imagem 2 %32
    • Remove the three T6 Torx screws securing the left fan to the logic board.

    • Lift the fan out of the upper case.

  9. MacBook Pro 15" Unibody Mid 2009 Upper Case Replacement: passo 9, imagem 1 %32
    • Use the flat end of a spudger to disconnect the left fan connector from the logic board.

    • Pry up from beneath the wires.

  10. MacBook Pro 15" Unibody Mid 2009 Upper Case Replacement: passo 10, imagem 1 %32 MacBook Pro 15" Unibody Mid 2009 Upper Case Replacement: passo 10, imagem 2 %32
    • Remove the three T6 Torx screws securing the left fan to the logic board.

    • Lift the left fan out of the upper case.

  11. MacBook Pro 15" Unibody Mid 2009 Upper Case Replacement: passo 11, imagem 1 %32
    • The camera cable connector is not secured by any locking or snapping mechanism. Hence, Apple sticks a small strip of black plastic with adhesive applied to the side facing the logic board behind the camera cable connector to keep it in its socket.

    • When moving the strip (cable retainer) out of the way, be sure not to break any surface-mounted components off the logic board.

    • Hold the end of the cable retainer down with one finger while you use the tip of a spudger to slightly lift the other end and rotate it away from the camera cable connector.

    • Disconnect the camera cable by pulling the male end straight away from its socket.

    • Pull the connector parallel to the face of the logic board, not straight up.

  12. MacBook Pro 15" Unibody Mid 2009 Upper Case Replacement: passo 12, imagem 1 %32
    • Disconnect the camera cable by pulling the male end straight away from its socket.

    • Pull the connector parallel to the face of the logic board, not straight up.

  13. MacBook Pro 15" Unibody Mid 2009 Upper Case Replacement: passo 13, imagem 1 %32
    • Use the flat end of a spudger to pry the optical drive cable connector up off the logic board.

  14. MacBook Pro 15" Unibody Mid 2009 Upper Case Replacement: passo 14, imagem 1 %32
    • Using the flat end of a spudger, pry the subwoofer connector straight up from the connector jack.

    • Be careful to pry the connector, not the socket. It's possible to accidentally pry the socket up from the logic board.

    • Removing the foam applied to the top of the connector will make it easier to see and avoid prying up the socket.

  15. MacBook Pro 15" Unibody Mid 2009 Upper Case Replacement: passo 15, imagem 1 %32
    • Use the flat end of a spudger to pry the hard drive/IR sensor cable connector up off the logic board.

  16. MacBook Pro 15" Unibody Mid 2009 Upper Case Replacement: passo 16, imagem 1 %32 MacBook Pro 15" Unibody Mid 2009 Upper Case Replacement: passo 16, imagem 2 %32
    • Remove the two 1.5 mm Phillips screws securing the cable cover to the logic board.

    • Lift the cable cover out of the upper case.

  17. MacBook Pro 15" Unibody Mid 2009 Upper Case Replacement: passo 17, imagem 1 %32
    • Use a spudger to pry the trackpad flex ribbon cable connector up off the logic board.

  18. MacBook Pro 15" Unibody Mid 2009 Upper Case Replacement: passo 18, imagem 1 %32 MacBook Pro 15" Unibody Mid 2009 Upper Case Replacement: passo 18, imagem 2 %32
    • Use your fingernail to flip up the locking flap on the ZIF socket for the keyboard ribbon cable. The locking flap is located at the opposite side of the socket compared to the keyboard ribbon cable. Hook your fingernail under it and carefully lift it up vertically.

    • Do not attempt to slide the keyboard ribbon cable out of its socket before you have unlocked the ZIF socket. Ribbon cables are fragile and excessive force will easily break them.

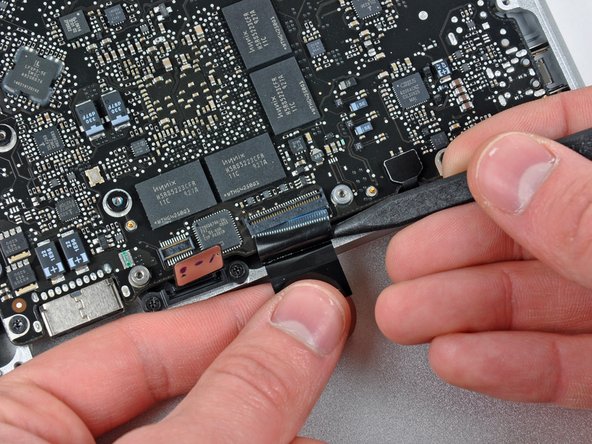
    • Use the tip of a spudger to slide the keyboard ribbon cable out of its socket.

  19. MacBook Pro 15" Unibody Mid 2009 Upper Case Replacement: passo 19, imagem 1 %32
    • Use a spudger to pry the battery indicator ribbon cable connector up off the logic board.

  20. MacBook Pro 15" Unibody Mid 2009 Upper Case Replacement: passo 20, imagem 1 %32 MacBook Pro 15" Unibody Mid 2009 Upper Case Replacement: passo 20, imagem 2 %32
    • Remove the single 7 mm Phillips screw securing the display data cable retainer to the upper case.

    • This screw may remain captive in the display data cable ground loop. If replacing the display, be sure to transfer this screw to the new unit.

    • Remove the display data cable retainer from the upper case.

  21. MacBook Pro 15" Unibody Mid 2009 Upper Case Replacement: passo 21, imagem 1 %32 MacBook Pro 15" Unibody Mid 2009 Upper Case Replacement: passo 21, imagem 2 %32
    • Grab the plastic pull tab secured to the display data cable lock and rotate it toward the DC-in side of the computer.

  22. MacBook Pro 15" Unibody Mid 2009 Upper Case Replacement: passo 22, imagem 1 %32
    • Pull the display data cable connector straight away from its socket.

    • Make sure to pull the connector parallel to the face of the logic board, not straight up from its socket.

  23. MacBook Pro 15" Unibody Mid 2009 Upper Case Replacement: passo 23, imagem 1 %32 MacBook Pro 15" Unibody Mid 2009 Upper Case Replacement: passo 23, imagem 2 %32
    • Using the tip of a spudger, flip up the keyboard backlight ribbon cable retaining flap.

    • Pull the keyboard backlight ribbon cable straight out of its socket.

  24. MacBook Pro 15" Unibody Mid 2009 Upper Case Replacement: passo 24, imagem 1 %32
    • Remove the following screws:

    • Seven 3.3 mm T6 Torx screws securing the logic board to the upper case.

    • Two 8 mm T6 Torx screws securing the DC-In board to the upper case.

    • Do not remove the logic board yet! There are components on the underside of the logic board attached to the the upper case that must first be disconnected.

  25. MacBook Pro 15" Unibody Mid 2009 Upper Case Replacement: passo 25, imagem 1 %32
    • Carefully lift the logic board assembly from the left side and work it out of the upper case, minding the port side that may get caught during removal.

    • Do not entirely remove the logic board yet!

  26. MacBook Pro 15" Unibody Mid 2009 Upper Case Replacement: passo 26, imagem 1 %32
    • Lift the logic board enough to gain clearance and use a spudger to pry the microphone up off the upper case.

    • Slide the logic board away from the port openings and lift the assembly out of the upper case.

    • Before reinstalling the logic board, it is easiest to press the microphone down into its housing in the left speaker to keep it in place.

  27. MacBook Pro 15" Unibody Mid 2009 Upper Case Replacement: passo 27, imagem 1 %32
    • Slide the logic board away from the port openings and lift the assembly out of the upper case.

    • Before reinstalling the logic board, it is easiest to press the microphone down into its housing in the left speaker to keep it in place.

  28. MacBook Pro 15" Unibody Mid 2009 Upper Case Replacement, Upper Case: passo 28, imagem 1 %32 MacBook Pro 15" Unibody Mid 2009 Upper Case Replacement, Upper Case: passo 28, imagem 2 %32
    • Remove the two Phillips screws securing the hard drive bracket to the upper case.

    • These screws are captive in the hard drive bracket.

    • Remove the hard drive bracket from the upper case.

  29. MacBook Pro 15" Unibody Mid 2009 Upper Case Replacement: passo 29, imagem 1 %32
    • Using its attached tab, lift the free end of the hard drive and pull it away from the edge of the upper case.

    • Do not try to remove the hard drive just yet.

  30. MacBook Pro 15" Unibody Mid 2009 Upper Case Replacement: passo 30, imagem 1 %32 MacBook Pro 15" Unibody Mid 2009 Upper Case Replacement: passo 30, imagem 2 %32
    • Pull the hard drive cable connector away from the body of the hard drive.

    • Remove the hard drive and set it aside.

  31. MacBook Pro 15" Unibody Mid 2009 Upper Case Replacement: passo 31, imagem 1 %32
    • Carefully peel the hard drive cable off the adhesive securing it to the right speaker housing.

  32. MacBook Pro 15" Unibody Mid 2009 Upper Case Replacement: passo 32, imagem 1 %32
    • Remove the following four screws securing the hard drive and IR sensor cable to the upper case:

    • Two 1.5 mm Phillips screws.

    • Two 4 mm Phillips screws.

  33. MacBook Pro 15" Unibody Mid 2009 Upper Case Replacement: passo 33, imagem 1 %32
    • Slide the hard drive and IR sensor bracket away from the edge of the upper case.

  34. MacBook Pro 15" Unibody Mid 2009 Upper Case Replacement: passo 34, imagem 1 %32
    • Carefully peel the IR sensor/sleep light ribbon cable off the adhesive securing it to the upper case.

  35. MacBook Pro 15" Unibody Mid 2009 Upper Case Replacement: passo 35, imagem 1 %32
    • Peel the camera cable off the adhesive securing it to the body of the optical drive.

  36. MacBook Pro 15" Unibody Mid 2009 Upper Case Replacement: passo 36, imagem 1 %32 MacBook Pro 15" Unibody Mid 2009 Upper Case Replacement: passo 36, imagem 2 %32
    • This step is for anti-glare display machines only. Skip this step if you have a glossy display.

    • Disconnect the Bluetooth cable by pulling the male end straight away from its socket.

    • Use the flat end of a spudger to carefully pry the AirPort antenna off its socket on the AirPort card.

    • Pull the connector parallel to the face of the logic board, not straight up.

  37. MacBook Pro 15" Unibody Mid 2009 Upper Case Replacement: passo 37, imagem 1 %32 MacBook Pro 15" Unibody Mid 2009 Upper Case Replacement: passo 37, imagem 2 %32
    • This step is for anti-glare display machines only. Skip this step if you have a glossy display.

    • Remove the two 8 mm Phillips screws securing the Bluetooth/camera cable retainer to the upper case.

    • One of the screws may remain captive in the Bluetooth/camera cable ground loop. If replacing the display, be sure to transfer this screw to the new unit.

    • Lift the AirPort board/cable retainer assembly out of the upper case.

  38. MacBook Pro 15" Unibody Mid 2009 Upper Case Replacement: passo 38, imagem 1 %32
    • Remove the single 3.5 mm Phillips screw securing the inner side of the optical drive to the upper case.

  39. MacBook Pro 15" Unibody Mid 2009 Upper Case Replacement: passo 39, imagem 1 %32
    • Remove the two 3.5 mm Phillips screws securing the outer side of the optical drive to the upper case.

  40. MacBook Pro 15" Unibody Mid 2009 Upper Case Replacement: passo 40, imagem 1 %32
    • Lift the optical drive from its left edge and pull it out of the upper case.

  41. MacBook Pro 15" Unibody Mid 2009 Upper Case Replacement: passo 41, imagem 1 %32
    • Remove the following four screws securing the subwoofer and right speaker assembly to the upper case:

    • Two 3.2 mm Phillips screws.

    • One 2.6 mm Phillips screw.

    • One 5 mm Phillips screw.

  42. MacBook Pro 15" Unibody Mid 2009 Upper Case Replacement: passo 42, imagem 1 %32
    • Lift the subwoofer and right speaker assembly out of the upper case.

  43. MacBook Pro 15" Unibody Mid 2009 Upper Case Replacement: passo 43, imagem 1 %32 MacBook Pro 15" Unibody Mid 2009 Upper Case Replacement: passo 43, imagem 2 %32
    • This step is for glossy display machines only. If you have an anti-glare display, skip this step.

    • Remove the two 8 mm Phillips screws securing the camera cable retainer to the upper case.

    • One of the screws may remain captive in the camera cable ground loop. If replacing the display, be sure to transfer this screw to the new unit.

    • Lift the camera cable retainer out of the upper case.

  44. MacBook Pro 15" Unibody Mid 2009 Upper Case Replacement: passo 44, imagem 1 %32 MacBook Pro 15" Unibody Mid 2009 Upper Case Replacement: passo 44, imagem 2 %32
    • Remove the outer two T6 Torx screws securing both display hinges to the upper case (four screws total).

  45. MacBook Pro 15" Unibody Mid 2009 Upper Case Replacement: passo 45, imagem 1 %32
    • Open your MacBook Pro so the display is perpendicular to the upper case.

    • Place your opened MacBook Pro on a table as pictured.

    • While holding the display and upper case together with your left hand, remove the remaining T6 Torx screw from the lower display bracket.

  46. MacBook Pro 15" Unibody Mid 2009 Upper Case Replacement: passo 46, imagem 1 %32
    • Be sure to hold the display and upper case together with your other hand. Failure to do so may cause the freed display/upper case to fall, potentially damaging each component.

    • Remove the last remaining 6 mm Torx screw securing the display to the upper case.

  47. MacBook Pro 15" Unibody Mid 2009 Upper Case Replacement: passo 47, imagem 1 %32 MacBook Pro 15" Unibody Mid 2009 Upper Case Replacement: passo 47, imagem 2 %32 MacBook Pro 15" Unibody Mid 2009 Upper Case Replacement: passo 47, imagem 3 %32
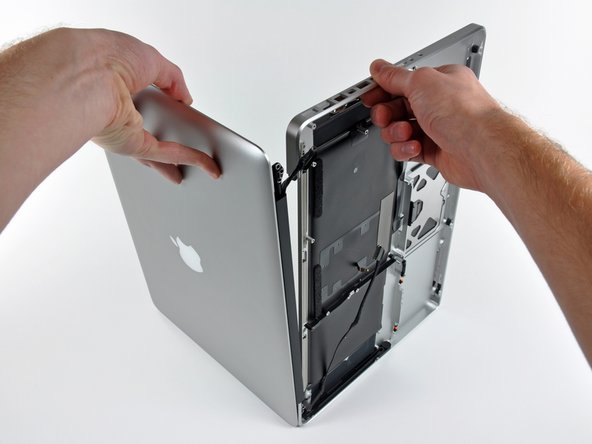
    • Grab the upper case with your right hand and rotate it slightly toward the top of the display so the upper display bracket clears the edge of the upper case.

    • Rotate the display slightly away from the upper case.

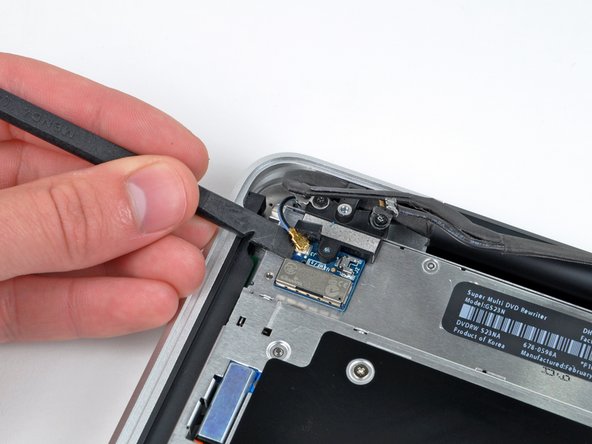
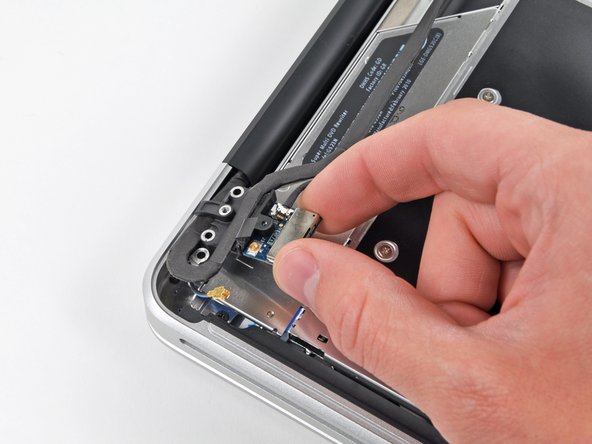
    • Lift the display away from the upper case, minding any brackets or cables that may get caught.

Conclusão

To reassemble your device, follow these instructions in reverse order.

36 outras pessoas executaram este guia.

Um comentário

Thanks for a fantastic guide! I needed to replace my track pad and this served me well. Also was the perfect opportunity to clean out all the dust. A couple minor mods and a trackpad guide could be published for all those like me.

Cheers!

prstarward - Responder

Adicione um comentário

Exibir estatísticas:

Últimas 24 horas: 2

Últimos 7 dias: 3

Últimos 30 dias: 21

Duração total: 56,889