Esta versão pode conter edições incorretas. Mude para o último instantâneo verificado.
O que você precisa
-
Este passo não foi traduzido. Ajude a traduzi-lo
-
Remove the following ten screws securing the lower case to the upper case:
-
Three 13.5 mm (14.1 mm) Phillips screws.
-
Seven 3 mm Phillips screws.
-
-
Este passo não foi traduzido. Ajude a traduzi-lo
-
Using both hands, lift the lower case near the vent to pop it off two clips securing it to the upper case.
-
Remove the lower case and set it aside.
-
-
Este passo não foi traduzido. Ajude a traduzi-lo
-
Use the edge of a spudger to pry the battery connector upwards from its socket on the logic board.
-
-
Este passo não foi traduzido. Ajude a traduzi-lo
-
Bend the battery cable slightly away from its socket on the logic board so it does not accidentally connect itself while you work.
-
-
Este passo não foi traduzido. Ajude a traduzi-lo
-
Pull the camera cable connector straight out of its socket on the logic board.
-
-
-
Este passo não foi traduzido. Ajude a traduzi-lo
-
Use the flat end of a spudger to carefully pry the AirPort/Bluetooth ribbon cable up off its socket on the logic board.
-
-
Este passo não foi traduzido. Ajude a traduzi-lo
-
Use the tip of a spudger to pry the four antenna connectors up from their sockets on the AirPort/Bluetooth board.
-
-
Este passo não foi traduzido. Ajude a traduzi-lo
-
De-route all four antenna cables from their channels in the AirPort/Bluetooth housing.
-
De-route the camera cable from its channel in the AirPort/Bluetooth housing.
-
-
Este passo não foi traduzido. Ajude a traduzi-lo
-
Remove the following two screws securing the AirPort/Bluetooth assembly to the upper case:
-
One 8.6 mm Phillips screw
-
One 3.9 mm Phillips screw
-
-
Este passo não foi traduzido. Ajude a traduzi-lo
-
Remove the AirPort/Bluetooth assembly from the upper case, minding any cables that may get caught.
-
-
Este passo não foi traduzido. Ajude a traduzi-lo
-
Peel and remove the piece of EMI tape wrapped around the AirPort/Bluetooth assembly.
-
-
Este passo não foi traduzido. Ajude a traduzi-lo
-
Use the flat end of a spudger to pry the AirPort/Bluetooth cable away from its socket on the AirPort/Bluetooth board.
-
Remove the AirPort/Bluetooth cable from the AirPort/Bluetooth assembly.
-
-
Este passo não foi traduzido. Ajude a traduzi-lo
-
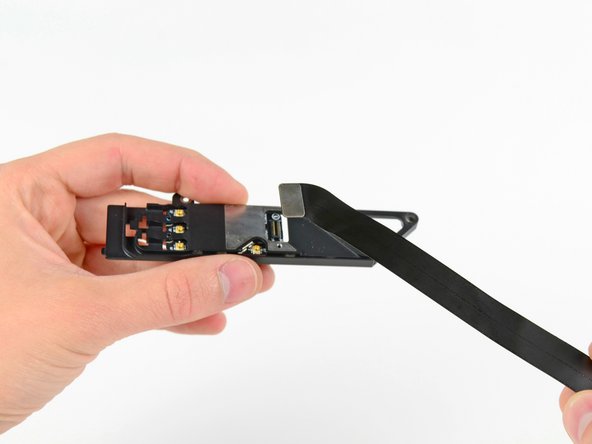
Remove the three Phillips screws securing the AirPort/Bluetooth board to the AirPort/Bluetooth board housing.
-
Use the flat end of a spudger to dislodge the AirPort/Bluetooth board from its recess in the AirPort/Bluetooth board housing.
-
-
Este passo não foi traduzido. Ajude a traduzi-lo
-
Remove the AirPort/Bluetooth board from its aluminum housing.
-


Cancelar: não concluí este guia.
32 outras pessoas executaram este guia.

6 comentários
I'm interested to replace the Airpot/Bluetooth Board on my MPB Late 2011 (MacbookPro 8,2) that currently has the board BCM 2070B0. I need to be sure that the replacement board at this link (http://www.ebay.com/itm/Macbook-Pro-A127...) will fit with my MBP.
The next question is related to the replacement of the aluminium frame as well as mentioned at the beginning of this article or is the current one is ok as well. I have available the images of the HW data of my MBP if need to properly answer the questions.
Many thanks for your great help.
Best regards
Paolo
Used this to replace my late 2011 Airport/Bluetooth board with a slightly later one that fits the same and enabled Bluetooth 4.0. BCM94331PCIEBT4AX => BCM94331PCIEBT4ACX.
Do you mind if I ask which Bluetooth board you updated to and where you bought it?
Colin -
hello i have a MacBookPro 6.2. Midle 2010
i’m also interested to replace the Airpot/Bluetooth Board for a higher Version. ?!
is there a option, an with witch Card.