Introdução
Follow this guide to safely remove the glued-in battery from your MacBook Pro using an iFixit kit with adhesive remover. The liquid solvent in the kit will dissolve the adhesive securing the battery, allowing you to remove it more easily.
iFixit adhesive remover is flammable—use it in a well-ventilated area, and do not smoke or work near an open flame.
To minimize risk of damage, turn on your MacBook and allow the battery to fully discharge before starting this procedure. A charged lithium-ion battery can be very dangerous if accidentally punctured. If your battery looks puffy or swollen, take extra precautions.
Note: The solvent used to dissolve the battery adhesive can damage certain plastics. Follow all instructions and take care where you apply the adhesive remover.
O que você precisa
-
-
Power on your Mac and launch Terminal.
-
Copy and paste the following command (or type it exactly) into Terminal:
-
sudo nvram AutoBoot=%00
-
Press [return]. If prompted, enter your administrator password and press [return] again. Note: Your return key may also be labeled ⏎ or "enter."
-
sudo nvram AutoBoot=%03
-
-
-
Use a P5 Pentalobe driver to remove six screws securing the lower case, of the following lengths:
-
Four 4.7 mm screws
-
Two 6.6 mm screws
I miss a printable template to leave the screws and removed parts on it for future identification when reassembly, linked maybe with the location in the Macbook, or with the number of the step.
-
-
-
Press a suction handle into place near the front edge of the lower case, between the screw holes.
-
Pull up on the suction handle just enough to open a small gap under the lower case.
Throw away this suction cup and get another. It just doesn't work! Luckily I had one that does work in my tool kit.
-
-
-
Pull firmly to slide the lower case towards the front edge of the MacBook (away from the hinge area) to separate the last of the clips securing the lower case.
-
Pull first at one corner, then the other.
this step must require a lot of force. I tried to pull it with the plastic hookie thing from the ifixit set by hooking it in one of the screw holes — the tip of the hookie thing broke.
The amount of force required for removing the bottom cover is absolutely ridiculous. Almost feels like i'm about to push my MacBook towards the wall the second it comes off.
Be careful, I ended up breaking 2 grounding pins on the motherboard last time I tried opening my computer up.
PLEASE DON'T PULL!!!
Instead just gently push with plastic pick from the other side (where vents outputs are) towards the center... Cover will very easily open that way.
I hope iFixit will correct this step.
Came here to share exactly this.
Robert -
That's definitely how this step should be done. Thanks!
VovS -
If someone has a photo to share regarding this comment, it might be very useful. Thanks.
I used a screwdriver at 45 degrees angle and pushed the cover from the hinges, it worked really smooth. I had it close to the corners.
Yeah, definitely don't pull; if you do, wear protective gloves. Mine was stuck so strongly that I just cut my palm quite deep.
You would think ifixit would investigate why the last step required them to pull with great force to remove the bottom case lid as the solution.
It's counter-intuitive to use an excessive method to remove a part.
There's always an easier way. It's frustrating because you can't see inside.
Using the iFixit opening Tool in the hinge opening required close to no force to open.
Ah... after attempting to 'pull' this rear cover off, to no avail, I tried to coax the cover off with a nylon pry tool. MUCH better! iFixIt will do well to amend it's recommendation to 'pull' this cover in any way. All I wanted to do was a little house cleaning and exorcize the dust bunnies that took up residence in my MBP's fans. Today is much quieter. Thank you all for pointing out the obvious.
-
-
-
Remove the lower case.
-
Set it in place and align the sliding clips near the display hinge. Press down and slide the cover toward the hinge. It should stop sliding as the clips engage.
-
When the sliding clips are fully engaged and the lower case looks correctly aligned, press down firmly on the lower case to engage the four hidden clips underneath. You should feel and hear them snap into place.
If I had it all to do over, again, I would blow out the dust with compressed air at this point. During the disassembly, I kept encountering little dust bunnies, and I was very worried that one would get caught in one of the connectors when I plugged everything back up (which wouldn’t get discovered until I put it all back together and tried out all of the components).
-
-
-
Peel up and remove the insulating sticker covering the battery board, on the edge of the logic board nearest the battery.
-
If the cover doesn't peel up easily, apply mild heat with an iOpener, hair dryer, or heat gun to soften the adhesive underneath, and try again.
-
-
-
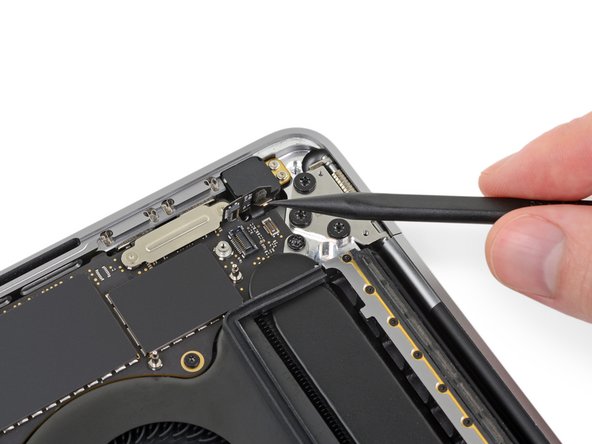
Peel back any tape covering the battery board data cable connector.
-
Use a spudger to gently pry up the locking flap on the ZIF connector for the battery board data cable.
-
-
-
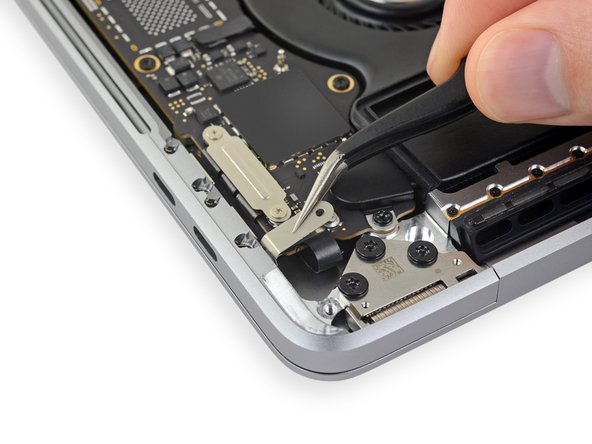
Slide the battery board data cable out of its socket on the battery board, and remove it completely.
Bonjour, super Tuto, petite question elle sert a quoi cette nappe , et quesqui se passe si elle est pas branché ?
-
-
-
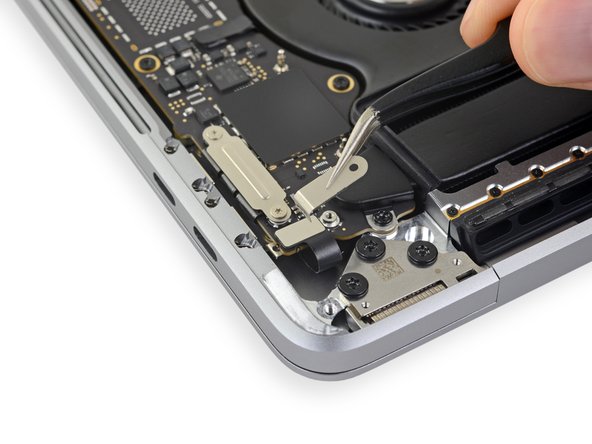
Use a spudger to lift the battery power connector, disconnecting the battery.
Put a little bit of insulating tape over the terminal to be safe.
-
-
-
Use a T3 Torx driver to remove the two 1.9 mm screws securing the cover bracket for the keyboard and trackpad cable connectors.
-
Remove the bracket.
I didn’t have T3 but T4 worked ;)
-
-
-
Use a T5 Torx driver to remove the 13 screws securing the trackpad assembly:
-
Nine 5.8 mm screws
-
Four 4.9 mm screws
I dont have the “clicky” feedback from my trackpad anymore - please advise how to fix this
The "clicky" feedback is achieved by electromagnet on the bottom, so for anyone like me who wanted to make sure it is working before connecting battery - it will not.
(MacBook Pro 2019 15” 2 years old) There are 4 screws (2 on the left and 2 on the right, each pair held down by a black metal piece) next to the uppermost 5.8mm screws. What is the size/kind of screw are these? I’d like to purchase these missing items? Please help. A suspicious technician tried to scam me out of money. I asked for my computer back before they could charge me. I decided to do the repairs myself. When I received my laptop back and followed Ifixit instructions I found 2 screws missing and they replaced the original with an unrecognizable rusty screw on the farthest left screw hole, and the black metal pieces were missing as well.
-
-
-
Swing the display open slightly, but keep the MacBook upside-down. The trackpad assembly should separate and lay flat on the display.
-
Carefully feed the trackpad's ribbon cable through its slot in the chassis.
do not turn the touchpad over, as there are 4+5 very thin spacers/washers, and you might lose them. only the next step warns you about this. dont be me!
-
-
-
As you remove the trackpad assembly, be very careful not to lose the nine small metal washers resting on the screw posts. (They will fly off and get lost with very little provocation.)
-
Remove the trackpad assembly.
-
-
-
-
Use your spudger to disconnect the keyboard by prying its connector straight up from the logic board.
-
-
-
Use a T3 Torx driver to remove the two 3.5 mm screws securing the cover on the display board flex cable.
-
Remove the display board flex cover.
I was able to complete this procedure successfully without removing the logic board. I don’t use any liquid adhesive remover. I employ A rubber type silicon rubber-semi stiff spatula used for putting icing on cakes. Use careful leveraged prying, sliding under battery to break the adhesive seal. Also careful application of heat with a heat gun being careful to not damage the speakers. I remove all logic board screws, disconnect all service cables including USB C caps on both sides. The goal is to be able to carefully ”lift” The lower edge of logic board most proximal to the battery enough to allow the ribbon cable to clear the “ridge” that is on rear edge of the battery compartment, Thus allowing you to pull the battery back horizontally towards The front edge laptop and out. I use popsicle sticks to keep the logic board lifted. Careful not to bend the board or break it! You need about 1/8” of clearance. 99% isopropyl alcohol libera dabbed on with a Q-tip to adhesive residue will clean it off.
I had some issues using my T3 bit for most of these screws. Had to use a T4. Strange because I do not use either of those bits often, so I would assume they are still in good shape. Using a T3 felt like I was going to round out each of the screws. Wonder if anyone else experienced this same thing? I'm using the 'Pro Tech Toolkit' by iFixit.
-
-
-
Using a T3 Torx driver, remove the two 1.7 mm screws securing the bracket for the display board cable connector.
-
Remove the display board cable connector bracket.
I also did this
Both of these screws also stripped for me. I’m not sure taking extra care would have helped: they stripped almost instantly and felt corroded. I basically continued by carefully manually turning out the right screw head using a regular, (slightly larger than T3) philips driver (and other small tools) until the head popped off the screw and one side of the bracket released. Then the bracket can be lifted and the other screw can be loosened using upward pressure. Upon replacement I basically used a small amount of high viscosity “gel” super glue (or epoxy) to reattach the right side of the bracket.
And now? It's definitely not T3. What the hell do I do now...
Hey everyone, I stripped these screws also. Buy some VamPliers (5" Minis VT-001-5). These will get those screws out. I did the same thing and they worked! Amazon has them.
Another one here with a stripped T3 screw at this section. Was the right screw for me. Got is out using a T4 bit.
-
-
-
Pry the display board flex cable straight up from its socket to disconnect it from the display board.
Having a lot of trouble getting this connector to re seat into its slot. It just won't snap back in. I've been trying for 30 mins. It doesn't appear to be damaged, but it just won't go back in and the display isn't working.
-
-
-
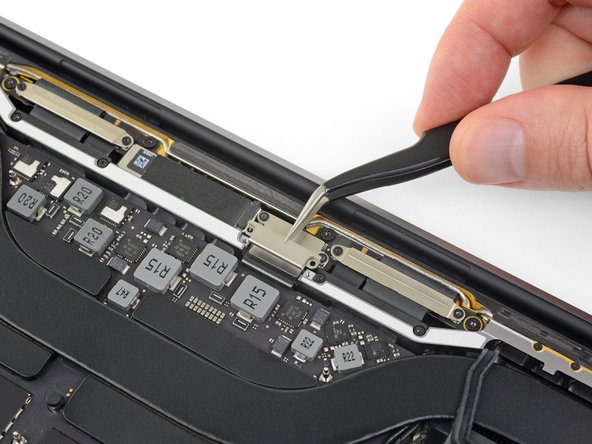
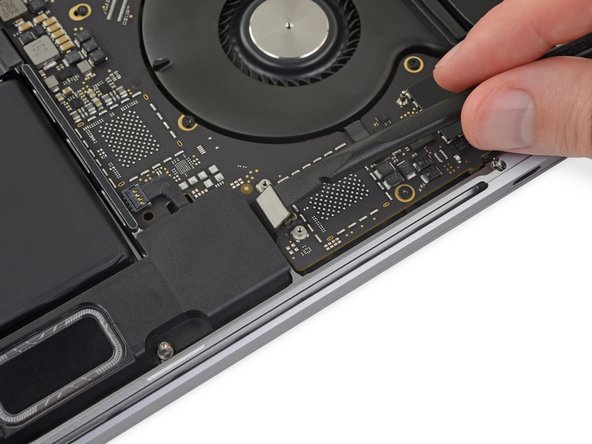
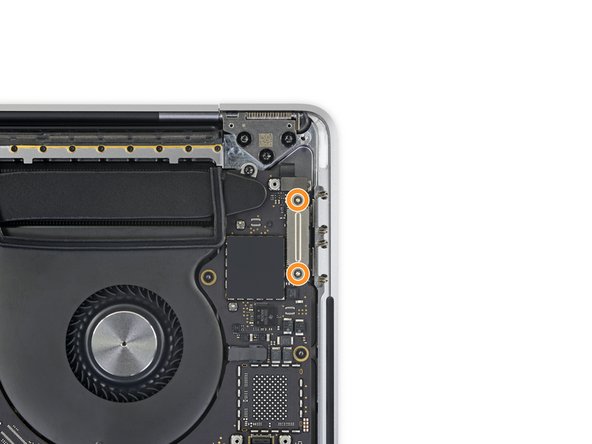
Use a T3 Torx driver to remove the two 2.4 mm screws securing the cover bracket for the Touch ID and headphone jack cable connectors.
-
Remove the bracket.
Here is a first! I did not notice this when disassembling but spent a bit of time validating I had reassembled things correctly. After 35 years of this stuff, you don’t see much new - just smaller. !
—->The 2.4 mm screw closest to the hinge screws into the logic board screw circled in green T8 (larger head)at step 47.
Try finding that screw in your bucket of spares!
-
-
-
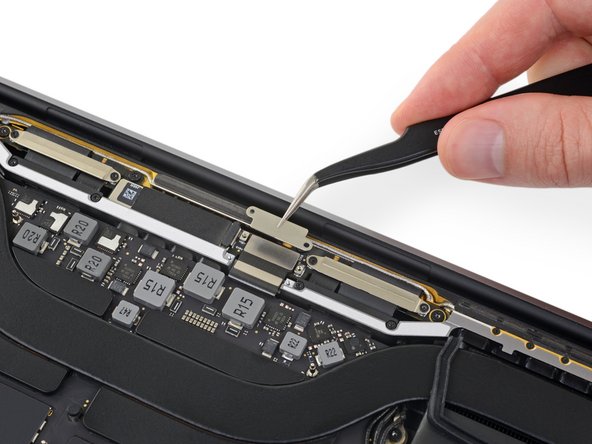
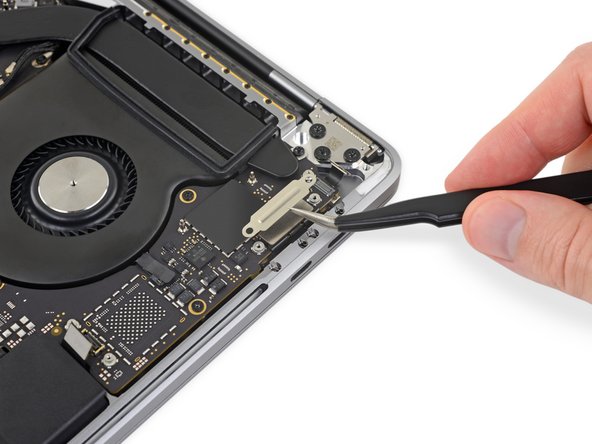
Disconnect the power button and Touch ID sensor by prying its connector straight up from the logic board.
This smaller connector cable of the touch ID sensor that sits underneath the power sensor connector is easy to overlook when replacing the logic board. It is small & short and can easily hide. Make sure you account for it when placing the LB in and before screwing it down.
-
-
-
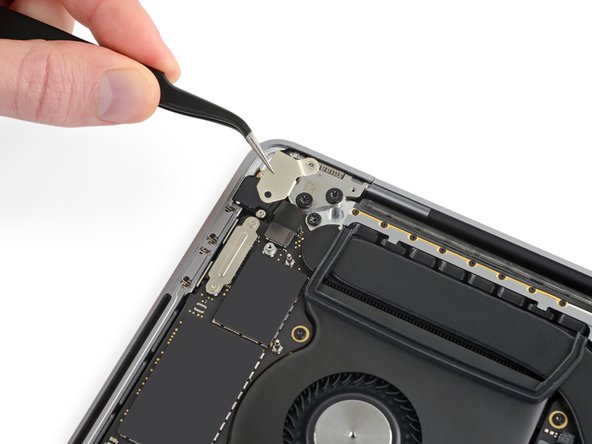
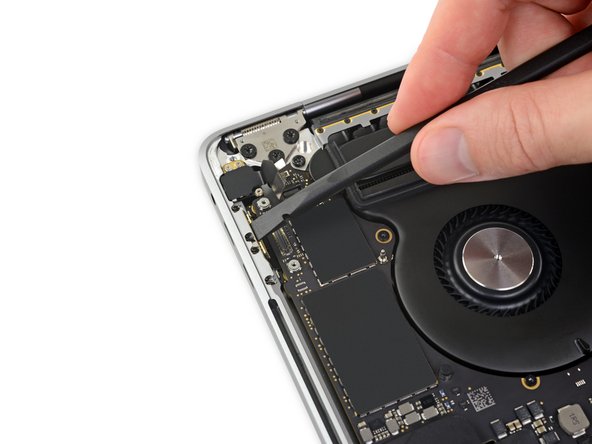
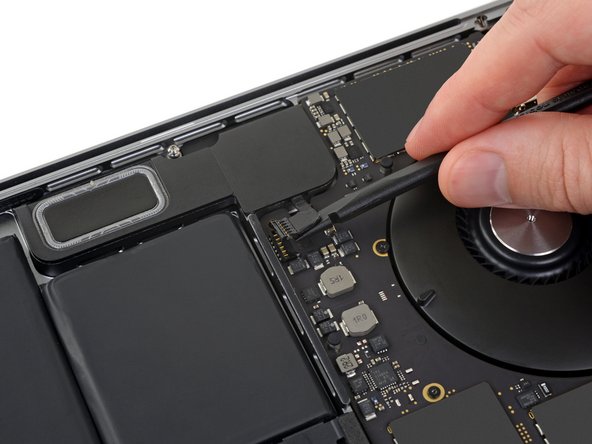
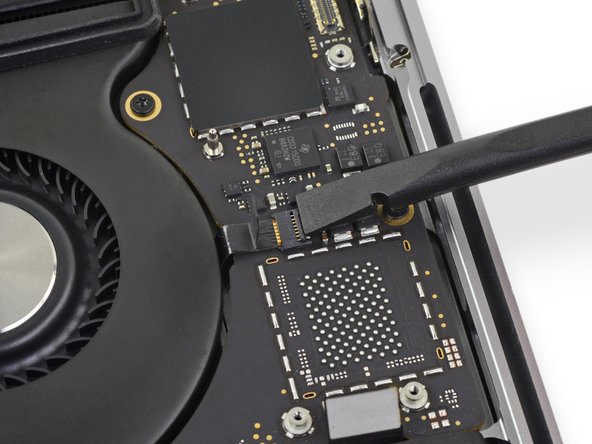
Disconnect the Touch Bar display cable by prying its connector straight up from the logic board.
-
-
-
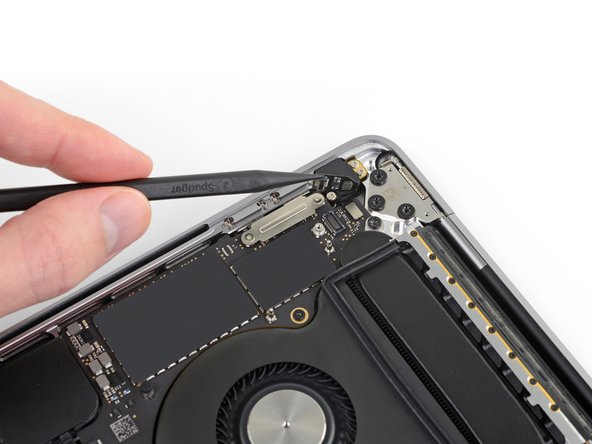
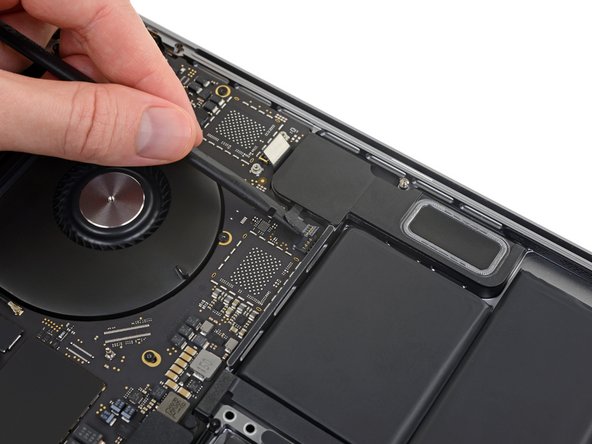
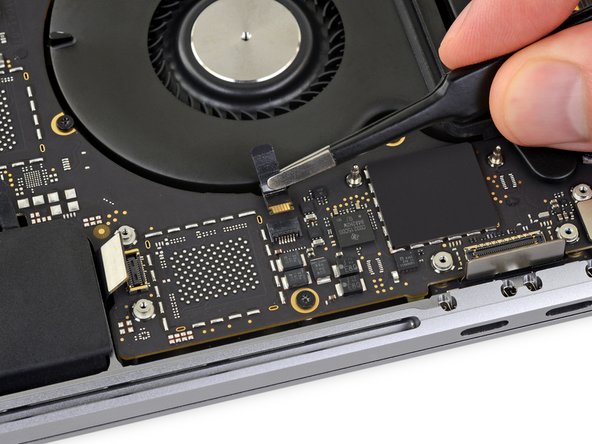
Disconnect the two speaker connectors by sliding the flat end of your spudger underneath each cable near its connector.
-
Gently twist or pry up to disconnect both speakers.
Both had a dab of glue underneath. I used heat gun to loosen.
On this step, it helped to use the tip of sharp tweezers to open the small metal tab of the connector to the side.
After disconnecting the speaker connector, does the speaker just come out, or is it glued or screwed in place? All I need is to Replace the Right Speaker with a New one. This guide gets me to this point but doesn’t address replacing the speaker. Would like to know if it’s more complicated than that before I get started… Thanks
Would be nice to have a guide just for Speaker Replacement. Thanks
My right speaker doesn't work now because the cable and connector disconnected from the logic board. From one problem to another now... What should I do?
⚠️ DON'T DO THIS FOR THE LEFT SPEAKER!
The right speaker has a six-pin connector which is wider than the spadler. The procedure described is correct.
But the left speaker has a four-pin connector, narrower than the flat end of your spadler. If you slide it under the mat and lift, even gently, you will pull the connector off the motherboard.
And, like me, you'll get the same problem as Blake Johnson.
PS : Why six and four pins for a speaker?
-
-
-
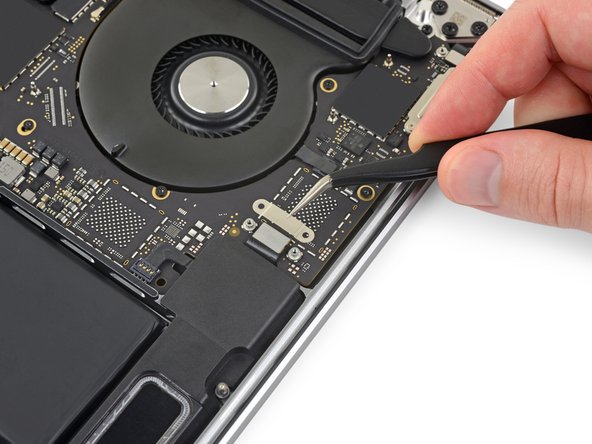
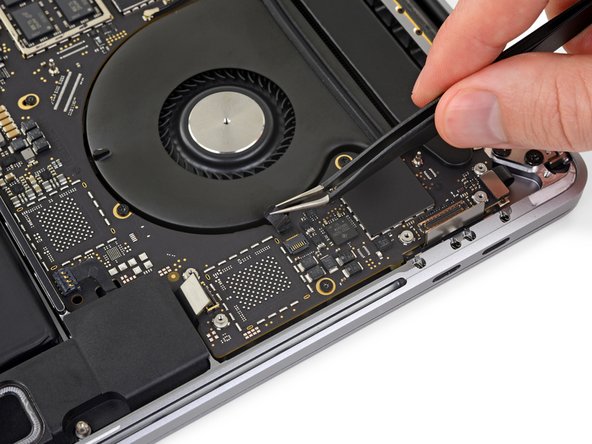
Peel up any tape covering the microphone cable connector socket.
Wenn möglich das Klebeband nicht abziehen! Zwei Schritte weiter bist Du froh darum.
-
-
-
Open the locking flap on the microphone cable's ZIF connector by prying it straight up from the logic board.
During reassembly, when trying to lock the ZIF connector flap, the flap jumped out of the connector.
If this happens to you and you are lucky, as I was, maybe it is not broken. It is possible to fix it, but you will need dexterity and patience as this is a very tiny part.
I had to go and get my watchmaker eyeglass to actually see what was going on.
I also found this iFixit tutorial. Here is the link so you don't have to look for it:
Repositionnement du clapet de connecteur de nappe flexible -
-
-
Disconnect the microphone by pulling its cable toward the fan until it releases from its socket.
-
If possible, pull on the tape attached to the cable, rather than the cable itself, to reduce the risk of damage.
At this stage, when reassembling, I did disconnect the zif connector locking flap.
If this happens to you, it is not necessarily broken. It can be fixed with very fine tweezers, a good magnifier, and a bit of patience.
I had to go and get my watchemaker magnifier to achieve this.
Here is a link to the tutorial if you need it:
-
-
-
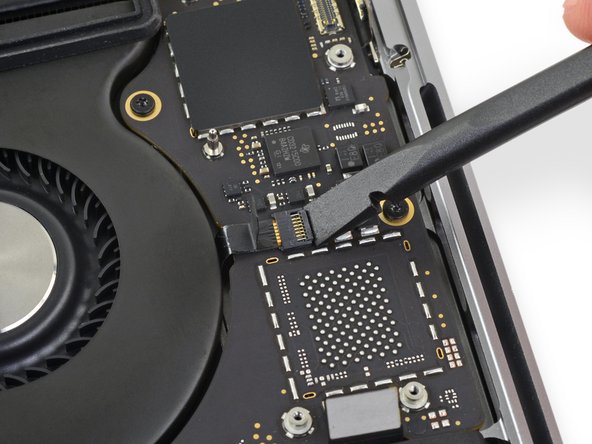
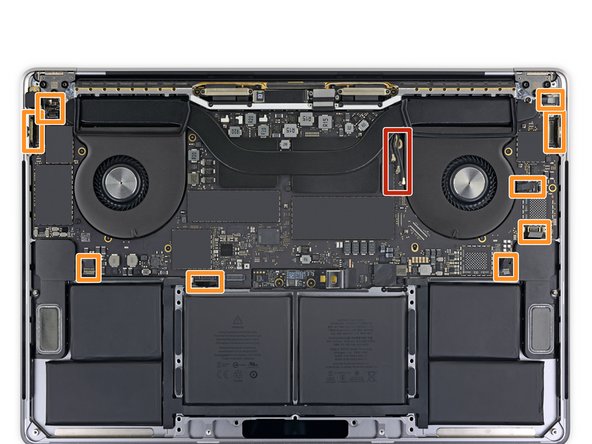
Remove all ten screws securing the logic board assembly:
-
Two 2.6 mm T3 Torx screws
-
Five 2.9 mm T5 Torx screws
-
One 3.7 mm T5 Torx screw
-
One 3.9 mm T8 Torx screw (large head)
-
One 4.0 mm T8 Torx screw
When reassambling, the screw in the top left corner (coloured green here) is the one with a threaded hole in its head. This is used to secure one of T3 screws in Step 29. Took me a while to figure this out.
-
-
-
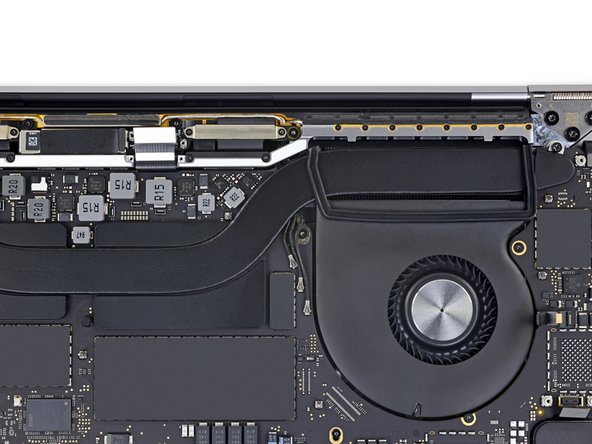
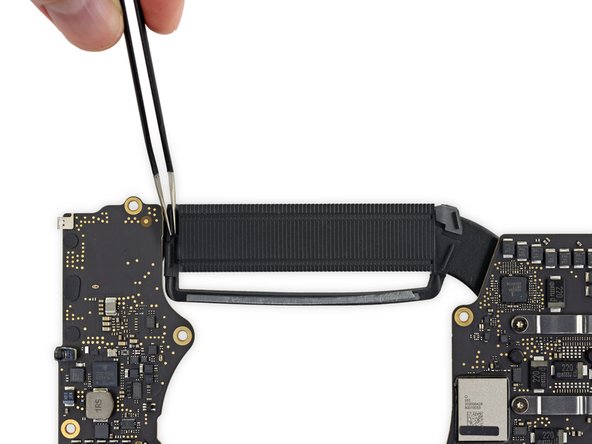
Peel up (but don't remove) the two rubber vibration damping strips from the adhesive holding them to the fans.
-
If needed, apply mild heat with an iOpener, hair dryer, or heat gun to soften the adhesive and make the dampers easier to separate.
-
-
-
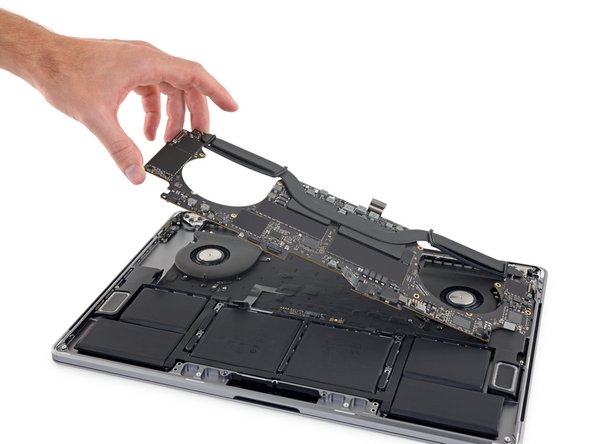
Lifting from the left side, remove the logic board.
To ease logic board removal (and especially later for reinstallation), I choose to gently bend each connector away from the logic board & use a little tape to hold them out of the way.
Is there new adhesive for fans? I’m into deep . 50/50 shot.. I get his back together ..😩
For me, I didn’t have to remove the MOBO. To be honest i didn’t need to follow the steps that require you to remove certain plugs. It may help to remove the speakers and what not, but other than that you don’t have to remove the whole thing. Also this is from my experience. So don’t get mad at me if it doesn’t work. Goodluck!
-
-
-
Check the alignment of the rubber vibration dampers, and adjust them as needed.
-
Feed the antenna cable bundle through the gap between the logic board and heat sink, and make sure it lines up correctly as you lower the board into place.
-
Verify that no cables get trapped under the board as you install it. Check each marked location carefully.
Would be good to mention (at the end of instructions here) to pay special attention on reassembly that the Touch ID and power button cable does not slip under the logic board at the last moment7
-
-
-
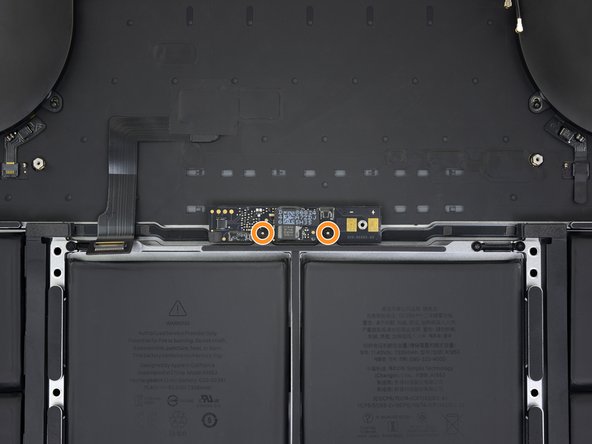
Remove the two screws securing the battery board:
-
2016-2017 models: Use a T5 Torx driver to remove both 3.5 mm screws.
-
2018-2019 models: Use a P2 Pentalobe driver to remove both 3.2 mm screws.
On my mid 2018 15.3” i9 MBP the battery board screws were PL1
I second this. If your repair is time-sensitive, consider making sure you have a PL1 driver in advance. Seeing that IFixit doesn’t seem to sell them, I bought a german-made Wiha driver, hoping the quality would be high. You never want these things to strip!
On my mid 2018 15.3 i9 MBP the keyboard cable is farther to the left (as shown at Step 23)! When reinstalling, make sure it is under the battery cable and its connector sticking up between the battery cable and the aluminum battery frame.
So if I’ve understood correctly, almost all the above could have been skipped if apple just made these two screws accessible? Wow, just wow
The screws are accessible, but the ribbon is under the board...
Chi Wang -
Dear Chi Wang, which cables do we remove once the logic board has been lifted? In step 49 and further I can only see the keyboard cable (which needs not getting removed) and the battery board cable doesn't look like it is under the board...
P2 bit end broke unscrewing the second of these screws… Now I have a piece of the bit stuck in the screw head and a MacBook completely disassembled…
Same just happened to me a, but I could get the screw out with a small pair of pliers, and then remove the broken tip from it with some banging on the desk. Took me 5 min, but I wasn’t sure that it will work, so I was a bit nervous 😬
Eike R -
I bought the battery + "kit" pack here and it doesn't include p2 screws. wow.... it seems like you own people don't even know what tools is needed for this? wow... just wow...
I used P0.8 for my Mac 2018
I used P0.8 on my MacBook 2018
There is no P2 in the kit 😞
Pas de P2 dans le kit pour les 2 dernières vis, c’est inadmissible !!! Mon mac est en pièces et je ne peux pas finir !!! J’ai pourtant bien acheté le bon kit complet…
Bonjour @guillaumegerald, je suis désolée d'apprendre cela. Veuillez contacter notre service client au support@ifixit.com (pour la boutique américaine) ou au eustore@ifixit.com (pour la boutique européenne et française) en indiquant ce qui s'est passé et votre numéro de commande. Ce sera un plaisir de vous aider !
C'est possible qu'il y a un malentendu ? Je crois qu'on a seulement besoin du P2 pour les modèles 2018/2019 et il est inclut dans le kit pour ces modèles là : MacBook Pro 15" Retina (Mid 2018-2019) Battery. Par contre, il n'est pas inclut dans le kit pour les modèles plus vieux car pour ceux-ci, un Torx T5 suffirait ?
-
-
-
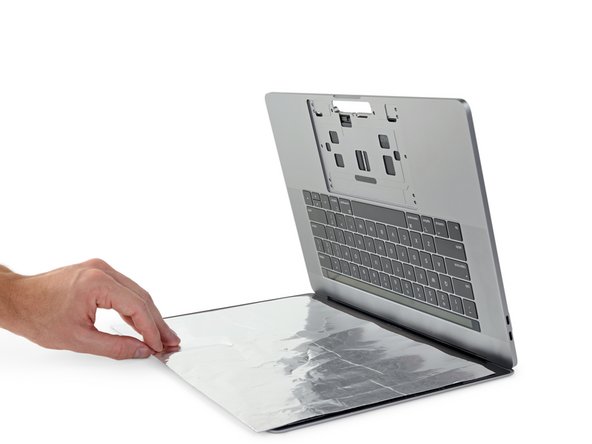
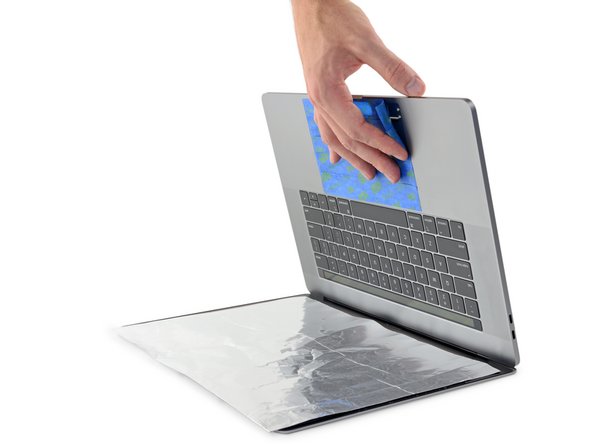
To protect your display, place a sheet of aluminum foil between the display and keyboard and leave it there while you work.
-
Additionally, use painter's tape to seal off the area under the trackpad as best you can. Optionally, you may also layer an absorbent towel directly underneath the trackpad area to soak up any excess adhesive remover.
I didn’t have any solution and was hesitant to simply use an Isopropyl Alcohol solution of any concentration let along subject my electronics to liquid and aluminum foil, so I simply took a card (something between a metrocard and credit card… i used a rewards card) and brute forced the adhesive while dry (making sure to direct the bulk of the force laterally and not down into the screen below and mostly wiggle back and forth instead of straight on). About 10 minutes later with a sore hand it worked just fine and avoided steps 52-62. (You may want to try the string method detailed in step 62 if stubborn and after started with card.
The alu foil and the paint tape make it much safer, use them!
Also removing battery with adhesive remover is quite dangerous (I don't like the idea of liquids around my MacBook insides) so you can do it slowly a carefully with just some plastic cards (like in step 57) putting below the batteries (I used my old credit cards to do this).
-
-
-
Now that your MacBook Pro is fully prepped, it's time to prep yourself.
-
Wear eye protection when handling and applying the adhesive remover. (Eye protection is included in your kit.)
-
Do not wear contact lenses without eye protection.
-
Protective gloves are also included in your kit. If you are concerned about possible skin irritation, put your gloves on now.
-
-
-
Pull off the black rubber stopper from your bottle of adhesive remover.
-
Use scissors to cut off the sealed tip of the applicator.
The latest Adhesive Remover arrives already with a tiny hole at the tip and the bottle cap and tip is now black instead of clear.
-
-
-
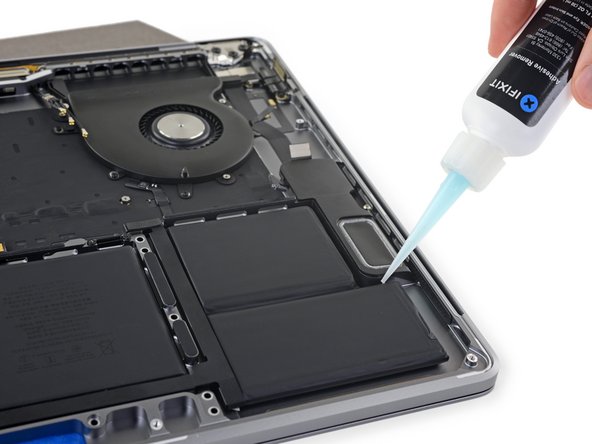
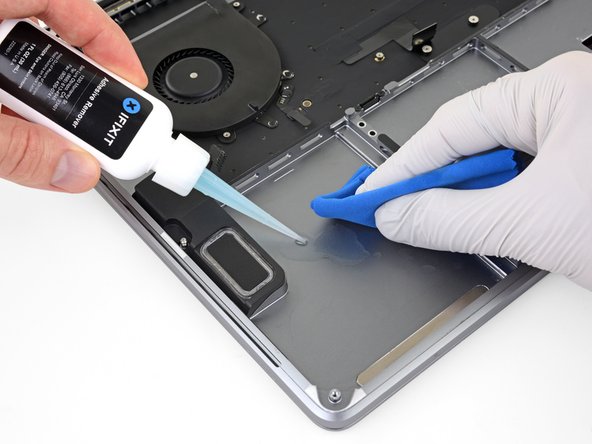
Apply a few drops of adhesive remover underneath the two battery cells on the right, starting along the edge nearest the fan.
The bottle may (will!) squirt liquid. I used a bit of absorbant paper around the tip while turning the bottle upside down and putting the tip where it needs to go. Be especially careful not to drip liquid onto the speakers.
For this type of work I always have a roll of thick toilet paper nearby: its leaves are smaller than those of kitchen paper.
-
-
-
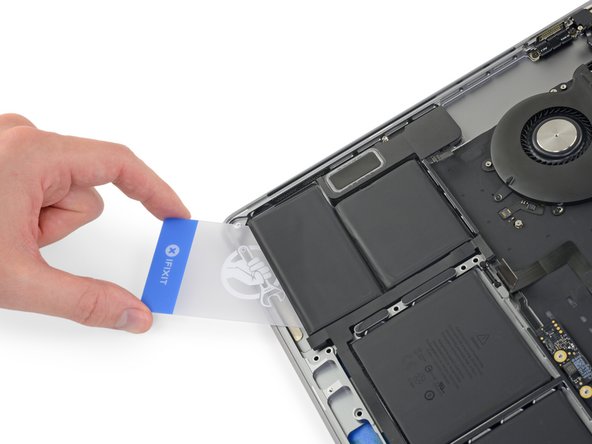
After a couple minutes, insert one corner of a plastic card underneath the battery, starting from the lower edge of the bottom, right-most cell.
-
Wiggle the card from side to side and slide it all the way underneath both battery cells.
-
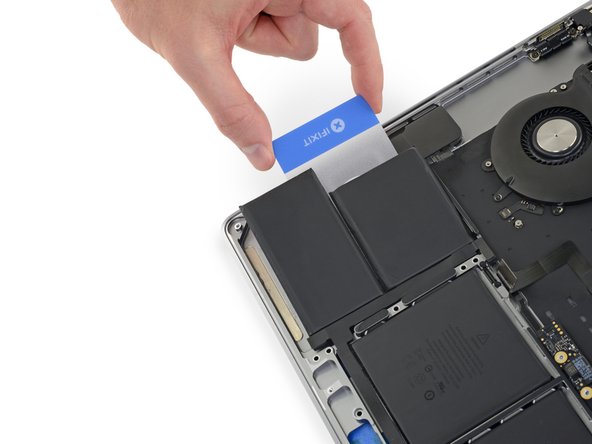
Lift the cells to fully separate the adhesive, but don't try to remove them from your MacBook yet.
-
Leave the plastic card temporarily underneath the cells to prevent the adhesive from re-bonding as you proceed to the next step.
I had a great deal of difficulty loosening the batteries. The solvent seemed to have little effect on the adhesive strips. Despite efforts, I deformed the batteries trying to get them free.
Took me three applications of adhesive remover. Think it really is about wiggling though.
It took me about 10 minutes or so to remove all battery modules. I used the adhesive remover as per the guide and also used the card with the corner doing most of the penetration instead of the blunt end. I also would gently wiggle the battery up and down while I applied more adhesive remover to allow it a better chance of getting underneath. BTW, my adhesive strips ran left to right and not back to front on the outer batteries, so I would think it would be more ideal to put the adhesive remover down the left and right sides of the outer batteries. The inner batteries (under trackpad) adhesive strips ran front to back. Keep this in mind when using the remover to loosen them up.
Once one of the packs is loose, stick a leaf of toilet paper under it, so that it cannot stick to the body again, while you are working on the other packs.
See my comment in Step 63. Might save you time and trouble. Putty knife to remove batteries, then hot dryer to get black strips off followed by de-solv-it (or the Ifix-it remover) to get off the adhesive junk.
I wanted to comment on what worked for me.
I did put some of the remover on like they showed.
I used the credit card plastic tool to kind of get underneath it.
Then I used plastic putty knife and slowly and carefully pried the batteries off. I take no responsibility here for you, but it worked for me. Also I used 99% isopropoyl to clean the adhesive off.
Also so you are probably reading this because it is hard, put the trackpad back like the other person said before you put the batteries in. I did that and it probably saved me time.
Also as you reassemble, make you go look at every connector and there are a bunch and make sure those leads are all coming up through the logic board. I don't want to tell you I thought I was done 2x when I found a small cable at the end I missed. If you do end up in that case, you can remove some of the screws, and use the curved tweezers to kind of snake the cable up top. I know you aren't there yet, but as someone ahead of you, you'll remember this tip.
The trick here was the use of a putty knife. As someone mentioned, the adhesive strips on mine also ran the direction of the width of the computer, not from the screen side down. Thus, putting the adhesive remover where the directions said only worked on the uppermost adhesive strip. The adhesive remover did nothing to help the process...
If you're very careful not to deform the packs, you can (ON THE SIDE PACKS ONLY) use the spudger to help gently push through stubborn adhesive. DO NOT use it on the middle packs though, because there are little squarish holes in the body that you could push the spudger through and end up gouging the hell out of your display. And then you'll be back here tomorrow praying there's a tut for that :)
-
-
-
Apply a few drops of adhesive remover along the top edges of the two center battery cells.
-
Be mindful of leaks, and apply more adhesive remover along the side edges if needed.
-
-
-
After a couple minutes, retrieve your first plastic card and insert one corner under the top edge of one of the center battery cells.
-
Wiggle it from side to side and slide it underneath the battery cell until all the adhesive separates.
Once you get the card edge under a cell, you can apply a couple of drops on top of the card and it will flow down to the working edge of the card. This will make moving the card back and forth a lot easier.
I'd consider looking at step 62 first.
-
-
-
If you had trouble getting the card underneath any of the battery cells, try working a piece of floss or wire underneath the battery cell and pull it side-to-side in a sawing motion to separate the adhesive.
Wouldnt the wire damage the underside of the cells?
Yes, but you should never re-use a glued-down battery after removing it like this. These batteries are not designed to be re-used, and can pose a fire risk even when removed carefully.
I used dental floss + pastic card for the middle part. Avoided using the adhesive remover for the middle ones.
I didn’t have to resort to this method, but if I did I would think some fishing line would be a good option. Put some candle wax on it if it starts to bind. I use this method to remove car dash phone holders that are siliconed down to the dash.
I used this method, (while waiting for the iFixIt glue dissolver kit: was over a weekend; so too late). Works well with a strong, doubled (with slight, about 1 turn per cm, twist) 25SWG (0.5mm, 0.02inch) copper wire, wrapped around spare small screwdriver handles. Ensure that the angle of the wire is _very_ _flat_ while ‘sawing’ slowly; take your time, quite a lot of force is required to sheer through the spongy pads in places. I started with the 2 larger central cells to refine the technique.
-
-
-
Lift and remove the battery.
-
Peel off any large strips of adhesive using tweezers or gloved fingers.
-
Scrape away any remaining chunks of adhesive with a plastic tool, and clean the underlying areas with adhesive remover or isopropyl alcohol. Wipe in one direction (not back and forth) until the chassis is clean and ready for your new battery.
Mine was very difficult to remove and clean. I spent forever trying to clean up the residue. However, I tried 70% isopropyl on two bays and the iFixit adhesive remover in the other two, and covered with food plastic wrap. Went to lunch and when I got back I used razor blade scraper (like used to remove stickers from glass), and it was pretty easily cleaned. Both chemicals worked just as well. Just soak and let the chemicals do the work.
I found the best way to do this was to put the hairdrier on the adhesive for a few seconds, then it just peeled off in one go. Wasted a lot of time trying to scratch them off before this.
SECOND THIS ADVICE!! Use a hairdryer it will save you a lot of time and the old adhesive will come off much, much cleaner
Yes, hairdryer and use the plastic card to push/scrape one end so you can grab it with your fingers, then peel off the adhesive strip.
Used a putty knife and removed the batteries, then hair dryer and removed the remaining black strips. Used De-Solv-it (my usual computer anti-glue) to get the gooey glue off. Went well and clean. New batteries in and reassembled.
By far the easiest way to remove the adhesive strips for me was to use tweezers. After removing the battery I had mostly large swaths of adhesive. first I used the tweezers, open, then laid it on an angle so the edge laid flat against the surface. Then scraped up side of the adhesive. I wedged up sufficient adhesive so that i could grab it angled (lengthwise not with the point) , Then i slowly pulled up the adhesive without a tear nearly every time, almost satisfying.
-
-
-
If your battery came with adhesive pre-installed on the bottom, flip it over and carefully peel away the liner to expose the adhesive. If your battery did not come with adhesive, apply a thin double-sided adhesive tape such as Tesa 61395 to keep your battery in place.
-
Carefully position the battery and set it into place.
-
Press and hold each cell firmly for 5-10 seconds to secure it to the lower case.
In this photo, the holes that are shown in Step 51, where it states, “2018-2019 models: Use a P2 Pentalobe driver to remove both 3.2 mm screws,” are in a different position, so that re-securing the battery board doesn’t seem possible.
Step 51 shows the correct procedure for two different models; this step shows only one model, because the procedure here works for both. Order the correct replacement battery for your model, and you’ll have no problem.
I strongly recommend re-installing the touchpad BEFORE installing the battery. Doing that and feeding the ribbon cable through the correct slot will ensure that you don’t block the path of the cable. I did not do this and had to cut some of the framing plastic away to give me just a bit more slack to be able to reconnect the cable.
After you have the touchpad back in, do a “dry” fit of the battery to make sure you see how the battery should go in so you don’t affect the ribbon cable. Then you can peel off the adhesive protection strips to secure the battery.
After reading this comment I went straight back to steps 19/20 and reversed them before installing the battery… will update if something is notable!
The version i got had the individual adhesives stuck to what look like tempered plastic that covered the whole battery. Removing the main plastic took off all adhesives at the same time. Its usefull to have another set of hands at this stage.
I had the same problem as others with the adhesive sticking harder to the plastic cover than to the batteries themselves. Another set of hands here would indeed be useful. This was actually the hardest step of the entire process as you cannot reposition the batteries once you set them down. Luckily it seems there is at least a little wiggle room in there. Make sure the power connection lines up with its screw holes as the number one priority.
I took off the top side full cover of plastic before sticking which meant all the individual cells were flopping about - leave it on until after sticking it down (as per the next step!).
Unsticking the packs is messy and dangerous since they may tear if too much force is applied, especially if swollen.
But do they need to be glued in?
The batteries should not move: in time that would damage the connections. Measuring carefully, the space between the unibody and its lower case is 8.2mm. The thinnest packs are 7.0mm: there is some room.
Instead of taking the protective sheets off the glue patches, I put bits of double-sided tape on top. The batteries are now easier to remove, but they cannot slide around.
However, after turning the machine upside up, they are in fact “hanging” from the “ceiling”! My office tape solution works, but the thinner packs might in time unstick and fall down.
It may be advisable to use the strong glue anyway, or else put some thermally conductive silicone sponge between them and the lower case.
The batteries are under the palms of your hands: they don’t get warm, leaving the protective sheets on should not have any effect. The unibody case there is 0.8mm thick.
Position the battery first with the back covers on it, to feel how it would fit in place (the battery logic board position is a good reference, and the relative distance to the two speakers). Only when you get a good feeling of the position, remove the adhesive covers and put it in place. SLOWLY, there are not many chances to pull it up again if you do it wrong!!
I pressed on the batteries for 5-10 seconds but they did not stay stuck after a few days.
The bettery didnt feet well and there are some part wich are a little bit left up uppon the unibody but there were no solution since the size didn t feet it is a problem ?
Looks like I have the new version too Tesa 61395 not needed?
-
-
-
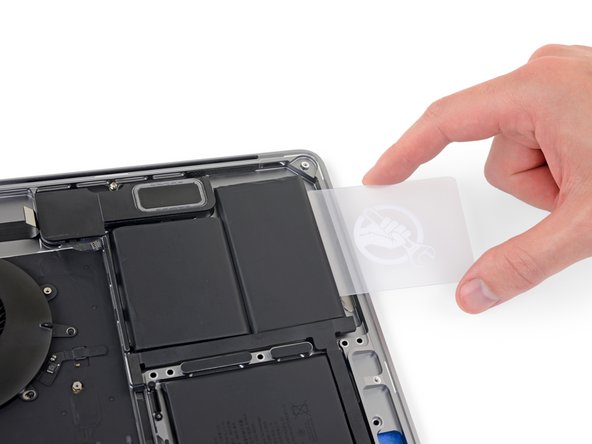
After your battery is properly positioned and installed, peel off and discard the clear plastic liner from the top.
-
Calibrate your newly installed battery: charge it to 100%, and keep charging it for at least 2 more hours. Unplug and use it normally to drain the battery. When you see the low battery warning, save your work, and keep your laptop on until it goes to sleep due to low battery. Wait at least 5 hours, then charge your laptop uninterrupted to 100%.
In order to not remove everything, I reduce the procedure in following only steps 1 to 18 (until trackpad cable is pushed away).
Then I removed the “low “ screws of step 46 in order to losen the fixation of “bottom” of the motherboard, as there is no room to remove the battery board and its ribbons).
Then I removed the two screws of the step 50 (battery board). To take off the glued battery, I used twine or thread (e.g. as shown here: https://www.youtube.com/watch?v=fupkPz55...) but not acetone nor diluant.
Then I lifted very carefully the bottom of the motherboard both to push away the battery board and its ribbons and to reinsert the new battery board and ribbons.
Then I proceed backward to remount (step 50, step 46 then step 18 to 1).
Note: my “old” battery was so inflated that the two screws of the lower case near the trackpad were difficult to remove (sometimes, this leads to a malfunctioning…
Thank to Jeff for this overall procedure which helps me a lot.
Did they change the step numbers? You mention step 46 and 50, but now it looks like these are steps 47 and 51.
strells -
Hi Strells, in the english or french version, it seems that it is always step 50 (two screws for battery) and 46 (“lower” screws for motherboard).
jompo -
As Jompo Discovered, I also concur: LB removal not necessary. “removed the “low “ screws of step 46 in order to losen the fixation of “bottom” of the motherboard, as there is no room to remove the battery board and its ribbons)”
Be careful, I removed all screws from LB & disconnected speakers as well. .
Thanks @jompo! Great tip... no, awesome tip! Worked like a charm for me, and saved a ton of work/mess. I've never done the solvent method on any of the batteries I've replaced with the help of iFixIt's excellent guides; I use a plastic card with a 'sharpened' edge to work the batteries loose. Way, way easier than having to take all the innards out (and risk breaking something) and using the solvent.
Another tip: the best tool for removing the remaining double-sided adhesive tape is a #11 Xacto blade; it's basically a super sharp tiny 'paint scraper' shape, and removes the tape remnants beautifully.
Also, quick note to the great folks behind iFixIt: I finally wised up and am buying all my batteries from you now. I learned my lesson about buying cheap knock-offs on Amazon that had to be replaced again in a year. No more; from now on, you get all my business!
Huge thanks all around!
jiclark -
Thanks a lot jompo! Your approach worked like a charm and saved a lot of time (and me potentially breaking something :D). The bit of lifting the motherboard up to take out the battery ribbon was a bit of a fiddle but in the end was worth it. The twine and thread approach definitely is less risker as we can avoid liquid damage from the use of the adhesive remover.
wow, this was awesome. thanks whoever wrote it. very well described.
I did the same a @jumbo . So, I’d be happy to rewrite this into a much shorter and less hazard format as @jumbo suggests which works perfectly and has many fewer steps and less risk of injury to the trackpad, motherboard and connected components. I did this in about an hour on my MacBook Pro late 2016.
Did you ever rewrite this @marcemarc ? I have to do this ASAP and would love to cut out as many steps as possible.
roopesh -
I didn’t rewrite it but basically stopped at step 19, and could get the batteries out without solvents or crazy efforts. Heat, slow working with a good spudger and they pop out.
One thing really important was I found my battery data connector on the motherboard had a loose connection. I had tried three different batteries and it wat the data cable connect on the motherboard. So, that was touch to figure out but it did solve the problem. Bottom line, be careful when disconnecting or manipulating the battery data cable latch.
Marc -
Plastic liner is not releasing from the battery cells. If I hold the foam pad in place the plastic sheet rips the foam.
Newer batteries have foam protection that needs to be removed. The blue tape between the foam and the battery peels off from the battery. https://i.imgur.com/NDwhyVO.jpg
Missing one critical helpful notation and photo on the reassembly part - a checklist of all the cables and connectors that need to be checked to make sure they are not caught under the motherboard. I missed the keyboard cable and it cost me half an hour. I checked off all the ones I could remember to make sure they were clear, but just missed that one. A photo with circles and a checklist would be a big help to make sure everything is clear. Otherwise, everything was very well done.
That’s in Step 49. Easy to miss, but it’s there! I feel your pain though, I’ve made that same mistake.
I think that was the same cable I missed… at the bottom by the battery connector. I mentioned it to ifixit to add a checklist as well…. Who is responsible for editing this guide? Do you know?
robert -
That happened to me, as well. I agree that the list is implied in the instructions (working in reverse during re-assembly), but I also missed the two small cables on the upper left (headphone and touch-id cables). I had almost everything re-assembled by the time I realized my mistake and had to pull everything back apart again to fix the issue. I think that was just me being eager to finish, thinking the hard part was done. (But kudos to the authors for these instructions - my laptop battery is now working great, and everything is functional!!!)
dot1000 -
OK well, followed the instructions to the word, & pleased to say my problem has now been resolved. So very many thanks for the fix kit & cracking easy to follow instructions. The MacBookPro lives to fight another day.
in knapp 3h habe ich den Akku gewechselt gehabt, passt auf die Unterlegscheiben vom Trackpad auf… die gehen schnell verloren und das Tastaturkabel vergisst man auch mal ganz schnell. Der Guide ist eine super Hilfe gewesen und ohne den hätte ich sicher das MBP noch nicht mal aufbekommen.
that’s what I thought :D But as others mentioned it can be reduced to a nice amount of steps. but anyway: I think producers should make their products waaaay easier to restore those parts like accumulator, ram, HD or even processor cores.. long live the good old desktop pc with motherboards as big and heavy as macbook airs from nowadays ;)
Great instructions I finally got my mac book back alive! I am noticing that the battery settings do not show that it is charging even though it is plugged in…tried resetting the SMC still nothing indicating it is charging…I have no idea if it is calibrating correctly. Has been plugged in for about 2 hours but only indicates a 30% charge
This guide worked very well for me. Triple-checked all the connectors when reassembling. I was able to get everything inside the machine cleaned up very well including the fans and the fan ports. Very well done!
Got through and it worked perfectly! Then I realized the up arrow key was no longer working :(
Ended up sending it to Apple for a free keyboard replacement since it’s the notorious butterfly keyboard problem.
Hopefully it will come back with the same battery and they won’t mind I replaced it.
Very good guide, I didn’t remove the whole mother board tho (A1707) but this is not my first time replacing a battery of macbook.
I used alcohol 96% to get the glue off the battery and a old card.
The way to do it if you don’t want to take apart the whole laptop is to follow this guide to step 23 and unscrew the mother board screws then start to take out the battery and slide the cable while holding up the motherboard.
I FixIt 😎
Ho acquistato il kit completo per il mio mbp 15" touchbar 2018.
Ho seguito la guida fino al punto 18, poi il 46 Ed il 50.
Non ho usato il solvente adesivo per staccare la vecchia batteria ma mi sono aiutato con la scheda in plastica e con un filo di rame sottile che facevo passare sotto le batterie, una alla volta. Mi sono anche aiutato con un phon per far ammorbidire il nastro adesivo originale sotto le batterie.
L’unica accortezza sta nello stare attenti quando si toglie e poi si inserisce la scheda della batteria sotto la scheda madre. Io ci son riuscito senza problemi.
Ora il mbp è in carica: sto seguendo i consigli di ifixit per la calibrazione della batteria.
Comunque una guida perfetta, in ogni minimo dettaglio. Se avete pazienza, dimestichezza, seguitela ed avrete una batteria nuova in circa 1,5h di lavoro.
Uh oh I did this and now the machine won’t turn on. When I open the lid it shows the battery level for a second then it disappears. No amount of key presses seems to work. Any ideas here? I assume I messed up the keyboard or some other connection?
Ah I fixed it. Double check step 31, that was my issue. The connector for the power button is right below another one.
Same. Thanks .
For sure we need every step so its clear. One misstep and its game over. Shouldnt there be a note or step to work backwards after battery is installed?
-


To reassemble your device, follow the above steps in reverse order.
Take your e-waste to an R2 or e-Stewards certified recycler.
Repair didn’t go as planned? Ask our Answers community for troubleshooting help.
To reassemble your device, follow the above steps in reverse order.
Take your e-waste to an R2 or e-Stewards certified recycler.
Repair didn’t go as planned? Ask our Answers community for troubleshooting help.
Cancelar: não concluí este guia.
74 outras pessoas executaram este guia.


39 comentários
Is this the same procedure for the 2017 MacBook pro 15” ?
Hi the Guide was very good.
Unfortunately In Austrailia i could not get the adhesive dissolver .
I was force to do it with plastic cards (Plastic Cards) and some plastic spludgers.
this worked well enough but also didn’t need to remove the logic board or speakers or anything else.
using some goooff (https://www.google.com/url?sa=t&rct=j&q=...) on a paper town was easy clean up.
reassembly was very easy and the whole process took a bit over a hour.
Note i have worked in electronic industry for a long time so possibly more experienced
Hi!
Can I use the device without battery? How to do it right? Please give an answer
Hi did you able to use the device without battery?
Sunjun -
Yes absolutely :) I have just removed the swollen battery from my MacBook pro 15 inches 2018 and running it on ac adapter now!
Sunjun -
Yes, you can. I am using my Macbook pro 15” 2018 without the battery. However, the processor clock speed is capped to 1.9GHz
Sunjun -
Hi! Thank you a lot for your work. Unfortunately, a camera doesn't work after a replaced battery. sudo killall VDCAssistant didn’t help. What else can I do?
I was able to use dental floss to “saw” through much of the adhesive without needing the adhesive solvent. Assertive prying and patience did the rest. It was a little gut-wrenching when I put it all back together and it wouldn’t power on. I even plugged it into the wall power, and it still wouldn’t come on. After about 20-30 seconds, a green battery indicator popped up on the screen, followed by the Apple boot logo. Whew! Great guide!
When will the battery be available?
Schade, dass nirgends die Batterie für ein Macbook Pro 2018 zu finden ist. Für einen Tipp wäre ich dankbar.
These instructions were fantastic. I was able to with ease replace the battery on my Macbook pro. I did buy the adhesive removal kit and the necessary screw drivers from ifixit where were absolutely necessary. Just be patient and don’t rush things and make sure to read all the instructions and understand them before doing anything.
Excellent guide!
I successfully replaced the battery in my 2018 15” MBP. This guide is fantastic! Some feedback:
1. Step 13 - The battery data cable is the most delicate part to remove. Be *very* careful. I removed it just fine but putting it back was tricky. I got it in but accidentally tore off part of the tab used to tug on when removing it. Luckily, this didn’t compromise the cable and things seem fine.
2. Step 22 - The 9 small metal washers in the trackpad assembly are ridiculously easy to lose. I was very careful, yet they fell out unnoticed on me twice. Luckily I found them each time - some stuck to the display, one in the hinge area, one floating around the trackpad, and one slight bent, having been caught between the trackpad assembly and case on reassembly. I was able to get the trackpad reinstalled with all washers on my third attempt.
3. When I first booted my MBP with the new battery, macOS (Big Sure) didn’t recognize the new battery. I had no Battery preference pane. A reboot fixed it up - luckily!
Fantastic guide! Thanks guys!
Some notes:
Don’t be stingy on the solvent. It needs A LOT MORE than two literal drops to melt the tape. Keep it going until you have 1/4 empty bottle. More makes ease.
While reattatching the lid, keep it lifted. The magnetic clips in the middle lock way too early.
When reconnecting the touchpad double check the allignment or you might end up with a missaligned pad that really !#^&@! you off (and reopen the back lid to correct ;)
When sticking the new battery, start pealing the protectors from the center out, no need to make it in one go and it will go smoother that way.
Great step by step instructions. Took me about 90 minutes to remove, clean, install new battery and re-assemble. My company just wanted to purchase another $3,000 laptop, but between disruption to work and cost, this was an amazing investment of time. I have now used your guides to fix iPhones, our 2 iMacs and now a 15” Pro. Keep up the amazing work iFixit!! Cheers!
Thank you so much for the detailed procedure. If anybody finds it helpful, nail polish remover works wonders at removing glue.
Hi,
replacement of the battery went great but since then I got a crackling right speaker. What could be the reason?
maybe when u open the case you accidentally hit the speaker with the bottom case and the membrane speaker ripped, it was happened to me too.
Great Guide!
The replacement of the battery went smooth, but even after over an hour of charging, the MBP still does not turn on.
No signs of life. Any troubleshooting tips?
(these machines are funny because there is no indicator light to show if it’s even charging)
yes same with me, until now, did the macbook turn on ?
I got through the entire installation of my replacement battery for my 2018 MacBook Pro and when I inserted the battery data cable into the battery terminal on the circuitboard that is attached to the battery, the terminal came off. I did not do this forcefully it was very gentle. It’s extremely frustrating having gone through this whole process that took three hours to have this happen on the last step.
Great kit and instructions. The vast majority of the time for me was getting the battery adhesive removed, particularly from the center batteries - the floss was a very useful tip. Took me about 2 hours, never done a repair like this before so I was a bit worried due to the difficult rating but it was quite straightforward.
I also did it.
Thanks a lot for such level of detail in this tutorial. It has been perfectly followed without any issue.
"Without any issue" : vale decír que desinstallar la vieja y reinstallar la nueva bateria fueron ambos exitosos ?
Gracias.
im so happy this worked for me, it was a big time commitment and a bit daunting , in the end success! thankyou for a well laid out guide.
Why did you remove the logic board at all? Doesn't seem like you need to? What am i missing?
It is actually long but not difficult. And I think the time is worth it to prevent potential damage during battery removal.
I just finished the process. The battery is in the calibration phase.
Thanks for this very clear and detailed tutorial! Everything went smoothly except for an incident with the microphone ZIF connector locking flap during reassembly (step 42, I left a comment with a link to instructions for the fix).
I see many questions about the reason for removing the logic board. In my opinion:
- This takes a little time, but this is not the most difficult part as it is only about screws and connectors.
- This is a reasonable time investment to protect the logic board from any accident that could happen during the battery removal process.
- This is a good opportunity to clean the computer from all the accumulated dust (It is incredible how much was in the cooling fans, my CPU will be thankful).
Thanks again.
A very detailed guide, thank you, it seamlessly worked.
What I would recommend to include in it:
1. make a very basic diagram of the laptop to print out. The users may want to mark the steps as per the guide and place physically on the chart the pieces - it helps a lot for re-assembly.
2. BEFORE you start, make a summary of the tools you will need and you actually have available. I had a missing P2 bit, that is needed at one of the last steps. It was good I had a different one, otherwise laptop would stay open until I find it
I opted to not do a the full tear-down.
The steps I skipped:
18 - No liquids. I used an old credit card to carefully separate the ribbon cable from the battery. I applied a very thin layer of common alcohol on the edge of the card.
24-40, 42-46, 48-50, 52-62 - skipped the full tear-down. Loosened the logic board by removing just its screws (Step 47).
That was enough to wiggle out the battery circuit board & cables out from the in between the logic board and case.
Alternative:
63 - I jumper ahead to this step. I started out with floss method, but it couldn't reach the deepest areas under the cells. I then used a credit card to loosen the deepest parts of the adhesive. Before inserting it under each cell, I applied a very thin layer of common alcohol on the edge of the card.
Needs more cautions:
20, 21 - Add warning about hidden washers that will spill out. They are easily lost. The mention at step 22 is too late in process! Could work over a white tray, if you don't have a magnetic surface.
Is this step necessary? I can’t perform this step as I am attempting to repair water damage and need to remove logic board & most likely replace the battery.
Macrepair SF - Responder
@mac_medic You definitely don’t want the power coming on while the board is wet. In your case, I think powering on the machine to disable Auto Boot would do more damage than it prevents. I agree, skip this step and be prepared to disconnect the battery quickly if the laptop automatically powers on. Good luck!
Jeff Suovanen -
Thats right! You don't want power running while working on your logic board.
Dan -
This did not work when running High Sierra.
Kyle B - Responder
Tried this on a 2018 MBP 13” Touchbar (there’s no iFixit guide for this model yet). Need to replace a broken screen.
Luckily I managed to connect to an external screen (Cmd-Down Brightness to switch displays) and enter above command. Seems to work, but there’s another problem with this model - it powers up as soon as any key is pressed……. ffs <gnashes teeth>
Cool_Breeze - Responder
I unscrew the battery first and wrap electrical tape over the logic board battery connector before attempting any repairs to the board. Haven’t had any problems yet and I’ve worked on about 10 of these models already. Also when you open the bottom case use a suction cup at the bottom and pull up then run a plastic spudger along the edges to disconnect the clips. Also only use a plastic spudger on the board. Saw a youtube video from a repair shop and he did not disconnect the power and used all metal tools during the entire process of removing the board. His last step was to disconnect the battery terminal.
Brian - Responder
Is this step necessary if my mac can turn on? Battery fully dead(
Nursat b - Responder
BEFORE YOU START: The included torx head stripped off before I was done (and you might need an additional T4) so stop now and go buy a good one. Also they fail to warn you above to get some blue threadlocker ahead of time.
Jason Sherron - Responder
This command did not work for me and I read that sometime in later 2020 Apple stopped this command from working…any ideas on a work around?
Patrick Machacek - Responder
Not able to do that with damaged screen
richardjgreen - Responder
If you have a damaged screen you can still use a converter from thunderbolt (USB 3) to HDMI and plug your Macbook Pro to your TV as monitor display. Just make sure to chose the right Source (HDMI IN) in your TV. I did it and to make it work I unplug and plug again in my Macbook and so I could disable the Auto boot
Roberto Sanchez Bustos -
Hi. This does not work on 2018 13” MacBook Pro with Touch Bar. I did exactly this to disable auto boot. But when I check by using nvram -p it says: auto-boot true. Am I doing something incorrectly? I did everything step by step. Copied and pasted the sudo command, pressed enter and then entered my password. I have Big Sur 11.1 installed. Is there any other way since I need to replace the screen. Thank you. Adrian
Adrian Vizik - Responder
Hi everyone. This is also a little pointless if you can’t see anything on the screen, and you don’t have a display adapter to USB C to display it. I agree with Brian about removing the back and disconnecting the battery cable before you even think about opening the lid of the MacBook. Applying the insulation tape is also a handy little tip that just makes sure there is no way to discharge from either the board or battery.
Roberto Enrieu - Responder
running `nvram -p | grep 'AutoBoot'` in terminal verifies that it was accepted
result: `AutoBoot %00`
Marek Polák - Responder
Running Big Sur 11.6.7 on a 2019 16" MBP, it's "auto-boot". So it's:
nvram -p | grep 'auto-boot'to display the current state, the default istrue- and then to change it,sudo nvram auto-boot=falsewhich turns it off.Ed Mechem -
This step is completely unnecessary if you follow the guide to disconnect the battery properly. Just put some tape between the battery and logic board connection to prevent it from accidentally touching and therefore powering on the laptop.
Grant Ormsby - Responder
It took me a few tries to make this command work, as I was able to copy and paste the command into Terminal, but could not type in my laptop’s password. I finally typed my password into a text document, copied it (command C), and then pasted it into Terminal and it worked.
tommy404 - Responder
I didn’t do this. Mine never auto-booted before I replaced the battery. Now it does.
hatuxka - Responder
BEFORE YOU DO ANYTHING - CHECK THE BATTERY!
I-fixit sent me a bad battery, which I didn’t realize until it was already install. They sent me a new one, but I wasted hours uninstalling and reinstalled.
Get a volt meter and measure the voltage on the output of the battery pack. If it reads 0 V, SEND IT BACK. It should read over 2 V.
bcardanha - Responder
I've just received my replacement battery and it reads 0,042V between the two main connectors. Do you think it's dead?
peter sussex -
When I did this from Terminal.app within Recovery Mode, the “sudo” was not recognized but I could invoke it without the sudo part. It seems to have been accepted when looking at “nvram -p”
johann beda - Responder
When in Recovery Mode, you already have superuser powers. So you don't need to prefix commands with the sudo command to invoke them with root privileges; you already have them. Do a
pwd(print working directory) after opening Terminal in Recovery Mode, and you'll see that you're in the root user's directory.Ed Mechem -
I received the battery kit for my 2018 MacBook Pro and as per the above comment from bcardanha - Oct 12, 2021, I checked the voltage on the pads marked + and - . It was zero volts so I panicked a bit.
I sent a message on the iFixiT Facebook page and I got no reply. I finally found the customer service email for Ifixit Europe and sent them an email voicing my concern as I was not keen to work for couple of hours just to discover that the battery is faulty. I had an almost instant reply on the email (kudos to them) and they adviced me to go ahead and install the new battery as the voltage measured when battery is not connected is not relevant.
I took a leap of faith and after two hours… the new battery showed 50% charge and everything seems to be working just fine. I am happy it worked.
Mircea Comanici - Responder
After removing the old battery and installing the new battery I powered up the MBP before screwing the bottom on. I discovered the my keyboard would not function. It took a few hours of investigation and frustration that I discovered the track pad power ribbon had become partially dislodged from the trackpad. I was able to see that this through the little machined slot where the battery sat. I had to remove the trackpad to reinsert the power ribbon back into the connector in the trackpad. after reassembling and reinstalling the battery etc the keyboard worked. Just food for thought if your run into the keyboard issue.
Ed Mease - Responder
This should be the default. IMO I tell you to power on - not the lid.
G Sena - Responder
Est ce que cela fonctionne sur un macbook pro 2017 sans touchbar ?
maël muzelet - Responder
Bonjour Maël, oui, ce tutoriel concerne "les MacBook Pro 2016 (et plus récents) et les MacBook Retina 12" 2017 (et plus récents)"
Claire Miesch -
Excellent instructions. I was able to follow and install the new screen. I recommend that you get a good set of tools before you begin. I started with an inexpensive repair kit bought online. The Penta and torx bits failed. I bought an IFIXIT kit with quality bits and I was able to do everything I needed.
Tom Markham - Responder
If you're not running an admin account the sudo command won't work (which honestly, you should not be running admin). Rather than logging in to your admin amount via the OS, in the terminal type "login [admin username]," then the password and you'll be able to do the sudo command as described above. Once you're complete, type "logout [admin username]" and you'll be good to go. Obviously replace [admin username] with whatever the account name for your admin user is.
arichard2401 - Responder
For those unable to complete this step because the screen is too damaged I recommend leaving your macbook on until the battery dies.
Nicholas R Licato - Responder
Just replaced my 2018 15" MBP battery. Running Sonoma.
I found no way to disable AutoBoot (The status can be checked in the Power section of system report).
Anyway, i left my battery completely drain before opening the MBP, and had no issues during the process.
Cédric Bontems - Responder
After sending this command in terminal when I checked what happens if I now open the lid, instead the screen lit slightly up (still black) then a battery symbol showing the charging state showed up.
Now, after replacement of the battery, this is all I get to see.
No reset of NVRAM nor PRAM helped.
Currently the new battery charges (58% atm) and it feels like it‘s mocking me.
webrockers - Responder
I suspected the keyboard or TouchID sensor wouldn’t work, so I went on and checked every connector.
I missed connecting the left TouchID sensor from step 31.
webrockers -