Ir para o conteúdo principal

MacBook Pro 15" Retina Display Mid 2012 Heat Sink Replacement

O que você precisa

  1. MacBook Pro 15" Retina Display Mid 2012 Heat Sink Replacement, Lower Case: passo 1, imagem 1 %32
    • Remove the following P5 pentalobe screws securing the lower case to the MacBook Pro:

    • Eight 3.0 mm

    • Two 2.3 mm

  2. MacBook Pro 15" Retina Display Mid 2012 Heat Sink Replacement: passo 2, imagem 1 %32
    • Lifting from the edge nearest the clutch cover, lift the lower case off the MacBook Pro.

    • Set the lower case aside.

  3. MacBook Pro 15" Retina Display Mid 2012 Heat Sink Replacement, Battery Connector: passo 3, imagem 1 %32
    • Peel back the warning label covering the battery connector.

  4. MacBook Pro 15" Retina Display Mid 2012 Heat Sink Replacement: passo 4, imagem 1 %32 MacBook Pro 15" Retina Display Mid 2012 Heat Sink Replacement: passo 4, imagem 2 %32
    • Using the flat end of a spudger, gently pry the battery connector straight up out of its socket on the logic board.

    • Bend the battery cables back and out of the way, ensuring that the battery connector doesn't accidentally make contact with the logic board.

  5. MacBook Pro 15" Retina Display Mid 2012 Heat Sink Replacement, Heat Sink: passo 5, imagem 1 %32 MacBook Pro 15" Retina Display Mid 2012 Heat Sink Replacement, Heat Sink: passo 5, imagem 2 %32 MacBook Pro 15" Retina Display Mid 2012 Heat Sink Replacement, Heat Sink: passo 5, imagem 3 %32
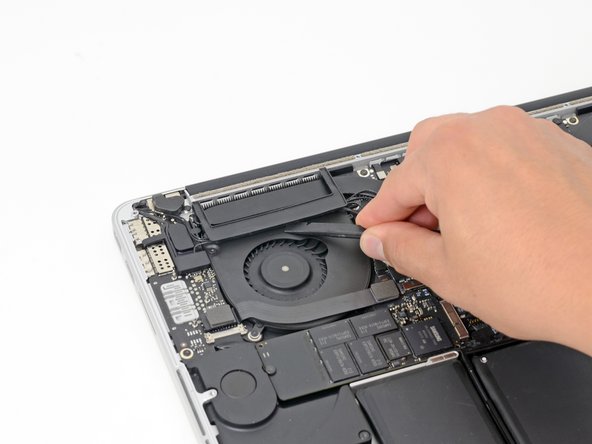
    • Insert the flat end of a spudger underneath the rubber heat sink cover on the right fan.

    • Slide the spudger underneath the length of the cover, releasing the adhesive.

    • Lift the cover and rotate it off of the heat sink.

  6. MacBook Pro 15" Retina Display Mid 2012 Heat Sink Replacement: passo 6, imagem 1 %32 MacBook Pro 15" Retina Display Mid 2012 Heat Sink Replacement: passo 6, imagem 2 %32 MacBook Pro 15" Retina Display Mid 2012 Heat Sink Replacement: passo 6, imagem 3 %32
    • In the same manner described above, release the adhesive and flip back the heat sink cover on the left fan.

  7. MacBook Pro 15" Retina Display Mid 2012 Heat Sink Replacement: passo 7, imagem 1 %32
    • Remove the following ten screws securing the heat sink to the logic board:

    • Two 2.4 mm T5 Torx screws

    • Six 3.4 mm T5 Torx screws

    • One 5.2 mm Raised Head T5 Torx screw

    • One 3.5 mm T5 Torx screw

    This step forgets two silver T5 screws, on either end of the heatpipe (highlighted in purple here) : http://i.imgur.com/zCNdb.jpg

    The one on the left is covered by a rubber cap which can be removed and put back easily.

    If those are not removed, the heatsink will NOT come off and you risk breaking something by applying unnecessary force to the heatsink or surrounding components.

    renaudbedard - Responder

    Some of the screws are stuck and i cant remove them, ive already tried using rubberbands, pliers and even super glue to fill in the holes, how do i remove them? The shape of the heads are barely showing, due to constant turning of the screwdriver.

    XxjustuwuxX - Responder

    yes, I had that problem on mine, too. One of the tiny 2,4 mm screws( red circles) was stripped, I couldnt get it out to renew the thermal paste under the heatpipe..

    I solved the problem by using a plier, I grabed the stripped screw on its sides and that unlocked it..

    Jamba - Responder

  8. MacBook Pro 15" Retina Display Mid 2012 Heat Sink Replacement: passo 8, imagem 1 %32
    • Grasping the heat sink from one side, lift the heat sink off of the MacBook Pro, pulling it free from the computer.

    • The thermal paste may make it difficult to remove the heat sink. Pull the heat sink off gently but forcefully to avoid damaging any components on the logic board.

    • When installing the new heat sink, do not forget to replace the thermal paste underneath the heat sink. See our Applying Thermal Paste guide for further instructions.

    If the black stickers surrounding the cpu and graphics card got damaged, is it safe to reinstall the heatsink without them?

    Osama Maddani - Responder

Conclusão

To reassemble your device, follow these instructions in reverse order.

40 outras pessoas executaram este guia.

Brett Hartt

Membro desde: 04/12/10

127.876 Reputação

Autoria de 143 guias

Equipe

iFixit Membro de iFixit

Staff

Membros da 135

Autoria de 16.732 guias

7 comentários

would doing this void the warranty?

sakada - Responder

Hello everybody!!! I tried to follow this guide... I removed the bottom case, no problem... but when it was the time to remove the upper 2.4mm T5 torn screw... it stripped and now i cannot remove it! How can i remove that screw?

And if this is not enough one of the 3mm pentalobe screw of the bottom stripped too! so what can i do?!? please help me!

Sorry for my bad english

Shaggot96 - Responder

I'm sorry to hear that! Try checking out this stripped screw guide and reading through this Answers post. Hope this helps with your repair!

Sam Goldheart -

I won't call this moderate but rather easy instead, seems like ifixit expect that easy is something you just unplug without even open the computer

Benjamin H - Responder

Where can I get new screws if I want to replace them?

Boro J. - Responder

where to buy 2.4 mm T5 torx screw for heat sink?

Yuriy Alquadaur - Responder

I am looking for them too. They are very tightly attached to the heatsink and very easy to strip.

Dhiru -

Adicione um comentário

Exibir estatísticas:

Últimas 24 horas: 1

Últimos 7 dias: 27

Últimos 30 dias: 128

Duração total: 40,332