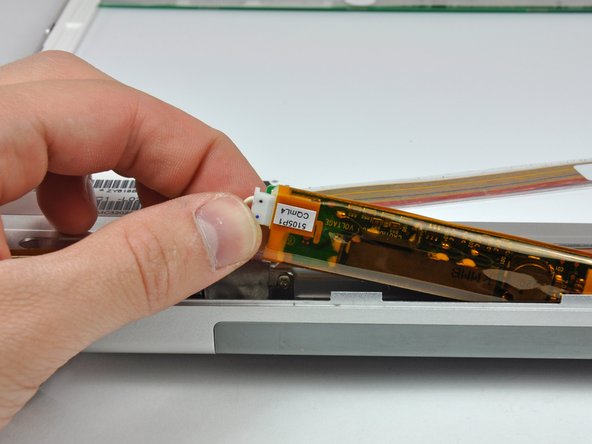
Ir para o conteúdo principal

MacBook Pro 15" Core 2 Duo Model A1211 Display Inverter Replacement

O que você precisa

  1. MacBook Pro 15" Core 2 Duo Model A1211 Display Inverter Replacement, Battery: passo 1, imagem 1 %32
    • Use your fingers to push both battery release tabs away from the battery, and lift the battery out of the computer.

  2. MacBook Pro 15" Core 2 Duo Model A1211 Display Inverter Replacement, RAM Shield: passo 2, imagem 1 %32
    • Remove the three identical Phillips screws from the memory door.

  3. MacBook Pro 15" Core 2 Duo Model A1211 Display Inverter Replacement: passo 3, imagem 1 %32
    • Lift the memory door up enough to get a grip on it, and slide it toward you, pulling it away from the casing.

  4. MacBook Pro 15" Core 2 Duo Model A1211 Display Inverter Replacement, Upper Case: passo 4, imagem 1 %32
    • Remove the two 2.8 mm Phillips screws in the battery compartment near the latch.

  5. MacBook Pro 15" Core 2 Duo Model A1211 Display Inverter Replacement: passo 5, imagem 1 %32
    • Remove the following 6 screws:

    • Two 10 mm T6 Torx screws on either side of the RAM slot.

    • Four 14.5 mm Phillips screws along the hinge.

  6. MacBook Pro 15" Core 2 Duo Model A1211 Display Inverter Replacement: passo 6, imagem 1 %32
    • Remove the four 3.2 mm Phillips screws on the port side of the computer.

  7. MacBook Pro 15" Core 2 Duo Model A1211 Display Inverter Replacement: passo 7, imagem 1 %32
    • Rotate the computer 90 degrees and remove the two 3.2 mm Phillips screws from the rear of the computer.

  8. MacBook Pro 15" Core 2 Duo Model A1211 Display Inverter Replacement: passo 8, imagem 1 %32
    • Rotate the computer 90 degrees again and remove the four 3.2 mm Phillips screws from the side of the computer.

  9. MacBook Pro 15" Core 2 Duo Model A1211 Display Inverter Replacement: passo 9, imagem 1 %32
    • Do not yank the upper case off quickly. The case is attached to the logic board via a ribbon cable.

    • Lift up at the rear of the case and work your fingers along the sides, freeing the case as you go. Once you have freed the sides, you may need to rock the case up and down to free the front of the upper case (there are some hidden plastic clips that need to be clicked off).

  10. MacBook Pro 15" Core 2 Duo Model A1211 Display Inverter Replacement: passo 10, imagem 1 %32
    • Disconnect the trackpad and keyboard ribbon cable from the logic board, removing tape as necessary.

    • Remove the upper case.

  11. MacBook Pro 15" Core 2 Duo Model A1211 Display Inverter Replacement, Display Assembly: passo 11, imagem 1 %32
    • Disconnect the three antenna cables attached to the Airport Extreme card.

    • Apple was kind enough to include a label showing where each color antenna cable plugs in - just make sure to look at this when reconnecting the antenna cables.

  12. MacBook Pro 15" Core 2 Duo Model A1211 Display Inverter Replacement: passo 12, imagem 1 %32
    • Deroute the Airport antenna cables from their channel in the left speaker.

  13. MacBook Pro 15" Core 2 Duo Model A1211 Display Inverter Replacement: passo 13, imagem 1 %32
    • Disconnect the iSight cable from the logic board by sliding the cable to the left and out of its connector.

  14. MacBook Pro 15" Core 2 Duo Model A1211 Display Inverter Replacement: passo 14, imagem 1 %32
    • Disconnect the inverter cable from the logic board by placing a spudger beneath the cable and lifting up.

  15. MacBook Pro 15" Core 2 Duo Model A1211 Display Inverter Replacement: passo 15, imagem 1 %32
    • Disconnect the display data cable from the logic board by pulling sideways.

  16. MacBook Pro 15" Core 2 Duo Model A1211 Display Inverter Replacement: passo 16, imagem 1 %32
    • Remove the silver T6 Torx securing the ground loop in the display data cable to the casing.

  17. MacBook Pro 15" Core 2 Duo Model A1211 Display Inverter Replacement: passo 17, imagem 1 %32
    • Support the display with one hand while removing the following 3 screws:

    • Two 9.5 mm silver T6 Torx screws with threads on only part of the shaft on the inside of the display hinges.

    • One 9.5 mm silver T6 Torx screw with threads on the entire shaft on the outside of the left hinge.

  18. MacBook Pro 15" Core 2 Duo Model A1211 Display Inverter Replacement: passo 18, imagem 1 %32
    • Grasp the display assembly on both sides and lift it up and out of the computer.

  19. MacBook Pro 15" Core 2 Duo Model A1211 Display Inverter Replacement, Rear Display Bezel: passo 19, imagem 1 %32 MacBook Pro 15" Core 2 Duo Model A1211 Display Inverter Replacement, Rear Display Bezel: passo 19, imagem 2 %32
    • Remove the two 5 mm Phillips screws from the lower left and right corners of the display (two screws total).

  20. MacBook Pro 15" Core 2 Duo Model A1211 Display Inverter Replacement: passo 20, imagem 1 %32 MacBook Pro 15" Core 2 Duo Model A1211 Display Inverter Replacement: passo 20, imagem 2 %32 MacBook Pro 15" Core 2 Duo Model A1211 Display Inverter Replacement: passo 20, imagem 3 %32
    • Insert the flat end of a spudger perpendicular to the face of the display between the plastic strip attached to the rear bezel and the front bezel.

    • Do not insert your spudger between the plastic strip and the rear bezel.

    • With the spudger still inserted, rotate it away from the display to separate the front and rear bezels.

    • Work along the left edge of the display until the rear bezel is evenly separated from the front bezel.

  21. MacBook Pro 15" Core 2 Duo Model A1211 Display Inverter Replacement: passo 21, imagem 1 %32 MacBook Pro 15" Core 2 Duo Model A1211 Display Inverter Replacement: passo 21, imagem 2 %32 MacBook Pro 15" Core 2 Duo Model A1211 Display Inverter Replacement: passo 21, imagem 3 %32
    • Insert the flat end of a spudger perpendicular to the face of the display between the plastic strip attached to the rear bezel and the front bezel.

    • With the spudger still inserted, rotate it away from the display to separate the front and rear bezels.

    • Work along the right edge of the display until the rear bezel is evenly separated from the front bezel.

  22. MacBook Pro 15" Core 2 Duo Model A1211 Display Inverter Replacement: passo 22, imagem 1 %32 MacBook Pro 15" Core 2 Duo Model A1211 Display Inverter Replacement: passo 22, imagem 2 %32 MacBook Pro 15" Core 2 Duo Model A1211 Display Inverter Replacement: passo 22, imagem 3 %32
    • Insert the flat end of a spudger between the front bezel and the plastic strip attached to the rear bezel near the screw holes at the bottom corners of the display.

    • Rotate your spudger toward the rear bezel to separate it from the front bezel.

    • If necessary, enlarge the gap between the lower edge of the rear bezel and the clutch cover until the two components are completely separated.

  23. MacBook Pro 15" Core 2 Duo Model A1211 Display Inverter Replacement: passo 23, imagem 1 %32
    • Lift the rear bezel by its bottom edge and rotate it away from the display assembly to separate the top edge.

    • Remove the rear display bezel from the display assembly.

  24. MacBook Pro 15" Core 2 Duo Model A1211 Display Inverter Replacement, Display Inverter: passo 24, imagem 1 %32
    • The display inverter is a very thin and delicate circuit board that is easily broken. Use caution when handling.

    • Carefully lift the inverter board out of the clutch cover.

  25. MacBook Pro 15" Core 2 Duo Model A1211 Display Inverter Replacement: passo 25, imagem 1 %32
    • Disconnect the LCD backlight from the inverter by pulling its connector away from the inverter board.

  26. MacBook Pro 15" Core 2 Duo Model A1211 Display Inverter Replacement: passo 26, imagem 1 %32
    • Be cautious to not put any strain on the inverter cable ground loop, as it is a very thin and delicate wire.

    • Disconnect the inverter cable by pulling its connector away from the socket on the inverter.

Conclusão

To reassemble your device, follow these instructions in reverse order.

19 outras pessoas executaram este guia.

0 comentários

Adicione um comentário

Exibir estatísticas:

Últimas 24 horas: 0

Últimos 7 dias: 1

Últimos 30 dias: 6

Duração total: 23,442