Esta versão pode conter edições incorretas. Mude para o último instantâneo verificado.
O que você precisa
-
-
Remova os 10 parafusos a seguir que fixam a estrutura inferior ao MacBook Pro 13" Monobloco:
-
Sete parafusos Phillips de 3 mm.
-
Três parafusos Phillips de 13,5 mm.
-
-
-
Levante ligeiramente a estrutura inferior e empurre-a em direção à parte traseira do computador para liberar as linguetas de montagem.
-
-
-
Remova os seguintes parafusos tri-point/tri-wing que prendem a bateria à estrutura superior:
-
Um parafuso tri-point de 5,5 mm.
-
Um parafuso tri-point de 13,5 mm.
-
-
-
-
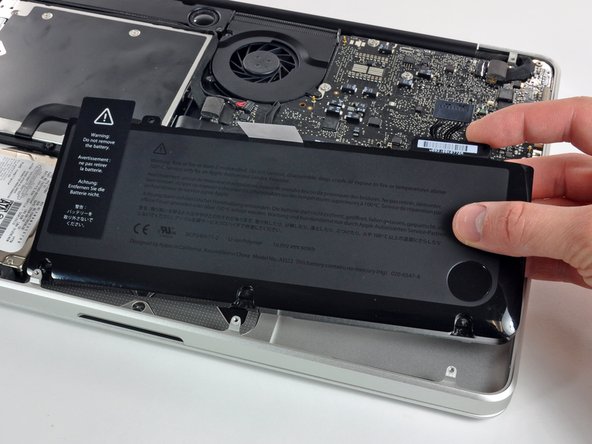
Retire a bateria da estrutura superior.
-
Carregue a 100% e deixe carregando-a por mais duas horas. A seguir, tire da tomada e use o aparelho normalmente até a bateria descarregar. Quando vir o aviso de bateria fraca, salve o trabalho e deixe o laptop ligado até ele entrar em modo espera (bateria fraca). Aguarde ao menos 5 horas e carregue o laptop ininterruptamente até 100%.
-
Se você notar algum comportamento incomum ou problemas após a instalação da nova bateria, talvez seja necessário redefinir o SMC do seu MacBook.
-
-
Este passo não foi traduzido. Ajude a traduzi-lo
-
Use the flat end of a spudger to carefully pry the trackpad connector up from its socket on the logic board.
-
-
Este passo não foi traduzido. Ajude a traduzi-lo
-
Open your MacBook Pro and set it on a table as shown.
-
-
Este passo não foi traduzido. Ajude a traduzi-lo
-
While holding the edge of the trackpad closest to the logic board with one hand, remove the four 1.2 mm Phillips screws highlighted in red.
-
-
Este passo não foi traduzido. Ajude a traduzi-lo
-
If necessary, carefully dislodge the edge of the trackpad closest to the keyboard from its recess in the upper case by pushing it away from the brackets attached to the upper case.
-
Carefully push the trackpad connector and cable down through the slot cut into the upper case.
-
It may be necessary to use a spudger to help get the trackpad connector past the edge of the logic board.
-
Once the cable has been completely pulled through its slot in the upper case, pull the trackpad away from the outer edge of the upper case and remove it from the machine.
-
-
Este passo não foi traduzido. Ajude a traduzi-lo
-
To remove the flex cable from the old trackpad, first flip open the latch on the ZIF connector, opposite the cable. Then, apply a little heat from a hair dryer or iOpener to soften the adhesive securing the cable to the trackpad, and carefully peel off and remove the cable.
-
-
Este passo não foi traduzido. Ajude a traduzi-lo
-
Next, reinstall the four 1.2 mm Phillips screws along the inner edge of the trackpad.
-
Check the alignment of the trackpad on the keyboard side of the upper case. Once you have centered the trackpad in the upper case, tighten the four Phillips screws all the way.
-


Cancelar: não concluí este guia.
149 outras pessoas executaram este guia.

10 comentários
Bought a new trackpad, installed it, fiddled with centering it, loosened the click adjuster screw and it would hardly click if I pressed real hard, just like the old trackpad. Problem solved by putting two 1/32" thick sticky pads under battery where the battery sits on the macbook frame near the lower bottom edge. The battery was new and not swollen but is was still too thick. Didn't need the new trackpad but now I have a spare.
The removal and installation went exactly as described, and the new trackpad worked correctly the first time. The toughest part - truly, not all that difficult - was manipulating the four screws that hold the trackpad in place. I don't think I've seen such small threaded fasteners since I went to a watch museum!
Would a swollen battery cause the track pad to seemingly pop out of the top of my 2010 MBP? Right side of trackpad is lifted the worst, top is slightly raised. The four corners and left side are seemingly flush with the rest of the computer. Trackpad works fine, other than no click...still has perfect movement.
That is indeed a common symptom of a swollen battery, you can pop the rear case off of your laptop and peek at the battery, and even take it out for a moment, if it looks swollen, you should probably replace it.