Esta versão pode conter edições incorretas. Mude para o último instantâneo verificado.
O que você precisa
-
-
Remova os 10 parafusos a seguir que fixam a estrutura inferior ao MacBook Pro 13" Monobloco:
-
Sete parafusos Phillips de 3 mm.
-
Três parafusos Phillips de 13,5 mm.
-
-
-
Levante ligeiramente a estrutura inferior e empurre-a em direção à parte traseira do computador para liberar as linguetas de montagem.
-
-
-
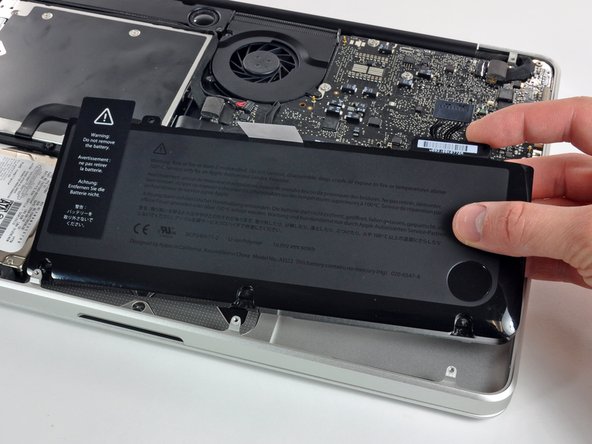
Remova os seguintes parafusos tri-point/tri-wing que prendem a bateria à estrutura superior:
-
Um parafuso tri-point de 5,5 mm.
-
Um parafuso tri-point de 13,5 mm.
-
-
-
-
Retire a bateria da estrutura superior.
-
Carregue a 100% e deixe carregando-a por mais duas horas. A seguir, tire da tomada e use o aparelho normalmente até a bateria descarregar. Quando vir o aviso de bateria fraca, salve o trabalho e deixe o laptop ligado até ele entrar em modo espera (bateria fraca). Aguarde ao menos 5 horas e carregue o laptop ininterruptamente até 100%.
-
Se você notar algum comportamento incomum ou problemas após a instalação da nova bateria, talvez seja necessário redefinir o SMC do seu MacBook.
-
-
Este passo não foi traduzido. Ajude a traduzi-lo
-
Use the flat end of a spudger to carefully pry the trackpad connector up from its socket on the logic board.
-
-
Este passo não foi traduzido. Ajude a traduzi-lo
-
Open your MacBook Pro and set it on a table as shown.
-
-
Este passo não foi traduzido. Ajude a traduzi-lo
-
While holding the edge of the trackpad closest to the logic board with one hand, remove the four 1.2 mm Phillips screws highlighted in red.
-
-
Este passo não foi traduzido. Ajude a traduzi-lo
-
If necessary, carefully dislodge the edge of the trackpad closest to the keyboard from its recess in the upper case by pushing it away from the brackets attached to the upper case.
-
Carefully push the trackpad connector and cable down through the slot cut into the upper case.
-
It may be necessary to use a spudger to help get the trackpad connector past the edge of the logic board.
-
Once the cable has been completely pulled through its slot in the upper case, pull the trackpad away from the outer edge of the upper case and remove it from the machine.
-
-
Este passo não foi traduzido. Ajude a traduzi-lo
-
To remove the flex cable from the old trackpad, first flip open the latch on the ZIF connector, opposite the cable. Then, apply a little heat from a hair dryer or iOpener to soften the adhesive securing the cable to the trackpad, and carefully peel off and remove the cable.
-
-
Este passo não foi traduzido. Ajude a traduzi-lo
-
Next, reinstall the four 1.2 mm Phillips screws along the inner edge of the trackpad.
-
Check the alignment of the trackpad on the keyboard side of the upper case. Once you have centered the trackpad in the upper case, tighten the four Phillips screws all the way.
-


Cancelar: não concluí este guia.
177 outras pessoas executaram este guia.

14 comentários
I replaced the trackpad and the new one had a strange behave: the arrow moves, the multi-touch works, but was not possible to click and when the arrow passes on the dock it doesn't react at all, then I plugged in an external mouse and the behave was the same (in few words it was impossible to use the computer).
Now I putted back the old trackpad and I work with the external mouse.
Did someone experienced something similar?
Did you solve in some way?
Thank you in advance.
Are you sure you pushed the cable in all the way
Hello,
I also had a similar problem. I was told to try to reset the SMC in this way:
1. Attach the MagSafe power cord
2. Power off the MacBook Pro
3. Press the L-Shift/Control/Option and Power button at the same time and hold.
4. Release them all at the same time
5. Then power on the MacBook Pro
but didn't work for me. Any other suggestion?
Anyone have trouble with the trackpad acting wonky after installation? Clicking well, but the right 1/3 side does not track properly. Cursor will start to go all over the place or stop. Also installed an Anker replacement battery as well, took off the foot pads as recommended. Just trying to figure out if it's software or hardware. (i.e. did I get a faulty replacement trackpad.).
Thanks!
Thanks for this very precise step-by-step guide! Good old MBP works fine again.
Cost: Track pad from China € 26, ifixit screwdriver set € 25 - compared to the Apple shop's cost estimate a real big deal!