Esta versão pode conter edições incorretas. Mude para o último instantâneo verificado.
O que você precisa
-
-
Ligue o Mac e abra o Terminal.
-
Copie e cole o seguinte comando (ou digite-o de forma exata) no Terminal:
-
sudo nvram AutoBoot=%00
-
Pressione [return]. Se solicitado, digite sua senha de administrador e pressione [return] novamente. ''Observação: sua tecla Return também pode se chamar ⏎ ou "enter".
-
sudo nvram AutoBoot=%03
-
-
Este passo não foi traduzido. Ajude a traduzi-lo
-
Use a P5 Pentalobe driver to remove the six screws securing the lower case:
-
Two 6.2 mm screws
-
Two 5.3 mm screws
-
Two 3.4 mm screws
-
-
Este passo não foi traduzido. Ajude a traduzi-lo
-
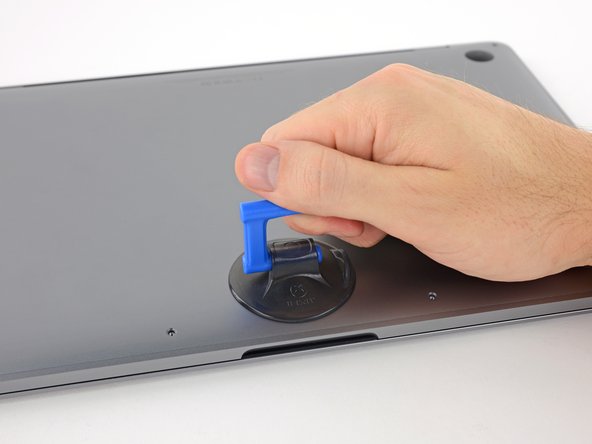
Apply a suction handle to the lower case near the front-center area of the MacBook Pro.
-
Lift the suction handle to create a slight separation between the lower case and the chassis.
-
-
Este passo não foi traduzido. Ajude a traduzi-lo
-
Insert one corner of an opening pick into the space between the lower case and the chassis.
-
Slide the opening pick around the nearest corner and halfway up the side of the case.
-
-
Este passo não foi traduzido. Ajude a traduzi-lo
-
Repeat the previous step on the opposite side, sliding your opening pick under the lower case and up the side to pop the second clip free.
-
-
Este passo não foi traduzido. Ajude a traduzi-lo
-
Insert your opening pick once again under the front edge of the lower case, near one of the two centermost screw holes.
-
Give the pick a firm twist to pop free the third clip securing the lower case to the chassis.
-
Repeat this procedure near the other of the two centermost screw holes, popping the fourth clip free.
-
-
Este passo não foi traduzido. Ajude a traduzi-lo
-
Pull the lower case firmly towards the front of the MacBook (away from the hinge area) to separate the last of the clips securing the lower case.
-
-
Este passo não foi traduzido. Ajude a traduzi-lo
-
Remove the lower case.
-
Set it in place and align the sliding clips near the display hinge. Press down and slide the cover toward the hinge. It should stop sliding as the clips engage.
-
When the sliding clips are fully engaged and the lower case looks correctly aligned, press down firmly on the lower case to engage the four hidden clips underneath. You should feel and hear them snap into place.
-
-
-
Este passo não foi traduzido. Ajude a traduzi-lo
-
Carefully peel up the large piece of tape covering the battery connector, on the edge of the logic board nearest the battery.
-
Remove the tape.
-
-
Este passo não foi traduzido. Ajude a traduzi-lo
-
Gently peel back the small piece of tape covering the battery board data cable connector.
-
-
Este passo não foi traduzido. Ajude a traduzi-lo
-
Use the tip of a spudger to flip up the small black locking tab securing the cable in its connector.
-
-
Este passo não foi traduzido. Ajude a traduzi-lo
-
Disconnect the battery board data cable by sliding it out from its socket.
-
Slide parallel to the logic board, in the direction of the cable.
-
-
Este passo não foi traduzido. Ajude a traduzi-lo
-
Fold the battery board data cable back and out of the way.
-
-
Este passo não foi traduzido. Ajude a traduzi-lo
-
Use a T5 Torx driver to remove the 3.7 mm pancake screw securing the battery power connector.
-
-
Este passo não foi traduzido. Ajude a traduzi-lo
-
Use a spudger to gently lift the battery power connector, disconnecting the battery.
-
Lift the connector high enough so that it stays separated from its socket.
-
-
Este passo não foi traduzido. Ajude a traduzi-lo
-
Use a T5 Torx driver to remove the two 1.9 mm screws securing the trackpad cable connector bracket.
-
-
Este passo não foi traduzido. Ajude a traduzi-lo
-
Use a spudger to disconnect the trackpad ribbon cable by gently prying its connector straight up from the logic board.
-
-
Este passo não foi traduzido. Ajude a traduzi-lo
-
Prepare an iOpener and lay it on top of the trackpad ribbon cable for about a minute, in order to soften the adhesive securing the trackpad ribbon cable to the top of the battery.
-
If you don't have an iOpener, use a hair dryer to warm up the cable instead. The cable should be warm, but not too hot to touch. Be careful not to overheat the battery.
-
-
Este passo não foi traduzido. Ajude a traduzi-lo
-
Carefully peel the trackpad ribbon cable up off the battery, and push it out of the way.
-
-
Este passo não foi traduzido. Ajude a traduzi-lo
-
Use a T5 Torx driver to remove the ten screws securing the trackpad assembly:
-
Two 4.3 mm screws
-
Eight 5.8 mm screws
-
-
Este passo não foi traduzido. Ajude a traduzi-lo
-
Remove the trackpad assembly.
-
Be sure not to lose the six small washers (two circular and four rectangular) resting on the underside of the trackpad.
-


Cancelar: não concluí este guia.
3 outras pessoas executaram este guia.


Um comentário
hello, I replace both the pad and the flex cable but problem is not fix. any idea? the keyboard works fine, could it be a logic board issue? please help thanks!