Esta versão pode conter edições incorretas. Mude para o último instantâneo verificado.
O que você precisa
-
-
Ligue o Mac e abra o Terminal.
-
Copie e cole o seguinte comando (ou digite-o de forma exata) no Terminal:
-
sudo nvram AutoBoot=%00
-
Pressione [return]. Se solicitado, digite sua senha de administrador e pressione [return] novamente. ''Observação: sua tecla Return também pode se chamar ⏎ ou "enter".
-
sudo nvram AutoBoot=%03
-
-
Este passo não foi traduzido. Ajude a traduzi-lo
-
Use a P5 Pentalobe driver to remove the six screws securing the lower case:
-
Two 6.2 mm screws
-
Two 5.3 mm screws
-
Two 3.4 mm screws
-
-
Este passo não foi traduzido. Ajude a traduzi-lo
-
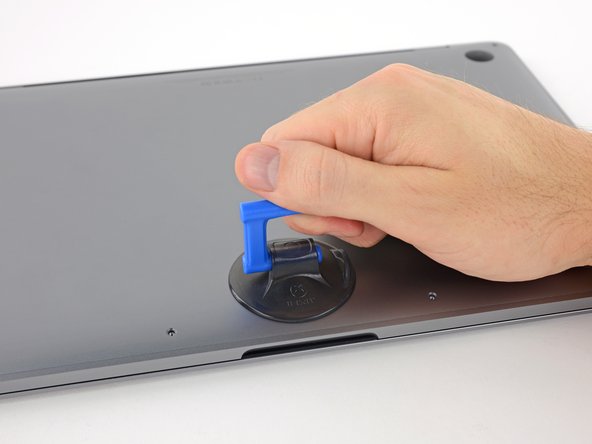
Apply a suction handle to the lower case near the front-center area of the MacBook Pro.
-
Lift the suction handle to create a slight separation between the lower case and the chassis.
-
-
-
Este passo não foi traduzido. Ajude a traduzi-lo
-
Insert one corner of an opening pick into the space between the lower case and the chassis.
-
Slide the opening pick around the nearest corner and halfway up the side of the case.
-
-
Este passo não foi traduzido. Ajude a traduzi-lo
-
Repeat the previous step on the opposite side, sliding your opening pick under the lower case and up the side to pop the second clip free.
-
-
Este passo não foi traduzido. Ajude a traduzi-lo
-
Insert your opening pick once again under the front edge of the lower case, near one of the two centermost screw holes.
-
Give the pick a firm twist to pop free the third clip securing the lower case to the chassis.
-
Repeat this procedure near the other of the two centermost screw holes, popping the fourth clip free.
-
-
Este passo não foi traduzido. Ajude a traduzi-lo
-
Pull the lower case firmly towards the front of the MacBook (away from the hinge area) to separate the last of the clips securing the lower case.
-
-
Este passo não foi traduzido. Ajude a traduzi-lo
-
Remove the lower case.
-
Set it in place and align the sliding clips near the display hinge. Press down and slide the cover toward the hinge. It should stop sliding as the clips engage.
-
When the sliding clips are fully engaged and the lower case looks correctly aligned, press down firmly on the lower case to engage the four hidden clips underneath. You should feel and hear them snap into place.
-


Cancelar: não concluí este guia.
12 outras pessoas executaram este guia.

