Esta versão pode conter edições incorretas. Mude para o último instantâneo verificado.
O que você precisa
-
Este passo não foi traduzido. Ajude a traduzi-lo
-
Remove the following ten screws securing the lower case to the upper case:
-
Two 2.3 mm P5 Pentalobe screws
-
Eight 3.0 mm P5 Pentalobe screws
-
-
Este passo não foi traduzido. Ajude a traduzi-lo
-
Wedge your fingers between the upper case and the lower case.
-
Gently pull the lower case away from the upper case.
-
Remove the lower case and set it aside.
-
-
Este passo não foi traduzido. Ajude a traduzi-lo
-
The lower case is connected to the upper case at the center, with two plastic clips.
-
-
Este passo não foi traduzido. Ajude a traduzi-lo
-
Remove the plastic cover adhered to the battery contact board.
-
-
Este passo não foi traduzido. Ajude a traduzi-lo
-
Remove the following screws securing the battery connector board to the logic board:
-
Two 2.8 mm T6 Torx screws
-
One 7.0 mm T6 Torx shouldered screw
-
-
Este passo não foi traduzido. Ajude a traduzi-lo
-
Use tweezers to remove the small plastic cover located near the bottom right of the battery connector board.
-
-
Este passo não foi traduzido. Ajude a traduzi-lo
-
Remove the wide head 6.4 mm T6 Torx screw securing the battery connector to the logic board assembly.
-
-
Este passo não foi traduzido. Ajude a traduzi-lo
-
Carefully lift the battery connector board up off the logic board.
-
It is recommended to bend the battery cables just slightly, to keep the board suspended up above the logic board and out of the way.
-
-
Este passo não foi traduzido. Ajude a traduzi-lo
-
Grasp the Interposer with tweezers.
-
Lift the Interposer off the logic board and remove it.
-
-
Este passo não foi traduzido. Ajude a traduzi-lo
-
Use the flat end of a spudger to pry the right side of the I/O board data cable connector up off its socket on the I/O board.
-
-
Este passo não foi traduzido. Ajude a traduzi-lo
-
Wedge the flat end of a spudger beneath the left side of the I/O board data cable connector.
-
Gently twist the spudger to disconnect the I/O board data cable connector from its socket on the logic board.
-
-
Este passo não foi traduzido. Ajude a traduzi-lo
-
Lift and remove the I/O board data cable from the MacBook Pro.
-
-
-
Este passo não foi traduzido. Ajude a traduzi-lo
-
Use the flat end of a spudger to pry the SSD cable connector up from its socket on the logic board.
-
Move the SSD cable connector out of the way.
-
-
Este passo não foi traduzido. Ajude a traduzi-lo
-
Wedge the pointed end of a spudger beneath the right speaker cable connector.
-
Gently pry the right speaker cable connector up off from its socket on the logic board.
-
-
Este passo não foi traduzido. Ajude a traduzi-lo
-
Use a T5 Torx driver to remove the following screws securing the right speaker to the upper case:
-
One black 6.8 mm screw
-
One silver 6.3 mm screw
-
One black 4.9 mm screw
-
-
Este passo não foi traduzido. Ajude a traduzi-lo
-
Lift and remove the right speaker out of the upper case.
-
-
Este passo não foi traduzido. Ajude a traduzi-lo
-
Use the flat end of a spudger to pry the headphone jack cable connector straight up off its socket on the logic board.
-
-
Este passo não foi traduzido. Ajude a traduzi-lo
-
Wedge the tip of a spudger beneath the left speaker cable connector.
-
Gently pry the left speaker cable connector up off from its socket on the logic board.
-
-
Este passo não foi traduzido. Ajude a traduzi-lo
-
Use a T5 Torx driver to remove the following screws securing the left speaker to the upper case:
-
One black 6.8 mm screw
-
One silver 6.3 mm screw
-
One black 4.9 mm screw
-
-
Este passo não foi traduzido. Ajude a traduzi-lo
-
Lift and remove the left speaker out of the upper case.
-
-
Este passo não foi traduzido. Ajude a traduzi-lo
-
Use your thumb or finger to bend the plastic spring bar on the SSD tray, freeing the two clips at the front side of the device.
-
While holding the spring bar depressed, tilt the SSD assembly up out of its cavity.
-
-
Este passo não foi traduzido. Ajude a traduzi-lo
-
Remove three 2.2 mm T5 Torx screws from each side of the battery (six screws total).
-
-
Este passo não foi traduzido. Ajude a traduzi-lo
-
To protect your display, place a sheet of aluminum foil between the display and keyboard and leave it there while you work.
-
-
Este passo não foi traduzido. Ajude a traduzi-lo
-
Now that your MacBook Pro is fully prepped, it's time to prep yourself.
-
Wear eye protection when handling and applying the adhesive remover. (Eye protection is included in your kit.)
-
Do not wear contact lenses without eye protection.
-
Protective gloves are also included in your kit. If you are concerned about skin irritation, put your gloves on now.
-
-
Este passo não foi traduzido. Ajude a traduzi-lo
-
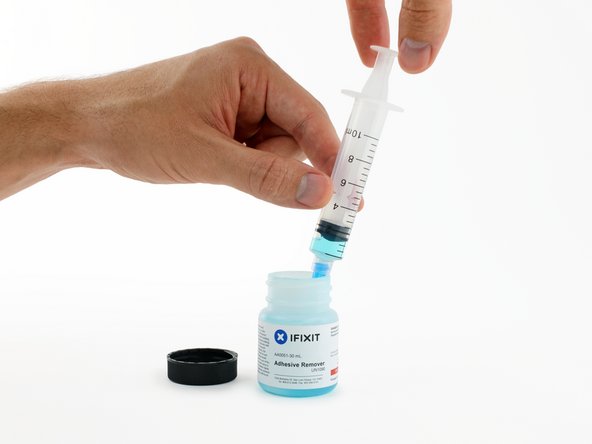
Open your container of adhesive remover.
-
Fill the syringe included in your kit with a small amount (approximately 1-2 milliliters) of adhesive remover.
-
Refill your syringe as needed throughout the rest of this procedure.
-
-
Este passo não foi traduzido. Ajude a traduzi-lo
-
Apply a small amount of adhesive remover (approximately 1 ml) evenly under the edge of the leftmost battery cell.
-
Wait 2-3 minutes for the liquid adhesive remover to penetrate underneath the battery cell before you proceed to the next step.
-
-
Este passo não foi traduzido. Ajude a traduzi-lo
-
Insert the flat edge of a spudger or plastic card underneath the leftmost battery cell.
-
Run your tool along the bottom perimeter of the battery cell and lift to begin separating the adhesive.
-
-
Este passo não foi traduzido. Ajude a traduzi-lo
-
Insert the spudger along the left-hand side of the leftmost battery cell.
-
Run the spudger up along the left side of the leftmost battery cell.
-
Slightly pry the leftmost battery cell to release it from the adhesive.
-
-
Este passo não foi traduzido. Ajude a traduzi-lo
-
Repeat the above steps to separate the adjacent battery cell from its adhesive:
-
Apply a small amount (about 1 ml) of liquid adhesive remover under the battery cell.
-
Wait 2-3 minutes for the adhesive remover to penetrate and soften the adhesive.
-
Carefully wedge a spudger or plastic card inwards, being careful to not damage the battery, and separate the battery cell from the adhesive securing it to your MacBook Pro.
-
-
Este passo não foi traduzido. Ajude a traduzi-lo
-
Insert the flat end of a spudger underneath the larger leftmost battery cell.
-
Carefully wedge the spudger inwards, being careful to not damage the battery cells.
-
Pry the larger leftmost battery cell up off the upper case.
-
-
Este passo não foi traduzido. Ajude a traduzi-lo
-
Grasp the battery cells and gently move (but do not remove) them from their recess in the upper case.
-
Leave the battery cells resting on top of the upper case as shown in the third picture.
-
-
Este passo não foi traduzido. Ajude a traduzi-lo
-
Switch sides and repeat the above procedure for the two battery cells on the right-hand side of the MacBook Pro.
-
Remember to add about 1 ml of liquid adhesive remover under each battery cell, and wait 2-3 minutes for it to penetrate before prying up the cell.
-
-
Este passo não foi traduzido. Ajude a traduzi-lo
-
Lift the battery as a whole up out of the upper case, and remove the battery.
-
With a little luck, you can slowly pull out each strip of adhesive with your fingers.
-
Otherwise, soak each section of adhesive with a bit of adhesive remover for 2-3 minutes, and then scrape it out with an opening pick or one of the other tools in your kit. This can take quite a bit of work, so be patient.
-
Mop up any remaining adhesive remover and give your MacBook Pro a few minutes to air dry.
-
Calibrate your new battery before using it: allow it to drain overnight, then charge it to 100% and drain it again until your MacBook Pro shuts down automatically. Charge it again and use it normally.
-


Cancelar: não concluí este guia.
Uma outra pessoa concluiu este guia.
