Esta tradução pode não refletir as atualizações mais recentes do guia de fontes. Ajude a atualizar a tradução ou veja guia de fontes.
Introdução
Diese Anleitung zeigt, wie man das Kabel der Festplatte austauscht oder spannt, wenn es locker ist.
O que você precisa
-
-
Entferne die folgenden 10 Kreuzschlitz-Schrauben, die die Gehäuse-Unterseite des MacBook Pro 13" Unibody befestigen:
-
Sieben 3 mm Schrauben.
-
Drei 13,5 mm Schrauben.
-
-
-
Hebe die Unterseite vorsichtig an und drücke sie Richtung Rückseite des Laptops, um die Halterungsclips zu lösen.
-
-
-
Löse mit der Kante eines Spudgers den Akkuanschluss nach oben, weg vom Sockel auf dem Logic Board.
-
-
-
Entferne die beiden Kreuzschlitzschrauben, die die Halteklammer der Festplatte am oberen Gehäuseteil sichern.
-
-
-
-
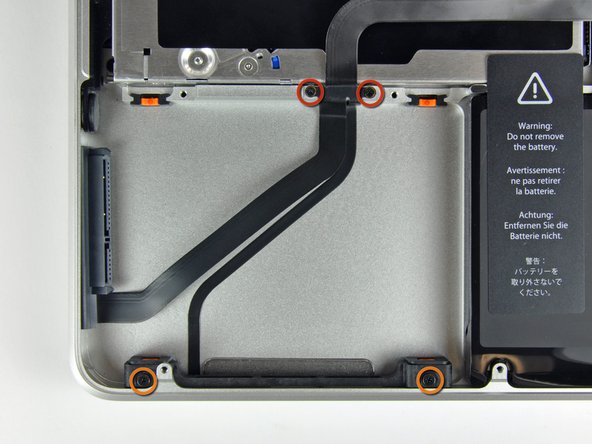
Entferne die folgenden vier Schrauben, mit denen die Festplatte und das IR-Sensorkabel am oberen Gehäuse befestigt sind:
-
Zwei 1,5 mm Kreuzschlitzschrauben
-
Zwei 9,5 mm Kreuzschlitzschrauben
-


Folge dieser Anleitung in umgekehrter Reihenfolge, um dein Gerät wieder zusammenzubauen.
Folge dieser Anleitung in umgekehrter Reihenfolge, um dein Gerät wieder zusammenzubauen.
Cancelar: não concluí este guia.
292 outras pessoas executaram este guia.
Um agradecimento especial a esses tradutores:
87%


Estes tradutores estão nos ajudando a consertar o mundo! Quer contribuir?
Comece a traduzir ›

7 comentários
Used a Phillips #00 and a creditcard. It's an easy job, takes about 10 minutes. :)
In step #8 the two small screws were very tight in my computer. The Phillips #00 was too large and damaging the screws. I changed to a Phillips #000 applied substantial pressure and voila, the screws came off.
Reassembly: placing the IR sensor cable (the one you"peeled off" in step #9) is a bit tricky. Start from the side opposite the IR sensor (the side with the two small screws of step 8) and press first along the short vertical side and then across towards the IR section. There should be a little left for a vertical section at the IR sensor end.
if i change the HDD cable and get the same results what could be the the real problem , because the original problem as we all know was the we were getting the question mark on the white screen .