Ir para o conteúdo principal

Esta versão pode conter edições incorretas. Mude para o último instantâneo verificado.

O que você precisa

  1. , Estrutura inferior: passo 1, imagem 1 %32
    Ferramenta utilizada nesse passo:
    P5 Pentalobe Screwdriver Retina MacBook Pro and Air
    $5.99
    Comprar
    • Antes de continuar, desligue o dispositivo, feche a tampa e coloque-o em uma superfície macia com a parte superior voltada para baixo.

    • Remova os dez parafusos a seguir:

    • Dois parafusos Pentalobe de 5 pontas de 9 mm

    • Oito parafusos Pentalobe de 5 pontas de 2,6 mm

    • A chave especial necessária para remover os oito parafusos Pentalobe de 5 pontas pode ser encontrada aqui.

  2. : passo 2, imagem 1 %32
    • Coloque seus dedos entre a tela e a estrutura inferior e puxe para cima para retirar a estrutura inferior do Air.

    • Remova a estrutura inferior e reserve-a.

  3. Este passo não foi traduzido. Ajude a traduzi-lo

    : passo 3, imagem 1 %32
    • For precautionary purposes, we advise that you disconnect the battery connector from the logic board to avoid any electrical discharge. This step is optional and is not required.

    • Grab the clear plastic pull tab attached to the battery connector and pull it toward the front edge of the Air to disconnect the battery from the logic board.

    • Do not lift upward on the connector as you disconnect it.

  4. Este passo não foi traduzido. Ajude a traduzi-lo

    : passo 4, imagem 1 %32
    • Use the flat end of a spudger to pry the I/O board cable connector upward out of its socket on the I/O board.

  5. Este passo não foi traduzido. Ajude a traduzi-lo

    : passo 5, imagem 1 %32 : passo 5, imagem 2 %32
    • The following connector has an especially deep socket. Use care when disconnecting it.

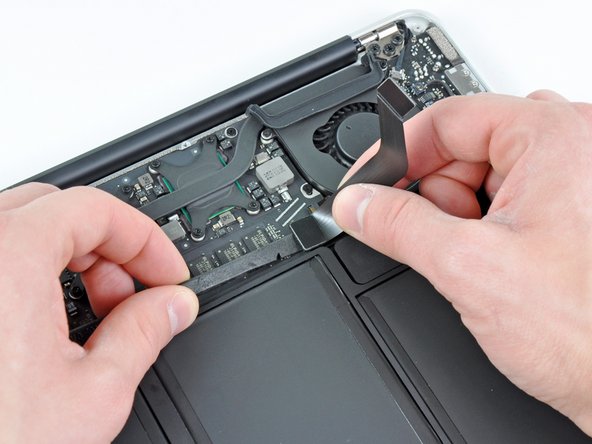
    • Carefully peel the I/O board cable from the top of the fan.

    • While gently pulling the I/O board cable upward near its connection to the logic board, use the tip of a spudger to pry upward on alternating sides of the connector to help "walk" it out of its socket.

    • Remove the I/O board cable.

Linha de Chegada

3 outras pessoas executaram este guia.

0 comentários

Adicione um comentário

Exibir estatísticas:

Últimas 24 horas: 3

Últimos 7 dias: 10

Últimos 30 dias: 21

Duração total: 6,842