Ir para o conteúdo principal

Likebook Muses Motherboard Replacement

O que você precisa

  1. Cuidado: as etapas de 1 a 5 são provenientes de um guia marcado como em andamento.

    Likebook Muses Motherboard Replacement, Power off: passo 1, imagem 1 %32
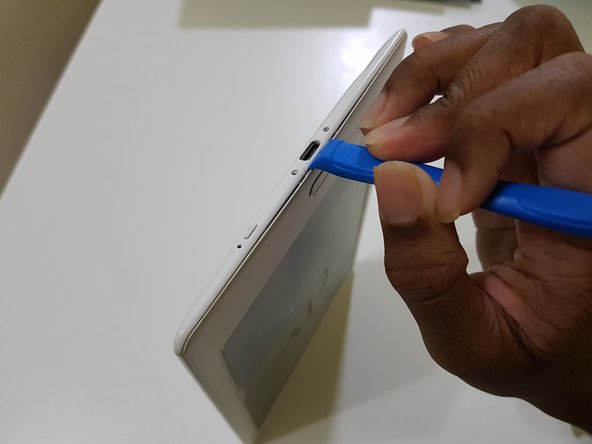
    • Power off the tablet by holding down the power button (on the bottom) and tapping "Power off" on screen, then wait 10-15 seconds for the underlying Android system to shut down.

  2. Likebook Muses Motherboard Replacement, Rear Cover: passo 2, imagem 1 %32
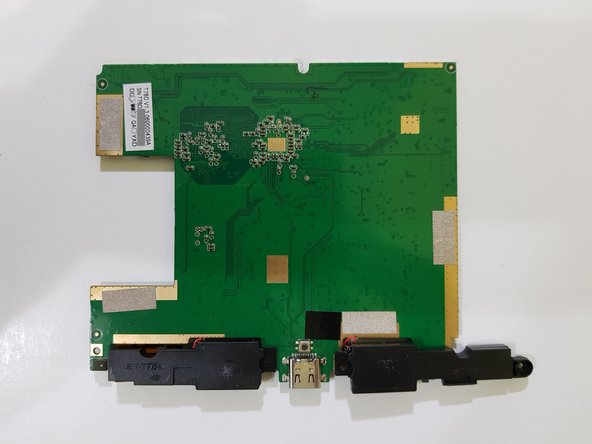
    • Unscrew the two Torx T2 screws surrounding the USB port.

    • Image needed: showing just the bottom in order to highlight screws in blue

  3. Likebook Muses Motherboard Replacement: passo 3, imagem 1 %32 Likebook Muses Motherboard Replacement: passo 3, imagem 2 %32 Likebook Muses Motherboard Replacement: passo 3, imagem 3 %32
    • Use the opening tool to pry at the lip in between the bezel and rear cover,

    • then slide in your opening pick with the flat end,

    • and slide it around to undo these clips.

  4. Likebook Muses Motherboard Replacement: passo 4, imagem 1 %32 Likebook Muses Motherboard Replacement: passo 4, imagem 2 %32 Likebook Muses Motherboard Replacement: passo 4, imagem 3 %32
    • (Note to self: Try opening the side using opening tools)

    • After releasing the clips, lift the front bezel out.

    • The extension piece for the power button can fall out. Don't lose this!

  5. Likebook Muses Motherboard Replacement: passo 5, imagem 1 %32
    • The rear cover has been removed.

  6. Likebook Muses Motherboard Replacement, Mainboard: passo 6, imagem 1 %32 Likebook Muses Motherboard Replacement, Mainboard: passo 6, imagem 2 %32 Likebook Muses Motherboard Replacement, Mainboard: passo 6, imagem 3 %32
    • Disconnect the battery.

    • Due to the placement of the battery, the connector may not come out all the way.

  7. Likebook Muses Motherboard Replacement: passo 7, imagem 1 %32 Likebook Muses Motherboard Replacement: passo 7, imagem 2 %32 Likebook Muses Motherboard Replacement: passo 7, imagem 3 %32
    • Using the pointed end of a spudger, disconnect the touch panel.

  8. Likebook Muses Motherboard Replacement: passo 8, imagem 1 %32 Likebook Muses Motherboard Replacement: passo 8, imagem 2 %32 Likebook Muses Motherboard Replacement: passo 8, imagem 3 %32
    • Disconnect the pen input controller.

  9. Likebook Muses Motherboard Replacement: passo 9, imagem 1 %32 Likebook Muses Motherboard Replacement: passo 9, imagem 2 %32 Likebook Muses Motherboard Replacement: passo 9, imagem 3 %32
    • Lift up part of the tape covering the frontlight connector.

    • Using the flat end of your spudger, disconnect the display.

  10. Likebook Muses Motherboard Replacement: passo 10, imagem 1 %32 Likebook Muses Motherboard Replacement: passo 10, imagem 2 %32
    • Peel the tape the rest of the way

    • Using the pointed end of your spudger, disconnect the frontlight.

  11. Likebook Muses Motherboard Replacement: passo 11, imagem 1 %32
    • Remove these screws using your J00 screwdriver (or a PH00 screwdriver if you don't have one).

    • Remove these screws using your PH00 screwdriver.

    • One of these screws has a tamper detection sticker pasted over the screw head.

    • You should be able to poke the screwdriver through it.

  12. Likebook Muses Motherboard Replacement: passo 12, imagem 1 %32
    • Lift the mainboard out from the top,

    • The speaker connections are only held in with solder, and may break if you're not careful.

  13. Likebook Muses Motherboard Replacement: passo 13, imagem 1 %32 Likebook Muses Motherboard Replacement: passo 13, imagem 2 %32 Likebook Muses Motherboard Replacement: passo 13, imagem 3 %32
    • The mainboard has been removed.

Conclusão

To reassemble your device, follow these instructions in reverse order.

Kevin Bhasi

Membro desde: 12/26/14

1.262 Reputação

Autoria de 9 guias

0 comentários

Adicione um comentário

Exibir estatísticas:

Últimas 24 horas: 0

Últimos 7 dias: 0

Últimos 30 dias: 0

Duração total: 62