Ir para o conteúdo principal

Lenovo Yoga 910-13IKB Motherboard Replacement

O que você precisa

  1. Lenovo Yoga 910-13IKB Motherboard Replacement, Back Panel: passo 1, imagem 1 %32 Lenovo Yoga 910-13IKB Motherboard Replacement, Back Panel: passo 1, imagem 2 %32
    • Turn the laptop over and remove the ten Torx T5 screws along the perimeter of the bottom panel using the T5 Torx Screwdriver.

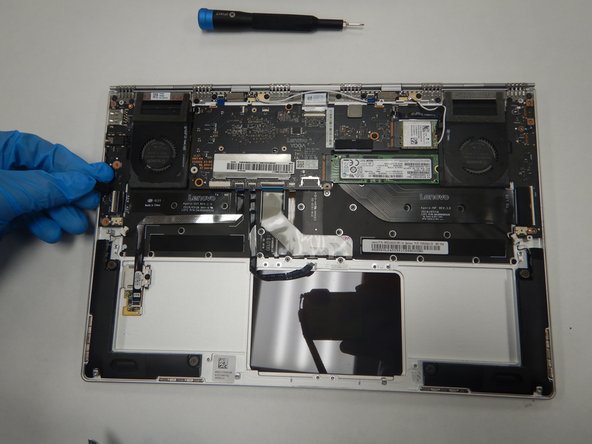
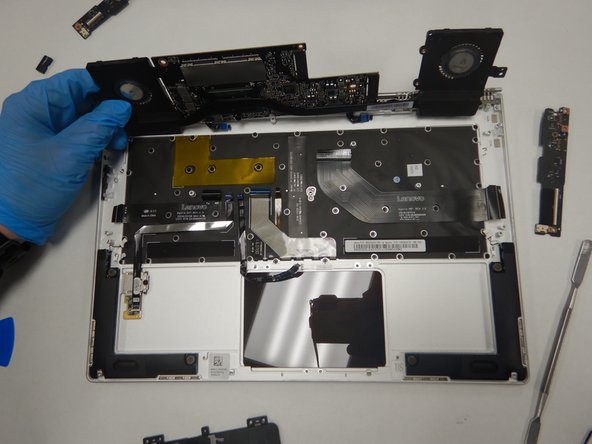
    • Remove the back panel from the device exposing the components.

  2. Lenovo Yoga 910-13IKB Motherboard Replacement, Battery: passo 2, imagem 1 %32
    • Remove the four 3 mm Phillips #0 screws holding the battery in place.

  3. Lenovo Yoga 910-13IKB Motherboard Replacement: passo 3, imagem 1 %32 Lenovo Yoga 910-13IKB Motherboard Replacement: passo 3, imagem 2 %32 Lenovo Yoga 910-13IKB Motherboard Replacement: passo 3, imagem 3 %32
    • Disconnect the battery cable from its motherboard socket by gently pulling it towards the battery. The spudger tool may be needed to lift the flap seal.

    • Pull parallel to the battery, not straight up.

    • Pull evenly on the width of the cable so that no individual wire is overly strained.

    • Lift the battery out.

  4. Lenovo Yoga 910-13IKB Motherboard Replacement, Trackpad: passo 4, imagem 1 %32 Lenovo Yoga 910-13IKB Motherboard Replacement, Trackpad: passo 4, imagem 2 %32 Lenovo Yoga 910-13IKB Motherboard Replacement, Trackpad: passo 4, imagem 3 %32
    • Using the Phillips #0 screwdriver, remove all six screws holding the trackpad to the device.

    • Find the ribbon cable, the black bundle of wires attached to the trackpad, and lift the head of the ribbon cable towards you.

    • Carefully lift up the trackpad and remove it from the device.

  5. Lenovo Yoga 910-13IKB Motherboard Replacement, Motherboard: passo 5, imagem 1 %32 Lenovo Yoga 910-13IKB Motherboard Replacement, Motherboard: passo 5, imagem 2 %32 Lenovo Yoga 910-13IKB Motherboard Replacement, Motherboard: passo 5, imagem 3 %32
    • Remove the screws attached to the USB ports on both sides of the device with a Phillips #0 screwdriver.

    • Detach both of the ribbon cables attached to each USB port with a wedge device, then detach the USB ports.

  6. Lenovo Yoga 910-13IKB Motherboard Replacement: passo 6, imagem 1 %32 Lenovo Yoga 910-13IKB Motherboard Replacement: passo 6, imagem 2 %32 Lenovo Yoga 910-13IKB Motherboard Replacement: passo 6, imagem 3 %32
    • Remove the screws attached to the SSD stick with a Phillips #0 screwdriver.

    • Pull the SSD stick directly to the right until it shifts out of place to remove it.

    • Storage chip above it (further away from you) may also be detached by pulling it directly to the right until it clicks out.

  7. Lenovo Yoga 910-13IKB Motherboard Replacement: passo 7, imagem 1 %32 Lenovo Yoga 910-13IKB Motherboard Replacement: passo 7, imagem 2 %32
    • Remove the four screws attached to both fans, and the back connector strip (the long metal piece furthest from you with screws in it) with a Phillips #0 screwdriver.

  8. Lenovo Yoga 910-13IKB Motherboard Replacement: passo 8, imagem 1 %32 Lenovo Yoga 910-13IKB Motherboard Replacement: passo 8, imagem 2 %32 Lenovo Yoga 910-13IKB Motherboard Replacement: passo 8, imagem 3 %32
    • Remove the screws attached to the motherboard with a Phillips #0 screwdriver.

    • Remove the back connector strip using a spudger or plastic opening tool to pry it off of the device.

    • With the back connector strip removed, pry the motherboard up and off of the device.

Conclusão

To reassemble your device, follow these instructions in reverse order.

3 outras pessoas executaram este guia.

0 comentários

Adicione um comentário

Exibir estatísticas:

Últimas 24 horas: 2

Últimos 7 dias: 6

Últimos 30 dias: 20

Duração total: 1,822