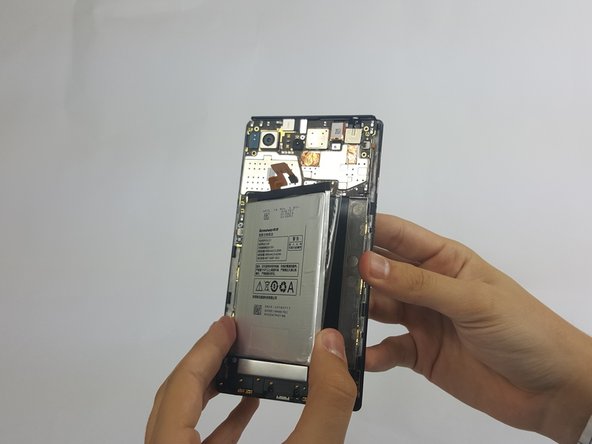
Ir para o conteúdo principal

Lenovo Vibe Z2 Pro Motherboard Replacement

O que você precisa

  1. Lenovo Vibe Z2 Pro Motherboard Replacement, Lenovo Vibe Z2 Pro Backplate Disassembly: passo 1, imagem 1 %32 Lenovo Vibe Z2 Pro Motherboard Replacement, Lenovo Vibe Z2 Pro Backplate Disassembly: passo 1, imagem 2 %32
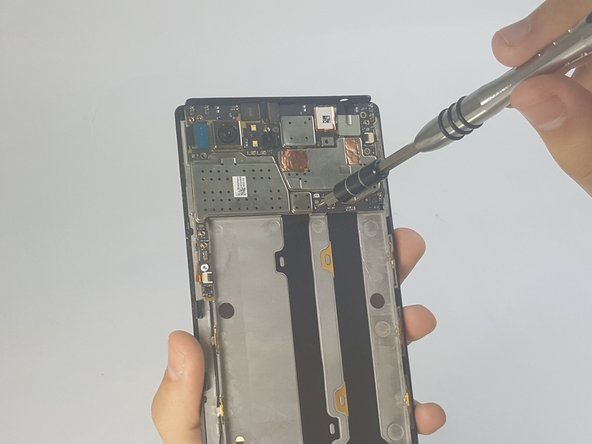
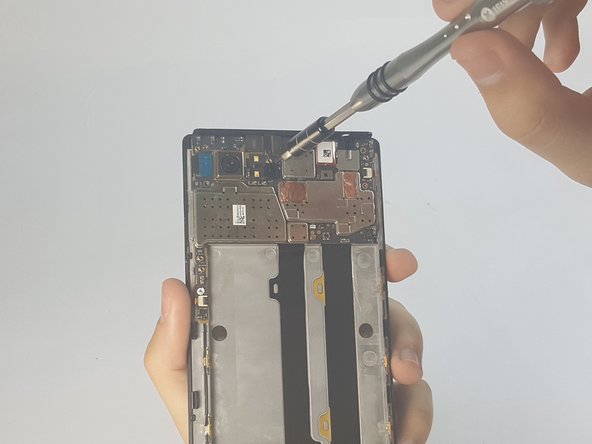
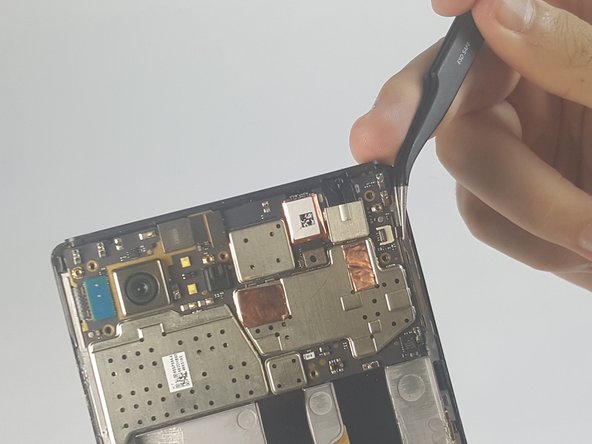
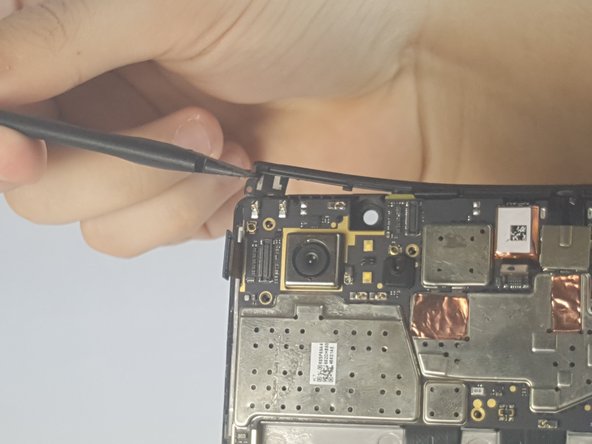
    • Remove the 4.9 mm torx head screws located on the camera plate on the back of the phone

  2. Lenovo Vibe Z2 Pro Motherboard Replacement: passo 2, imagem 1 %32
    • Remove the 3.65 mm Torx head screws at the bottom of the phone.

  3. Lenovo Vibe Z2 Pro Motherboard Replacement: passo 3, imagem 1 %32 Lenovo Vibe Z2 Pro Motherboard Replacement: passo 3, imagem 2 %32
    • Remove the SIM card tray by pushing a pin into the hole on the side of the phone.

  4. Lenovo Vibe Z2 Pro Motherboard Replacement: passo 4, imagem 1 %32 Lenovo Vibe Z2 Pro Motherboard Replacement: passo 4, imagem 2 %32
    • Push the Spudger along the gap between the phone and the backplate to separate them.

  5. Lenovo Vibe Z2 Pro Motherboard Replacement: passo 5, imagem 1 %32
    • Carefully pull the backplate away from the phone.

  6. Lenovo Vibe Z2 Pro Motherboard Replacement, Battery: passo 6, imagem 1 %32 Lenovo Vibe Z2 Pro Motherboard Replacement, Battery: passo 6, imagem 2 %32
    • Peel away protective the film using your hands.

  7. Lenovo Vibe Z2 Pro Motherboard Replacement: passo 7, imagem 1 %32 Lenovo Vibe Z2 Pro Motherboard Replacement: passo 7, imagem 2 %32
    • Remove any adhesive strips holding the battery in place gently using a fingernail or spudger.

    • The regular black nylon spudger should be used whenever possible, especially around batteries.

  8. Lenovo Vibe Z2 Pro Motherboard Replacement: passo 8, imagem 1 %32
    • Disconnect the orange battery ribbon cable by gently lifting with a spudger.

  9. Lenovo Vibe Z2 Pro Motherboard Replacement: passo 9, imagem 1 %32 Lenovo Vibe Z2 Pro Motherboard Replacement: passo 9, imagem 2 %32 Lenovo Vibe Z2 Pro Motherboard Replacement: passo 9, imagem 3 %32
    • Insert a fingernail or spudger into either side of the battery and lift upward.

    • Remove the battery from phone.

  10. Lenovo Vibe Z2 Pro Motherboard Replacement, Motherboard: passo 10, imagem 1 %32 Lenovo Vibe Z2 Pro Motherboard Replacement, Motherboard: passo 10, imagem 2 %32 Lenovo Vibe Z2 Pro Motherboard Replacement, Motherboard: passo 10, imagem 3 %32
    • Remove the 3.15mm Phillips Head #000 screws from motherboard.

  11. Lenovo Vibe Z2 Pro Motherboard Replacement: passo 11, imagem 1 %32 Lenovo Vibe Z2 Pro Motherboard Replacement: passo 11, imagem 2 %32 Lenovo Vibe Z2 Pro Motherboard Replacement: passo 11, imagem 3 %32
    • Disconnect the two ribbon cables by gently lifting on the black hinges and pulling away with tweezers

  12. Lenovo Vibe Z2 Pro Motherboard Replacement: passo 12, imagem 1 %32 Lenovo Vibe Z2 Pro Motherboard Replacement: passo 12, imagem 2 %32
    • Gently disconnect the rear-camera connector

  13. Lenovo Vibe Z2 Pro Motherboard Replacement: passo 13, imagem 1 %32 Lenovo Vibe Z2 Pro Motherboard Replacement: passo 13, imagem 2 %32
    • Gently remove the front-facing camera by gently lifting on the connector tab.

    • Remove the other connector by gently lifting with a spudger.

  14. Lenovo Vibe Z2 Pro Motherboard Replacement: passo 14, imagem 1 %32 Lenovo Vibe Z2 Pro Motherboard Replacement: passo 14, imagem 2 %32
    • Pry off the plastic brace along the top edge of the phone

  15. Lenovo Vibe Z2 Pro Motherboard Replacement: passo 15, imagem 1 %32 Lenovo Vibe Z2 Pro Motherboard Replacement: passo 15, imagem 2 %32
    • Remove the antenna connected to the bottom piece of the screen plate

  16. Lenovo Vibe Z2 Pro Motherboard Replacement: passo 16, imagem 1 %32
    • Gently lift the motherboard off the frame

    • Pull the camera out from behind the motherboard

  17. Lenovo Vibe Z2 Pro Motherboard Replacement: passo 17, imagem 1 %32 Lenovo Vibe Z2 Pro Motherboard Replacement: passo 17, imagem 2 %32 Lenovo Vibe Z2 Pro Motherboard Replacement: passo 17, imagem 3 %32
    • Using a spudger, disconnect the charging port assembly cable and the screen connection cable.

    • Remove the motherboard completely.

Conclusão

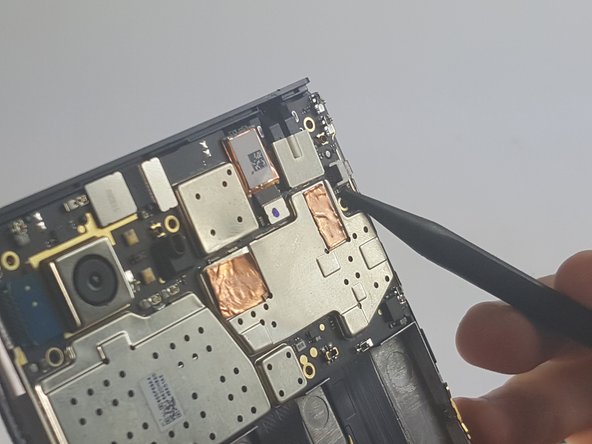
To reassemble your device, follow these instructions in reverse order.

4 outras pessoas executaram este guia.

Mitchell Beall

Membro desde: 09/15/16

407 Reputação

Autoria de 1 guia

Equipe

USF Tampa, Team 18-3, Blackwell Fall 2016 Membro de USF Tampa, Team 18-3, Blackwell Fall 2016

USFT-BLACKWELL-F16S18G3

Membros da 4

Autoria de 12 guias

0 comentários

Adicione um comentário

Exibir estatísticas:

Últimas 24 horas: 1

Últimos 7 dias: 2

Últimos 30 dias: 5

Duração total: 2,040