Ir para o conteúdo principal

Lenovo ThinkPad X1 Carbon 6th Gen CMOS Battery Replacement

O que você precisa

  1. Lenovo ThinkPad X1 Carbon 6th Gen CMOS Battery Replacement, Prepare To Disassemble The Laptop: passo 1, imagem 1 %32
    • Turn the laptop off and unplug the charger if necessary.

    • Close the lid and flip the laptop upside down.

  2. Lenovo ThinkPad X1 Carbon 6th Gen CMOS Battery Replacement, Remove The Back Cover: passo 2, imagem 1 %32 Lenovo ThinkPad X1 Carbon 6th Gen CMOS Battery Replacement, Remove The Back Cover: passo 2, imagem 2 %32 Lenovo ThinkPad X1 Carbon 6th Gen CMOS Battery Replacement, Remove The Back Cover: passo 2, imagem 3 %32
    • Unscrew the 5 screws holding the back cover on.

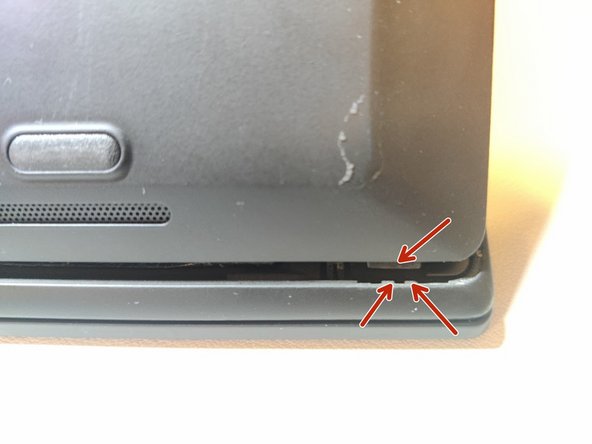
    • Use a spudger or pry tool to release the retention clips on the cover at the indicated points

    • Tilt the top of the cover up and away from the body, then remove the cover.

  3. Lenovo ThinkPad X1 Carbon 6th Gen CMOS Battery Replacement, Remove The Battery: passo 3, imagem 1 %32 Lenovo ThinkPad X1 Carbon 6th Gen CMOS Battery Replacement, Remove The Battery: passo 3, imagem 2 %32 Lenovo ThinkPad X1 Carbon 6th Gen CMOS Battery Replacement, Remove The Battery: passo 3, imagem 3 %32
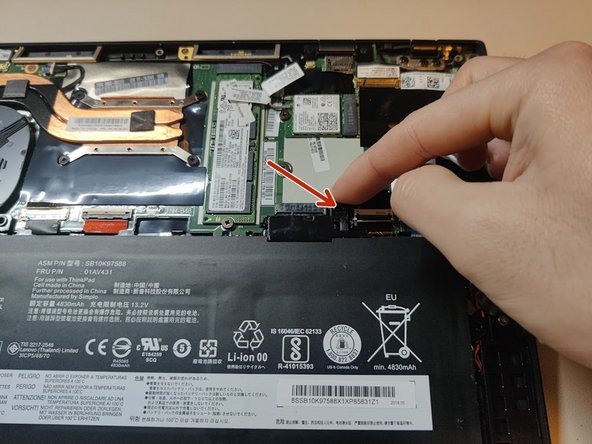
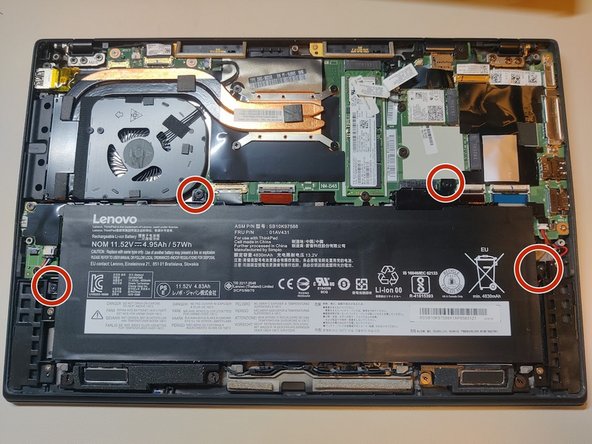
    • Unscrew the 4 screws holding the battery in place.

    • Disconnect the battery by prying it away from the chassis at the indicated point.

    • Remove the battery.

  4. Lenovo ThinkPad X1 Carbon 6th Gen CMOS Battery Replacement, Remove the original CMOS battery: passo 4, imagem 1 %32 Lenovo ThinkPad X1 Carbon 6th Gen CMOS Battery Replacement, Remove the original CMOS battery: passo 4, imagem 2 %32 Lenovo ThinkPad X1 Carbon 6th Gen CMOS Battery Replacement, Remove the original CMOS battery: passo 4, imagem 3 %32
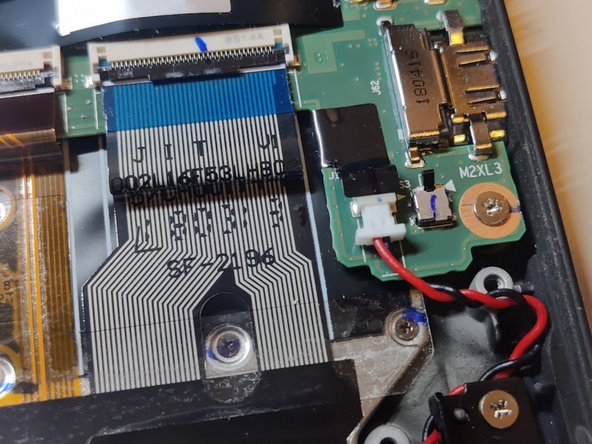
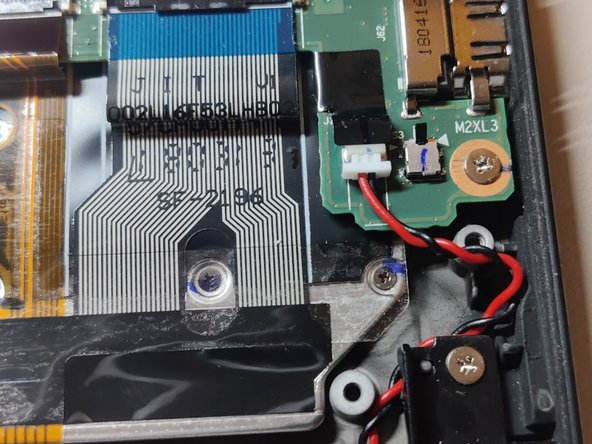
    • Disconnect the CMOS battery connector. A spudger may be helpful here.

    • Pry up the original CMOS battery. A spudger or pry tool may be helpful here.

  5. Lenovo ThinkPad X1 Carbon 6th Gen CMOS Battery Replacement, Remove old CMOS battery adhesive: passo 5, imagem 1 %32 Lenovo ThinkPad X1 Carbon 6th Gen CMOS Battery Replacement, Remove old CMOS battery adhesive: passo 5, imagem 2 %32
    • Remove the old adhesive pad underneath the CMOS battery. A spuger or pry tool may be helpful to scrap it off the chassis.

  6. Lenovo ThinkPad X1 Carbon 6th Gen CMOS Battery Replacement, Perform a test fit with the new CMOs battery: passo 6, imagem 1 %32 Lenovo ThinkPad X1 Carbon 6th Gen CMOS Battery Replacement, Perform a test fit with the new CMOs battery: passo 6, imagem 2 %32 Lenovo ThinkPad X1 Carbon 6th Gen CMOS Battery Replacement, Perform a test fit with the new CMOs battery: passo 6, imagem 3 %32
    • Place the new CMOS battery in the same spot as the original.

    • If the new CMOS battery comes with pre-applied adhesive, do NOT remove the adhesive backing paper yet.

    • Align the tabs on the bottom of the main battery with the retention clips on the chassis and slide the tabs into place.

    • Press down on the battery connector to fully seat it.

  7. Lenovo ThinkPad X1 Carbon 6th Gen CMOS Battery Replacement, Check the fit of the new CMOS battery: passo 7, imagem 1 %32 Lenovo ThinkPad X1 Carbon 6th Gen CMOS Battery Replacement, Check the fit of the new CMOS battery: passo 7, imagem 2 %32 Lenovo ThinkPad X1 Carbon 6th Gen CMOS Battery Replacement, Check the fit of the new CMOS battery: passo 7, imagem 3 %32
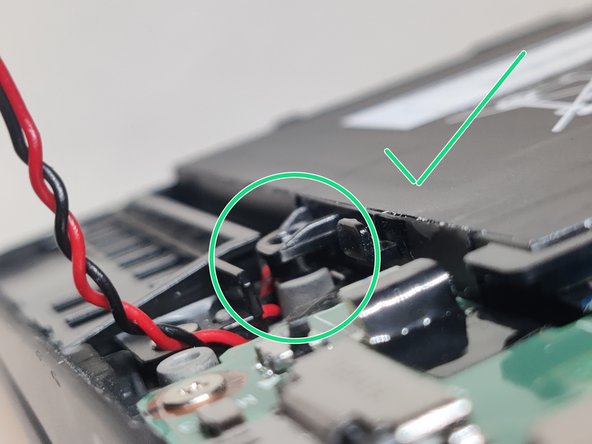
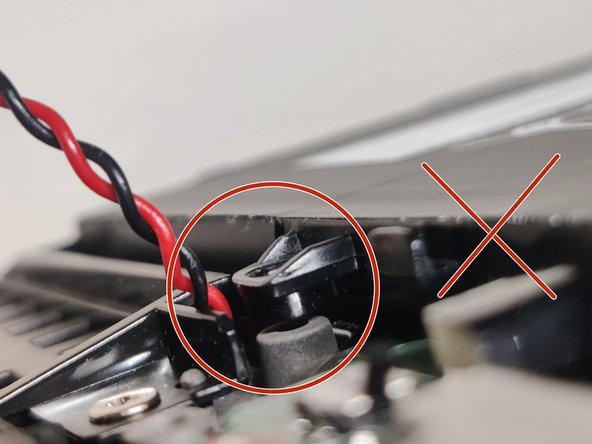
    • Check the fit between the tab on the battery and the screw standoff on the chassis closest to the CMOS battery.

    • There should be almost no gap between the battery tab and the standoff. The clearance circled in green is acceptable. The clearance circled in red is not acceptable.

    • If there is too large of a gap, screwing in the main battery will bend it and put stress on it, which could cause damage.

  8. Lenovo ThinkPad X1 Carbon 6th Gen CMOS Battery Replacement, Adjust CMOS battery thickness: passo 8, imagem 1 %32
    • If there was too large of a gap during the fit check, remove any pre-applied padding/adhesive from the new battery to decrease the thickness.

    • Repeat the fit check.

  9. Lenovo ThinkPad X1 Carbon 6th Gen CMOS Battery Replacement, Connect the new CMOS battery: passo 9, imagem 1 %32 Lenovo ThinkPad X1 Carbon 6th Gen CMOS Battery Replacement, Connect the new CMOS battery: passo 9, imagem 2 %32 Lenovo ThinkPad X1 Carbon 6th Gen CMOS Battery Replacement, Connect the new CMOS battery: passo 9, imagem 3 %32
    • Align the connector of the new battery with it's receptacle on the circuit board. The openings on the connector should be a the top.

    • The connector should only fit in one orientation. If it does not easily connect, try a different orientation.

    • Push the connector directly into its receptacle until it clicks into place.

  10. Lenovo ThinkPad X1 Carbon 6th Gen CMOS Battery Replacement, Install the new CMOS: passo 10, imagem 1 %32
    • If there is adhesive on the new CMOS battery, remove the backing paper from it.

    • Place the new CMOS battery into the correct spot, adhesive facing down.

    • Make sure the CMOS battery wires are not block or resting on top of the indicated screw standoffs.

  11. Lenovo ThinkPad X1 Carbon 6th Gen CMOS Battery Replacement, Re-install the main battery: passo 11, imagem 1 %32 Lenovo ThinkPad X1 Carbon 6th Gen CMOS Battery Replacement, Re-install the main battery: passo 11, imagem 2 %32
    • Following the same procedure from the test fit, re-install the main battery.

    • Be sure to firmly press down on the battery connector to fully seat it.

    • Screw in the 4 battery retention screws.

  12. Lenovo ThinkPad X1 Carbon 6th Gen CMOS Battery Replacement, Re-install the back cover: passo 12, imagem 1 %32 Lenovo ThinkPad X1 Carbon 6th Gen CMOS Battery Replacement, Re-install the back cover: passo 12, imagem 2 %32 Lenovo ThinkPad X1 Carbon 6th Gen CMOS Battery Replacement, Re-install the back cover: passo 12, imagem 3 %32
    • Align the tabs on the bottom corners of the back cover with the retention clips on the chassis and slide the tabs into place. Lower the back cover onto the chassis.

    • Firmly press at the indicated areas to engage the retention clips on the back cover. There should be a click or pop as each clip snaps into place.

  13. Lenovo ThinkPad X1 Carbon 6th Gen CMOS Battery Replacement, Screw in the back cover: passo 13, imagem 1 %32
    • Screw in the 5 indicated screws to secure the back cover.

  14. Lenovo ThinkPad X1 Carbon 6th Gen CMOS Battery Replacement, Set system time in BIOS: passo 14, imagem 1 %32 Lenovo ThinkPad X1 Carbon 6th Gen CMOS Battery Replacement, Set system time in BIOS: passo 14, imagem 2 %32
    • Power on the laptop. When prompted on screen, press 'Enter' to interrupt startup. Follow the remaining on-screen prompts to enter the system setup/BIOS menu.

    • After the CMOS battery replacement, the laptop may need to be plugged in to the charger when power on for the first time after the replacement.

    • Follow the on screen prompts to navigate to the Date/Time page of the BIOS and set the current date an time.

    • Follow the on screen prompts to save any changes and exit the BIOS.

Linha de Chegada

Uma outra pessoa concluiu este guia.

Lawrence Lee

Membro desde: 01/03/23

506 Reputação

Autoria de 2 guias

2 comentários

This amazon link is not for a gen6 compatible battery - can you please provide a correct link?

JB Primary - Responder

The Amazon item is compatible with gen 6, it just doesn't say so in the description. I have installed that item in my own gen 6 Thinkpad and it has been functioning without issue.

Lawrence Lee -

Adicione um comentário

Exibir estatísticas:

Últimas 24 horas: 12

Últimos 7 dias: 83

Últimos 30 dias: 356

Duração total: 2,191