Ir para o conteúdo principal

Lenovo IdeaPad U530 Touch Fan Replacement

O que você precisa

  1. Lenovo IdeaPad U530 Touch Fan Replacement, Battery: passo 1, imagem 1 %32 Lenovo IdeaPad U530 Touch Fan Replacement, Battery: passo 1, imagem 2 %32 Lenovo IdeaPad U530 Touch Fan Replacement, Battery: passo 1, imagem 3 %32
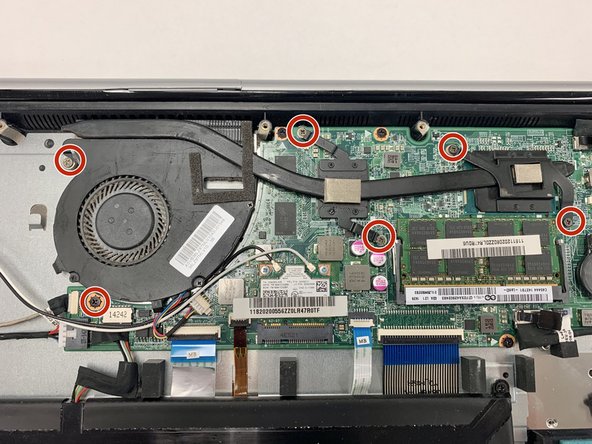
    • Remove the back panel by removing all screws. Use a PH000 screwdriver head.

    • Make sure to also remove the hinge screws.

  2. Lenovo IdeaPad U530 Touch Fan Replacement: passo 2, imagem 1 %32 Lenovo IdeaPad U530 Touch Fan Replacement: passo 2, imagem 2 %32
    • To remove the panel, use a plastic opening tool to prevent any damage.

  3. Lenovo IdeaPad U530 Touch Fan Replacement: passo 3, imagem 1 %32
    • Locate and assess the battery. Pictured in the upper right area of the computer.

  4. Lenovo IdeaPad U530 Touch Fan Replacement: passo 4, imagem 1 %32 Lenovo IdeaPad U530 Touch Fan Replacement: passo 4, imagem 2 %32
    • Locate and remove all screws attaching the battery to the hull of the computer. It is recommended that you use a JIS #1 screwdriver head for this task.

    • Be careful to keep track of all removed screws.

  5. Lenovo IdeaPad U530 Touch Fan Replacement: passo 5, imagem 1 %32
    • Detach the connection from the battery to the motherboard. This is the only connection that needs to be disconnected for the battery.

    • To remove the connection, please pull firmly, as it well secured.

  6. Lenovo IdeaPad U530 Touch Fan Replacement: passo 6, imagem 1 %32
    • Simply lift the battery out of the computer, and acquire a replacement.

  7. Lenovo IdeaPad U530 Touch Fan Replacement, Fan: passo 7, imagem 1 %32 Lenovo IdeaPad U530 Touch Fan Replacement, Fan: passo 7, imagem 2 %32 Lenovo IdeaPad U530 Touch Fan Replacement, Fan: passo 7, imagem 3 %32
    • Remove the six 3 mm screws from the fan using a JIS #1 screwdriver.

  8. Lenovo IdeaPad U530 Touch Fan Replacement: passo 8, imagem 1 %32 Lenovo IdeaPad U530 Touch Fan Replacement: passo 8, imagem 2 %32
    • Disconnect the connecter cords from the fan and remove the fan.

Conclusão

To reassemble your device, follow these instructions in reverse order.

0 comentários

Adicione um comentário

Exibir estatísticas:

Últimas 24 horas: 2

Últimos 7 dias: 2

Últimos 30 dias: 5

Duração total: 219