Ir para o conteúdo principal

Lenovo G70-80 Screen Replacement

O que você precisa

  1. Lenovo G70-80 Screen Replacement, Battery: passo 1, imagem 1 %32
    • Turn off the computer.

    • Set the computer upside down with the back facing up.

  2. Lenovo G70-80 Screen Replacement: passo 2, imagem 1 %32 Lenovo G70-80 Screen Replacement: passo 2, imagem 2 %32
    • Located directly below the bottom plate will be two switches near where the battery is located.

    • With the battery facing you, slide the battery switch on the right side of the laptop towards the right.

    • To ensure the switch on the right is unlocked, look for a red indicator next to the switch.

  3. Lenovo G70-80 Screen Replacement: passo 3, imagem 1 %32 Lenovo G70-80 Screen Replacement: passo 3, imagem 2 %32
    • Slide the left battery release switch to the left.

    • While holding the switch to the left, lift the battery to remove it from the computer.

  4. Lenovo G70-80 Screen Replacement: passo 4, imagem 1 %32 Lenovo G70-80 Screen Replacement: passo 4, imagem 2 %32
    • Remove the battery.

  5. Lenovo G70-80 Screen Replacement, Screen: passo 5, imagem 1 %32
    • Open the laptop to face the screen.

  6. Lenovo G70-80 Screen Replacement: passo 6, imagem 1 %32 Lenovo G70-80 Screen Replacement: passo 6, imagem 2 %32 Lenovo G70-80 Screen Replacement: passo 6, imagem 3 %32
    • Use a plastic opening tool to pull the bezel forward and release it from the top of the LCD panel.

    • The bezel is the plastic frame around the laptop screen.

  7. Lenovo G70-80 Screen Replacement: passo 7, imagem 1 %32 Lenovo G70-80 Screen Replacement: passo 7, imagem 2 %32
    • After the top part of the bezel is released, use the plastic opening tool to completely remove the bezel.

    • If you are having trouble removing the bezel from the LCD panel, pull both sides of the bezel towards you with your hands.

  8. Lenovo G70-80 Screen Replacement: passo 8, imagem 1 %32 Lenovo G70-80 Screen Replacement: passo 8, imagem 2 %32 Lenovo G70-80 Screen Replacement: passo 8, imagem 3 %32
    • Use a screwdriver to remove the screws that secure the LCD panel to the computer.

    • Once the bezel is removed, you will see eight screws around the screen that secure the LCD panel to the computer.

  9. Lenovo G70-80 Screen Replacement: passo 9, imagem 1 %32
    • Carefully separate the LCD panel from the plastic cover, placing it face down on the keyboard

  10. Lenovo G70-80 Screen Replacement: passo 10, imagem 1 %32
    • Disconnect the LCD panel from the computer by peeling the connector off.

  11. Lenovo G70-80 Screen Replacement: passo 11, imagem 1 %32 Lenovo G70-80 Screen Replacement: passo 11, imagem 2 %32
    • With a screwdriver, remove the four screws that mount the LCD panel onto the mounting arms.

    • There is one screw on each corner that connects to the mounting arms.

  12. Lenovo G70-80 Screen Replacement: passo 12, imagem 1 %32
    • Remove the LCD panel.

Conclusão

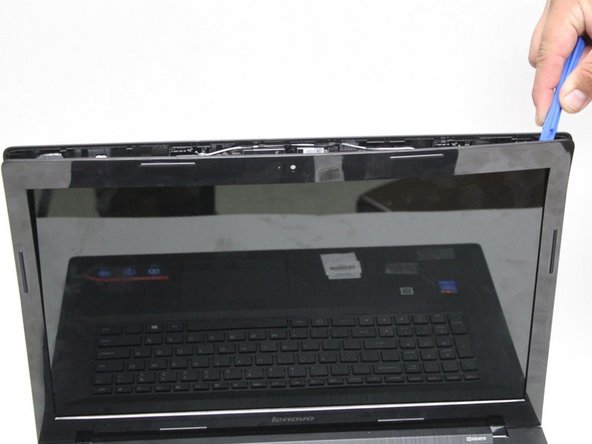
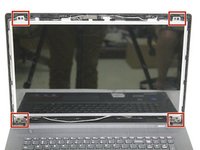
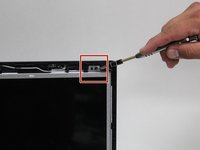
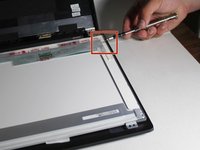
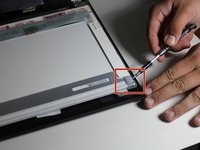
To reassemble your device, follow these instructions in reverse order.

2 outras pessoas executaram este guia.

Um comentário

how do you repair a whitescreen effect for a lenovo110 ideapad

sidney ifedha - Responder

Adicione um comentário

Exibir estatísticas:

Últimas 24 horas: 0

Últimos 7 dias: 0

Últimos 30 dias: 1

Duração total: 1,691