Introdução
This guide shows where to locate and clean the lens that reads the discs. This may be necessary if the DVD Player isn't reading discs correctly. This will take delicate work in order not to damage the lens.
O que você precisa
-
-
Remove four 7.5 mm Phillips screws on the both sides (2 on each side).
-
Remove five 7.5 mm Phillips screws on the back of the player.
 Pergunte ao FixBot
-
-
-
-
Lift the top panel from the back and remove. It should come off without being forced. There is a lip near the front so you many need to slide the top panel back slightly to remove it.
-
-
-
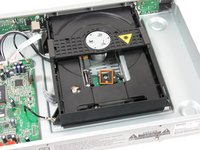
Locate the lens on the disc drive.
-
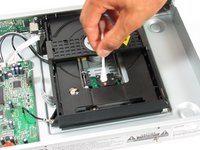
Dip one end of a cotton swab in rubbing alcohol.
-
Lightly dab the swab on the lens. Be very gentle.
-
Let the lens dry before replacing the top plate of the DVD player.
-


To reassemble your device, follow these instructions in reverse order.
Cancelar: não concluí este guia.
16 outras pessoas executaram este guia.
Equipe

Cal Poly, Team 21-20, Maness Fall 2011 Membro de Cal Poly, Team 21-20, Maness Fall 2011
CPSU-MANESS-F11S21G20
4 Membros
Autoria de 9 guias
5Comentários do guia
This item was not appropriate, thank you for trying.
Works on Samsung's box(home theater), thank you!
It worked on my cheap player. This unit is on 24/7. The dust in the house is heavy and smokers so the fix is cheap and I picked up a few things. Thanks
ne fonctionne toujours pas
My problem I think is alignment