Ir para o conteúdo principal

LG gram (14Z980-A.AAS7U1) SSD Replacement

O que você precisa

  1. LG gram (14Z980-A.AAS7U1) SSD Replacement, 1) Unscrew the back cover: passo 1, imagem 1 %32
    • Ensure that your laptop is fully powered down and disconnected from any power source before starting the repair. Confirm that the laptop is not in standby, sleep, or hibernation mode.

    • Utilize a screwdriver to remove the fasteners that secure the back cover.

    • Remove the 8 rubber feet and screws.

  2. LG gram (14Z980-A.AAS7U1) SSD Replacement, Loosen the back cover: passo 2, imagem 1 %32 LG gram (14Z980-A.AAS7U1) SSD Replacement, Loosen the back cover: passo 2, imagem 2 %32
    • Insert a pry tool or your fingers between the back cover. Gently run the tool along the edges to release any clips or latches.

    • Apply gentle pressure to avoid damaging the case or components inside.

    • If you encounter significant resistance while trying to remove the back cover, it's possible that your model may have screws located beneath. Proceed cautiously by gently prying up the laptop to inspect for any more screws.

  3. LG gram (14Z980-A.AAS7U1) SSD Replacement, Remove the back cover: passo 3, imagem 1 %32 LG gram (14Z980-A.AAS7U1) SSD Replacement, Remove the back cover: passo 3, imagem 2 %32
    • Lift from the bottom and gently remove the back cover.

    • When putting the back cover back on, apply gentle pressure along the edges of the cover to ensure that the clips snap back into place.

  4. LG gram (14Z980-A.AAS7U1) SSD Replacement, Disconnect battery: passo 4, imagem 1 %32 LG gram (14Z980-A.AAS7U1) SSD Replacement, Disconnect battery: passo 4, imagem 2 %32
    • Carefully locate the battery connector within the laptop and gently detach it from its port by applying pressure and pulling it straight out.

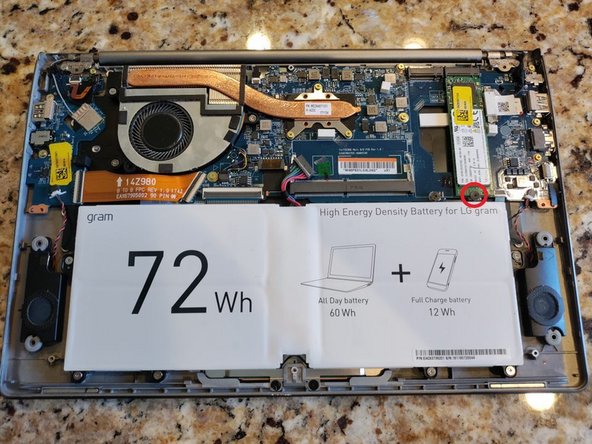
  5. LG gram (14Z980-A.AAS7U1) SSD Replacement, Remove drive screw: passo 5, imagem 1 %32 LG gram (14Z980-A.AAS7U1) SSD Replacement, Remove drive screw: passo 5, imagem 2 %32
    • Utilize a Phillips screwdriver to unscrew the 2.8 mm-sized screw that secures the SSD onto the LG Gram's motherboard.

  6. LG gram (14Z980-A.AAS7U1) SSD Replacement, Disconnect drive: passo 6, imagem 1 %32 LG gram (14Z980-A.AAS7U1) SSD Replacement, Disconnect drive: passo 6, imagem 2 %32
    • Carefully grip the SSD by its edges and gently pull it straight out.

    • Avoid any abrupt movements to prevent damage to the drive.

  7. LG gram (14Z980-A.AAS7U1) SSD Replacement, Connect new drive: passo 7, imagem 1 %32 LG gram (14Z980-A.AAS7U1) SSD Replacement, Connect new drive: passo 7, imagem 2 %32
    • Gently push the drive into the slot until it's snugly in place.

    • Apply even pressure to ensure a secure connection.

  8. LG gram (14Z980-A.AAS7U1) SSD Replacement, Screw in new drive: passo 8, imagem 1 %32
    • Insert the screw and screw in the drive.

Conclusão

To reassemble your device, follow these instructions in reverse order.

Derricka Jones

Membro desde: 12/04/23

157 Reputação

Autoria de 1 guia

0 comentários

Adicione um comentário

Exibir estatísticas:

Últimas 24 horas: 2

Últimos 7 dias: 7

Últimos 30 dias: 19

Duração total: 133