O que você precisa
-
Este passo não foi traduzido. Ajude a traduzi-lo
-
Use a pair of iOpeners by heating them in a microwave and placing the hot pads on the edges of the phone.
-
Allow to sit for 1-2 minutes to heat up the adhesive.
-
-
Este passo não foi traduzido. Ajude a traduzi-lo
-
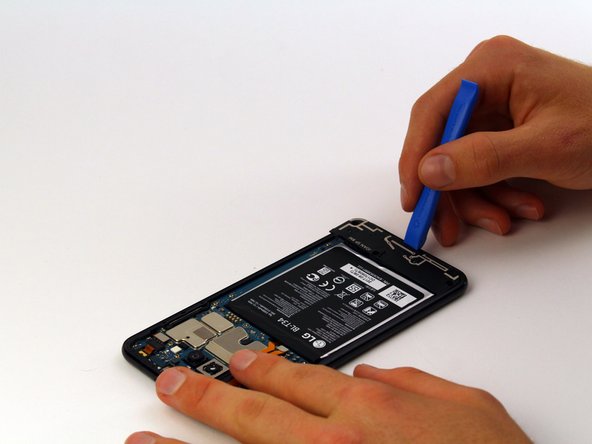
Insert an Opening Tool into the seam between the rear glass and side of the phone.
-
Pry the glass off just enough to insert an Opening Pick.
-
Slide the Opening Tool around the edges of the device, placing Opening Picks regularly.
-
-
Este passo não foi traduzido. Ajude a traduzi-lo
-
Once all edges of the device are lifted free, use a Suction Handle to gently pull the rear glass off the device.
-
-
-
Este passo não foi traduzido. Ajude a traduzi-lo
-
Remove the ten 4mm screws using the Phillips #00 Screwdriver.
-
-
Este passo não foi traduzido. Ajude a traduzi-lo
-
Gently push down on the small black tab with a Spudger to release the protective board.
-
Slide an Opening Tool between the phone and the protective board and slide along the edges of the phone to unclip it.
-
Carefully wiggle the board back and forth while gently pulling to unclip the last attachment point.
-
-
Este passo não foi traduzido. Ajude a traduzi-lo
-
Slide an Opening Tool between the lower protective board and the phone to unclip.
-
Slide the tool along the remaining edges of the protective board until it pops off.
-
-
Este passo não foi traduzido. Ajude a traduzi-lo
-
Gently pry each visible ribbon cable away from the motherboard to disconnect them.
-


Cancelar: não concluí este guia.
Uma outra pessoa concluiu este guia.

Equipe

Cal Poly, Team S1-G3, Maness Spring 2019 Membro de Cal Poly, Team S1-G3, Maness Spring 2019
CPSU-MANESS-S19S1G3
Membros da 4
Autoria de 10 guias
Um comentário
I followed these instructions and now my phone’s touchscreen is unresponsive. The phone turns off and on by holding the power button, and the screen displays the image properly, but it won’t respond to touch to unlock it.