Esta versão pode conter edições incorretas. Mude para o último instantâneo verificado.
O que você precisa
-
Este passo não foi traduzido. Ajude a traduzi-lo
-
Remove the back cover by placing the plastic opening tool on the bottom left side of the device and gently prying up.
-
-
Este passo não foi traduzido. Ajude a traduzi-lo
-
Insert the plastic opening tool into the indent at the bottom of the battery and lift up. Fully remove the battery with your fingers.
-
-
Este passo não foi traduzido. Ajude a traduzi-lo
-
Carefully use the Phillips #00 screwdriver to remove the eleven 3.9mm visible screws found on the back. The screws to be removed are marked with the given indicators.
-
-
-
Este passo não foi traduzido. Ajude a traduzi-lo
-
When you have finished removing all of the screws, place the plastic opening tool in the groove at the bottom left corner of the motherboard cover and lift up.
-
Make sure to remove the SIM card before you remove the motherboard cover. You can get the cover off without doing this, but the SIM card will be stuck underneath the cover once you put it back together.
-
Once a clip is released, you can detach the motherboard cover with your fingers and set aside.
-
-
Este passo não foi traduzido. Ajude a traduzi-lo
-
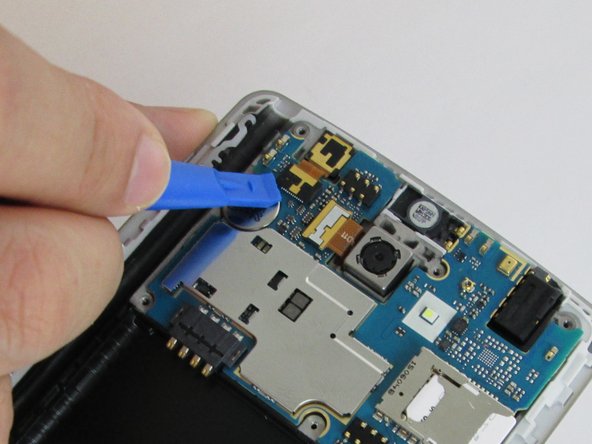
Carefully place the plastic opening tool under the ribbons where the cables are connecting and lift up to detach the cables.
-
-
Este passo não foi traduzido. Ajude a traduzi-lo
-
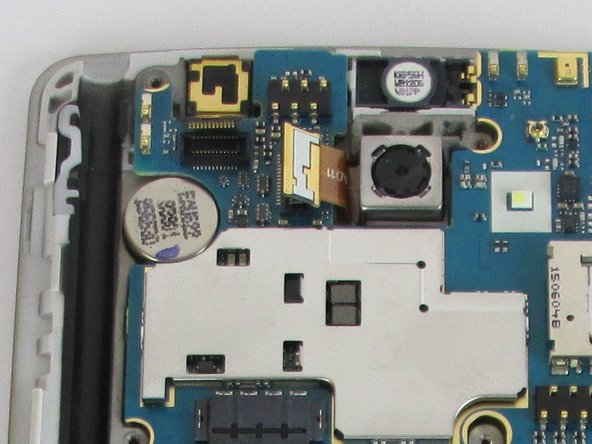
Fully remove the motherboard by prying upward with the plastic opening tool.
-
-
Este passo não foi traduzido. Ajude a traduzi-lo
-
Use the plastic opening tool to peel off the sticker.
-
-
Este passo não foi traduzido. Ajude a traduzi-lo
-
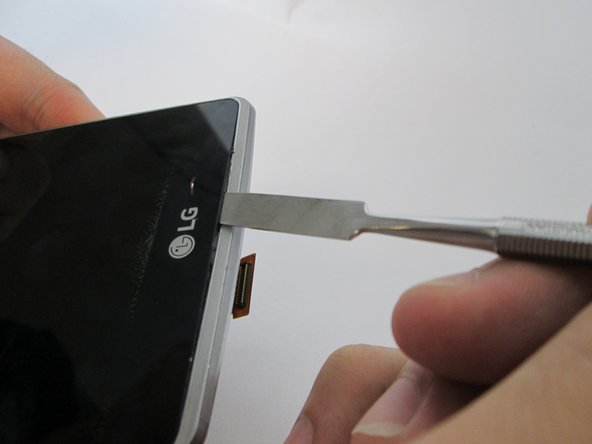
Gently use the plastic opening tool to set the tab free. This tab is used to hold the screen in place.
-
-
Este passo não foi traduzido. Ajude a traduzi-lo
-
Once you applied the iOpener on the device, use the plastic opening tool or opening pick to pry the screen free.
-
Once the broken screen has been set free, put in the screen replacement.
-


Cancelar: não concluí este guia.
39 outras pessoas executaram este guia.
Equipe

USF Tampa, Team 11-7, Cheng Spring 2016 Membro de USF Tampa, Team 11-7, Cheng Spring 2016
USFT-CHENG-S16S11G7
Membros da 4
Autoria de 14 guias
14 comentários
where I can found the screen pease?
thanks for the guide
Your guide was clear and the photos were good up until removing and replacing the glass, which is the title of this guide. Was the screen glued onto the LCD? Did you have to replace the LCD and glass or just the glass? How did you remove the glass from the LCD? Did you have to glue the glass back to the LCD screen or use adhesive tape? I'm asking because I don't know if this is a DIY job or if I should get the phone professionally repaired.
True, missing important details. I'm about to do this replacement. I assume the replacement screen has dual side tape built in. I'll report back soon.
joscomsu -
It seems the tutorial is for the whole screen (LCD+Glass) and it pretty much covers everything. After removing the screen, it's just a matter of replacing it with the new one.
My experience: I bought the whole screen and mine came without any adhesives, so I had to use a double sided tape I got previously for another screen. It's a very thin black tape and while I've read that it is not recommended, it held the screen in place. Although I am worried that it might be a bit weak for the long run. Also, it didn't came with the speaker grill, so I had to use the one from the broken screen. Remember this before installing the new one.
joscomsu -