Ir para o conteúdo principal

Keurig Mini B-31 Handle Replacement

O que você precisa

  1. Keurig Mini B-31 Handle Replacement, K-cup holder: passo 1, imagem 1 %32
    • Lift up the handle of the Keurig Mini.

  2. Keurig Mini B-31 Handle Replacement: passo 2, imagem 1 %32 Keurig Mini B-31 Handle Replacement: passo 2, imagem 2 %32
    • Make sure to avoid the needles above and inside the K-cup because may puncture your hand

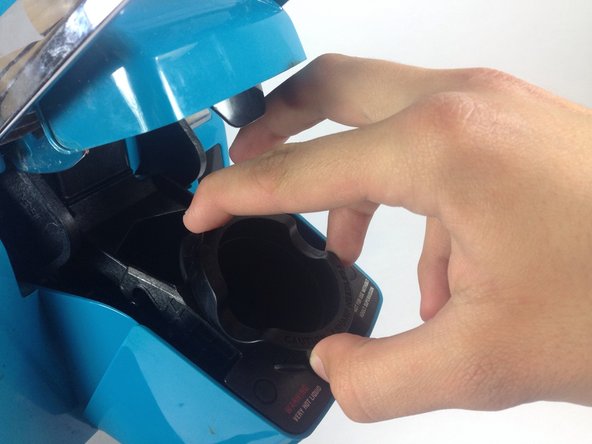
    • Firmly place a finger on each one of the three tabs that hold the K-cup holder into place, pushing in lightly. The tabs are difficult to see, but they are there and will make the removal easier. The top tab is located in the same location as the white triangle and the bottom two are located under the plastic bumps highlighted in the picture.

  3. Keurig Mini B-31 Handle Replacement: passo 3, imagem 1 %32 Keurig Mini B-31 Handle Replacement: passo 3, imagem 2 %32
    • Firmly rock the K-cup holder from side to side, loosening the K-cup holder from its seat.

  4. Keurig Mini B-31 Handle Replacement: passo 4, imagem 1 %32
    • Pull the K-cup holder straight out.

  5. Keurig Mini B-31 Handle Replacement, Top: passo 5, imagem 1 %32 Keurig Mini B-31 Handle Replacement, Top: passo 5, imagem 2 %32 Keurig Mini B-31 Handle Replacement, Top: passo 5, imagem 3 %32
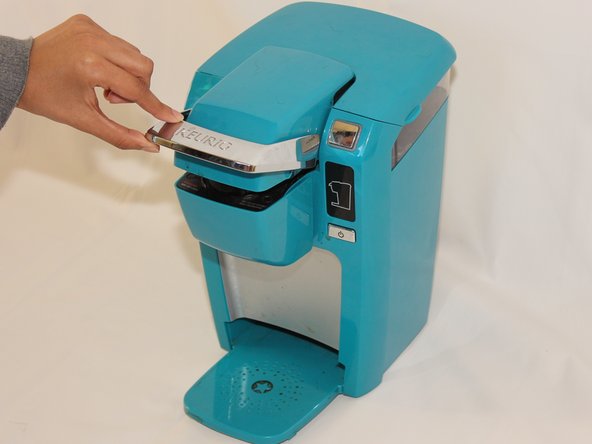
    • Open the top lid of the Keurig.

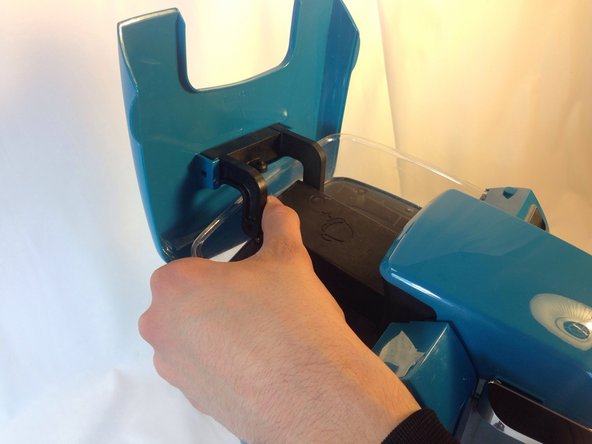
    • Pull directly outwards on one of the arms that holds the top lid in place. It will take some force to get the arm off the peg. Once one side is off, repeat the process on the second arm.

  6. Keurig Mini B-31 Handle Replacement: passo 6, imagem 1 %32
    • Lay the Keurig on its back with the water reservoir pointing away from you.

  7. Keurig Mini B-31 Handle Replacement: passo 7, imagem 1 %32
    • Avoid the top needle as it may puncture your hand.

    • Unscrew the two 9mm #1 Philips screws that hold the top plastic cover in place.

  8. Keurig Mini B-31 Handle Replacement: passo 8, imagem 1 %32
    • Set the Keurig in an upright position with the front side facing you.

    • Pull the cover off the top of the Keurig. It should come off easily with little force.

  9. Keurig Mini B-31 Handle Replacement: passo 9, imagem 1 %32
    • Firmly grasp the hose and pull it off of the plastic nozzle.

  10. Keurig Mini B-31 Handle Replacement, Top Needle: passo 10, imagem 1 %32
    • Unscrew the two 9 mm #1 Philips screws at the top of the device.

  11. Keurig Mini B-31 Handle Replacement: passo 11, imagem 1 %32
    • Push down lightly on the nozzle that the hose was attached to. The plastic housing along with the needle should pop off without much force.

  12. Keurig Mini B-31 Handle Replacement, Arm: passo 12, imagem 1 %32
    • With the needle removed, open the device by pulling up on the handle.

  13. Keurig Mini B-31 Handle Replacement: passo 13, imagem 1 %32 Keurig Mini B-31 Handle Replacement: passo 13, imagem 2 %32 Keurig Mini B-31 Handle Replacement: passo 13, imagem 3 %32
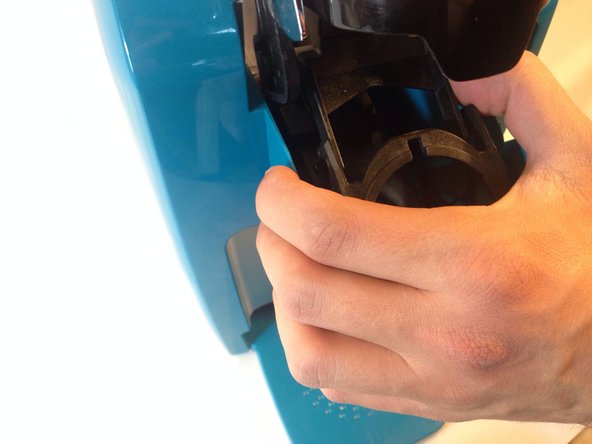
    • Push in on one of the arms attached to the K-cup holder plastic housing to remove it from its rails. The arms are identical for both sides so once one side is free repeat the process for the second side.

    • The plastic is flexible and will not snap with the force applied.

    • Once the arms are removed, the configuration should look like the picture. The K-cup holder housing should be separated from the arms.

  14. Keurig Mini B-31 Handle Replacement: passo 14, imagem 1 %32
    • Use a Phillips #1 screw driver to remove the four 12 mm screws that hold the arm assembly in place.

  15. Keurig Mini B-31 Handle Replacement: passo 15, imagem 1 %32 Keurig Mini B-31 Handle Replacement: passo 15, imagem 2 %32
    • Lift up the arm and pull up the handle assembly. It should easily come off.

    • This white tab falls off easily, remove it and set it aside to ensure it is not lost.

  16. Keurig Mini B-31 Handle Replacement, Handle: passo 16, imagem 1 %32
    • Unscrew the two 9mm #1 Philips screws from the handle assembly.

  17. Keurig Mini B-31 Handle Replacement: passo 17, imagem 1 %32
    • Lay the handle assembly on its side. Use one plastic prying tool to hold the snap ring in place so that it does not rotate and another to pop it off.

    • Flip the assembly over and repeat the process on the other side.

  18. Keurig Mini B-31 Handle Replacement: passo 18, imagem 1 %32
    • Once the both snap rings are removed, pull on the plastic side plates to remove them. It shouldn't take much force to remove them.

  19. Keurig Mini B-31 Handle Replacement: passo 19, imagem 1 %32
    • With the side plates off, lay the handle assembly upside down with the handle facing you.

    • Now push in the two bars that hold the handle in place.

  20. Keurig Mini B-31 Handle Replacement: passo 20, imagem 1 %32
    • Firmly pull on the handles to get them off of the bars. It should not take much force once the bars are pushed in.

Conclusão

To reassemble your device, follow these instructions in reverse order.

Note: A pair of pliers will assist in getting the snap rings back onto the bars.

Uma outra pessoa concluiu este guia.

Andrew Adriance

Membro desde: 01/14/14

1.914 Reputação

Autoria de 7 guias

Equipe

Cal Poly, Team 17-1, Forte Winter 2014 Membro de Cal Poly, Team 17-1, Forte Winter 2014

CPSU-FORTE-W14S17G1

Membros da 5

Autoria de 17 guias

Um comentário

I took apart my mini Keurig earlier this week and let many parts soak in vinegar besides really scrubbing area that coffee basket sits & getting oodles of caked coffee bits out. Have put it back together except one item I can’t make go back in, so doesn’t appear to be ready to use. There’s a rod with 2 plastic cylinders on it. Can’t get it to clip into the metal ‘j’ clip that appears to keep rod axle sliding in track.

Suggestions? Instructions?

Laurie Hill - Responder

Adicione um comentário

Exibir estatísticas:

Últimas 24 horas: 0

Últimos 7 dias: 0

Últimos 30 dias: 10

Duração total: 5,524