Ir para o conteúdo principal

Keurig B70 Platinum Check Valve Replacement

O que você precisa

  1. Keurig B70 Platinum Check Valve Replacement, Check Valve: passo 1, imagem 1 %32 Keurig B70 Platinum Check Valve Replacement, Check Valve: passo 1, imagem 2 %32
    • Lift up the top lid.

    • Remove the two screws with a Phillips #0 screwdriver.

  2. Keurig B70 Platinum Check Valve Replacement: passo 2, imagem 1 %32 Keurig B70 Platinum Check Valve Replacement: passo 2, imagem 2 %32
    • Push down on the lid.

    • Lift up and remove the lid.

  3. Keurig B70 Platinum Check Valve Replacement: passo 3, imagem 1 %32 Keurig B70 Platinum Check Valve Replacement: passo 3, imagem 2 %32
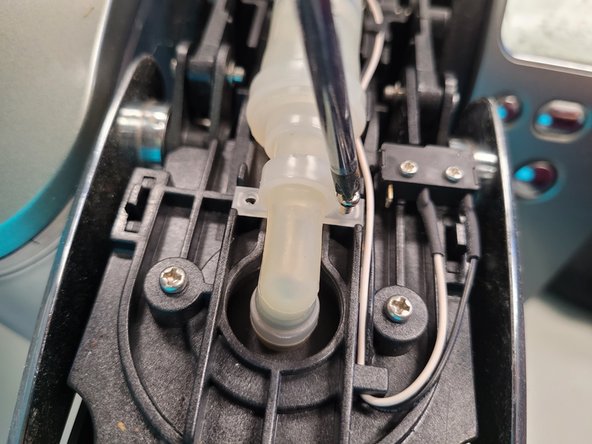
    • Using the Phillips #0 screwdriver, remove the two screws holding the tubing to the puncture needle.

  4. Keurig B70 Platinum Check Valve Replacement: passo 4, imagem 1 %32 Keurig B70 Platinum Check Valve Replacement: passo 4, imagem 2 %32 Keurig B70 Platinum Check Valve Replacement: passo 4, imagem 3 %32
    • Twist and pull to disconnect the valve on that side.

  5. Keurig B70 Platinum Check Valve Replacement: passo 5, imagem 1 %32 Keurig B70 Platinum Check Valve Replacement: passo 5, imagem 2 %32
    • On the other side, cut the one zip tie closest to the valve.

  6. Keurig B70 Platinum Check Valve Replacement: passo 6, imagem 1 %32 Keurig B70 Platinum Check Valve Replacement: passo 6, imagem 2 %32
    • Twist and pull to disconnect valve on the other side.

  7. Keurig B70 Platinum Check Valve Replacement: passo 7, imagem 1 %32 Keurig B70 Platinum Check Valve Replacement: passo 7, imagem 2 %32
    • Reassemble the valve in place.

    • Resecure it with a zip tie.

    • Trim the excess plastic off of the zip tie.

Conclusão

To reassemble your device, follow these instructions in reverse order.

Uma outra pessoa concluiu este guia.

0 comentários

Adicione um comentário

Exibir estatísticas:

Últimas 24 horas: 2

Últimos 7 dias: 17

Últimos 30 dias: 78

Duração total: 2,103