Ir para o conteúdo principal
JBL Clip 3 Button Board Replacement

JBL Clip 3 Button Board Replacement

Adrian Mayorga

Adrian Mayorga e um outro colaborador

Última atualização em December 30, 2024

20 minutos
Moderado

Introdução

Ir para o passo 1

This guide demonstrates how to replace the button board in a JBL Clip 3 speaker step-by-step.

The JBL Clip 3 speaker has a rather simple design. It features three buttons at the speaker's center for pausing/unpausing and increasing or decreasing volume. If the buttons fail to function, there are various reasons why this could be the case. The problem could be a faulty button or debris stuck in the button. Before using this guide, test to make sure that your button is not the issue and confirm that the issue is the speaker's button board.

Note: Before starting, make sure to power off the JBL Clip 3, and disconnect it from any power sources.

O que você precisa

Ferramentas

Exibir mais…

A iFixit ganha comissão quando você compra por estes links.
  1. JBL Clip 3 Button Board Replacement, Button Board: passo 1, imagem 1 %32 JBL Clip 3 Button Board Replacement, Button Board: passo 1, imagem 2 %32
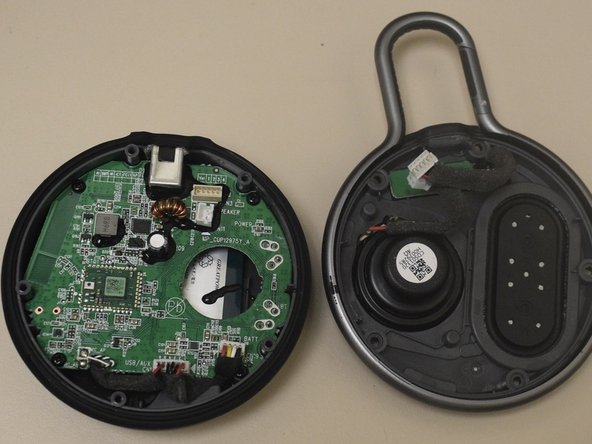
    • Insert an opening tool between the speaker grille and speaker housing and pry around the entire perimeter of the device until the grille is released.

    • A strong adhesive attaches the grill to the housing and requires some time and patience to break. Use mild heat to loosen the adhesive if necessary.

  2. JBL Clip 3 Button Board Replacement: passo 2, imagem 1 %32 JBL Clip 3 Button Board Replacement: passo 2, imagem 2 %32
    • Use a Phillips #1 screwdriver to remove the five 6.3 mm screws around the perimeter.

  3. JBL Clip 3 Button Board Replacement: passo 3, imagem 1 %32
    • Separate the speaker housing from the rest of the body.

    • Carefully lift the speaker housing since there are components that are connected to the speaker housing.

    • The speaker housing and the body are not glued together.

  4. JBL Clip 3 Button Board Replacement: passo 4, imagem 1 %32 JBL Clip 3 Button Board Replacement: passo 4, imagem 2 %32
    • Carefully remove the 2-pin and 4-pin connectors from the motherboard.

    • Tweezers can also be used to remove the 2-pin and 4-pin connectors.

  5. JBL Clip 3 Button Board Replacement: passo 5, imagem 1 %32 JBL Clip 3 Button Board Replacement: passo 5, imagem 2 %32 JBL Clip 3 Button Board Replacement: passo 5, imagem 3 %32
    • Use a Phillips #2 screwdriver to remove the two 6.3 mm screws.

    • Carefully remove the internal speaker from the speaker housing.

    • This step is completely optional; completing this step will help unclutter the speaker housing, allowing you to unscrew the last final screws easier.

  6. JBL Clip 3 Button Board Replacement: passo 6, imagem 1 %32 JBL Clip 3 Button Board Replacement: passo 6, imagem 2 %32 JBL Clip 3 Button Board Replacement: passo 6, imagem 3 %32
    • Use a Phillips #2 screwdriver to remove the two 6.3 mm screws from the button board.

    • Carefully lift and remove the button board from the speaker housing.

    • When reassembling your device, remember to use super glue to reattach the grille to the speaker housing.

Conclusão

To reassemble your device, follow these instructions in reverse order.

Uma outra pessoa concluiu este guia.

Adrian Mayorga

Membro desde: 10/21/24

133 Reputação

Autoria de 1 guia

Equipe

0Comentários do guia

Comentar

Visualizações:

Últimas 24 horas: 0

Últimos 7 dias: 7

Últimos 30 dias: 22

Ao todo: 66