Ir para o conteúdo principal
JBL Charge 3 Button Replacement

JBL Charge 3 Button Replacement

Sunmin Yoon

Sunmin Yoon e 3 outros colaboradores

Última atualização em May 10, 2024

3 - 5 minutos
Fácil

Introdução

Ir para o passo 1

Sometimes the button switches on your JBL Charge 3 can wear out or get dirt in them causing one or more buttons to not work. Luckily the buttons are easy to clean once the cover is removed.

O que você precisa

Ferramentas

Exibir mais…

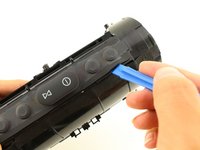
  1. JBL Charge 3 Button Replacement, Front Cover: passo 1, imagem 1 %32 JBL Charge 3 Button Replacement, Front Cover: passo 1, imagem 2 %32 JBL Charge 3 Button Replacement, Front Cover: passo 1, imagem 3 %32
    • Turn your speaker upside down and insert the plastic opening tool vertically into the slit in the front cover.

    • Slowly pull the plastic opening tool outward to remove the four clips holding the covering in place.

    • Repeat this process for all four edges of the front cover.

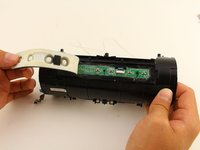
  2. JBL Charge 3 Button Replacement: passo 2, imagem 1 %32
    • Pull apart your cover gently from both sides and remove it from the speaker housing.

    • There are screws around the foot of the device that may need loosening to be able to unclip the other side of the cover.

    • The inside of the front cover has holes that must match with their corresponding pins on the speaker housing for proper reassembly.

    • Removing the Front Cover does not affect the waterproof seals of the device. However, removing any further disassembly of your speaker will require removing waterproof seals and gaskets. Your device may no longer be waterproof after these have been altered.

  3. JBL Charge 3 Button Replacement, Button: passo 3, imagem 1 %32 JBL Charge 3 Button Replacement, Button: passo 3, imagem 2 %32
    • Use your plastic opening tool to pry around the edges of the button cover. This will begin to separate the adhesive from the cover.

    • Peel away the button cover with your hand once you have enough separated from the speaker housing to grab.

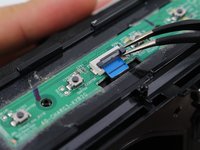
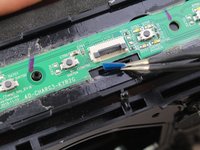
  4. JBL Charge 3 Button Replacement: passo 4, imagem 1 %32 JBL Charge 3 Button Replacement: passo 4, imagem 2 %32
    Ferramenta utilizada neste passo:
    Tweezers
    $4.99
    • Flip open the top flap on the ZIF connector.

    • Gently pull out the ZIF connector cable with tweezers.

Conclusão

To reassemble your device, follow these instructions in reverse order.

15 outras pessoas executaram este guia.

Sunmin Yoon

Membro desde: 10/30/18

1.976 Reputação

Autoria de 2 guias

Equipe

Cal Poly, Team S13-G1, White Fall 2018 Membro de Cal Poly, Team S13-G1, White Fall 2018

CPSU-WHITE-F18S13G1

3 Membros

Autoria de 26 guias

4Comentários do guia

my jbl dont turn on even its in charge it wont turn on

batteries are new but still wont wor

D- ASTRO - Responder

Where do i buy new buttons?

Thomas Bjerregaard - Responder

Could you please provide info about where to get the green board?

Alvaro Pérez Morales - Responder

Next steps are missing.

5.) What happens after the disconnecting the ZIF?

6.) a.) How do you remove the button board? Is that what needs to then be replaced?)

6.) b) Or do I need soldiering skills and learn to attach new buttons to the existing board.

Happy to learn - hoping to be pointed in the right direction...

Mark Freeman - Responder

Comentar

Visualizações:

Últimas 24 horas: 7

Últimos 7 dias: 31

Últimos 30 dias: 187

Ao todo: 25,716