Ir para o conteúdo principal

Iomega Z100S2 Disk Reader Replacement

O que você precisa

  1. Iomega Z100S2 Disk Reader Replacement, Case: passo 1, imagem 1 %32 Iomega Z100S2 Disk Reader Replacement, Case: passo 1, imagem 2 %32
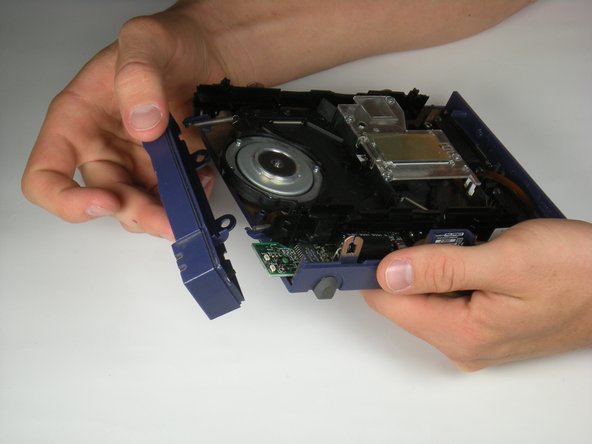
    • Push in the plastic tab that can be seen through cracks in the front left corner using a spudger.

  2. Iomega Z100S2 Disk Reader Replacement: passo 2, imagem 1 %32
    • Move down the same side and push in the plastic tab.

  3. Iomega Z100S2 Disk Reader Replacement: passo 3, imagem 1 %32
    • Move to the front right side and once again push in the plastic tab.

    • There is not a fourth tab to push in after this one.

  4. Iomega Z100S2 Disk Reader Replacement: passo 4, imagem 1 %32 Iomega Z100S2 Disk Reader Replacement: passo 4, imagem 2 %32
    • Grab the cover by the front side and pull upwards.

    • You might encounter some resistance. Pull firmly, but don't yank it.

  5. Iomega Z100S2 Disk Reader Replacement: passo 5, imagem 1 %32 Iomega Z100S2 Disk Reader Replacement: passo 5, imagem 2 %32
    • Tilt the front case down until the pegs detach from the bottom of the case.

    • Lift up and outward.

    • The motherboard will be loose at this point.

  6. Iomega Z100S2 Disk Reader Replacement, Disk Reader: passo 6, imagem 1 %32 Iomega Z100S2 Disk Reader Replacement, Disk Reader: passo 6, imagem 2 %32
    • Unhook the two springs from the front plastic hooks.

    • The black side rails of the reader should easily slide forward and off.

  7. Iomega Z100S2 Disk Reader Replacement: passo 7, imagem 1 %32
    • There is a white tab connected to the motherboard. Pull it upward by gently rocking it back and forth.

    • The tab does not come completely out, it only slides up slightly, so don't rip it out!

  8. Iomega Z100S2 Disk Reader Replacement: passo 8, imagem 1 %32 Iomega Z100S2 Disk Reader Replacement: passo 8, imagem 2 %32
    • Grab the reader by its sides and gently pull it upward.

    • There are two wires still connected to the bottom of the reader that haven't been detached.

  9. Iomega Z100S2 Disk Reader Replacement: passo 9, imagem 1 %32
    • Disconnect the white wires by using tweezers to gently pull the bottom connector toward you.

  10. Iomega Z100S2 Disk Reader Replacement: passo 10, imagem 1 %32 Iomega Z100S2 Disk Reader Replacement: passo 10, imagem 2 %32
    • Disconnect the thin ribbon wire by using tweezers to gently pull the connector at the bottom toward you.

  11. Iomega Z100S2 Disk Reader Replacement: passo 11, imagem 1 %32
    • Lift the reader up and out from the device.

Conclusão

To reassemble your device, follow these instructions in reverse order.

5 outras pessoas executaram este guia.

Ezery Kennedy

Membro desde: 10/05/10

288 Reputação

Autoria de 2 guias

Equipe

Cal Poly, Team 7-53, Amido Fall 2010 Membro de Cal Poly, Team 7-53, Amido Fall 2010

CPSU-AMIDO-F10S7G53

Membros da 4

Autoria de 6 guias

2 comentários

Great guide exactly what I was looking for.

Jim Schmidt - Responder

Zip disks were awesome, and they still are they fit that niche between needing something small in capacity but not large enough for a USB flash drive.

Trevor Rawlinson - Responder

Adicione um comentário

Exibir estatísticas:

Últimas 24 horas: 0

Últimos 7 dias: 3

Últimos 30 dias: 26

Duração total: 6,090