Esta versão pode conter edições incorretas. Mude para o último instantâneo verificado.
O que você precisa
-
Este passo não foi traduzido. Ajude a traduzi-lo
-
With the case closed, place the Unibody top-side down on a flat surface.
-
Depress the grooved side of the access door release latch enough to grab the free end. Lift the release latch until it is vertical.
-
-
Este passo não foi traduzido. Ajude a traduzi-lo
-
The access door should now be raised enough to lift it up and out of the Unibody.
-
-
Este passo não foi traduzido. Ajude a traduzi-lo
-
Grab the translucent plastic tab and pull the battery up and out of the Unibody.
-
If the latch is depressed it will lock the battery in place.
-
-
Este passo não foi traduzido. Ajude a traduzi-lo
-
Remove the following eight screws securing the lower case to the chassis:
-
One 5.4 mm Phillips screw.
-
Three 14 mm Phillips screws.
-
Four 3.5 mm Phillips screws.
-
-
Este passo não foi traduzido. Ajude a traduzi-lo
-
Using both hands, lift and remove the lower case off the upper case.
-
-
Este passo não foi traduzido. Ajude a traduzi-lo
-
Disconnect the camera cable by pulling the male end straight away from its socket.
-
-
Este passo não foi traduzido. Ajude a traduzi-lo
-
Deroute the camera data cable from the channel in the optical drive.
-
-
-
Este passo não foi traduzido. Ajude a traduzi-lo
-
Use a spudger to pry the optical drive connector straight up off the logic board.
-
-
Este passo não foi traduzido. Ajude a traduzi-lo
-
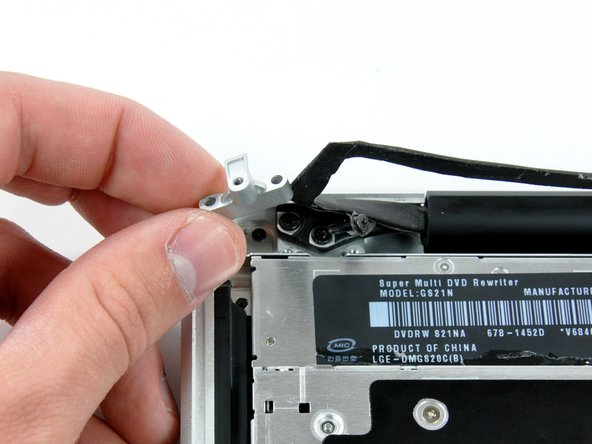
Remove two 8 mm Phillips screws securing the camera cable bracket to the upper case.
-
Lift the camera cable bracket out from the upper case.
-
-
Este passo não foi traduzido. Ajude a traduzi-lo
-
Remove the following three Phillips screws securing the optical drive to the upper case:
-
One 3.5 mm Phillips screw.
-
Two 2.5 mm Phillips screws.
-
-
Este passo não foi traduzido. Ajude a traduzi-lo
-
Lift the optical drive from its left edge and pull it out of the computer.
-
-
Este passo não foi traduzido. Ajude a traduzi-lo
-
Remove the optical drive cable by pulling it straight away from the optical drive.
-
-
Este passo não foi traduzido. Ajude a traduzi-lo
-
Remove the two black Phillips #0 screws securing the small metal mounting bracket. Transfer this bracket to your new optical drive or hard drive enclosure.
-
-
Este passo não foi traduzido. Ajude a traduzi-lo
-
Remove the plastic spacer from the optical bay hard drive enclosure by pressing in on one of the clips on either side and lifting it up and out of the enclosure.
-
-
Este passo não foi traduzido. Ajude a traduzi-lo
-
Make sure that the hard drive connectors are facing down before placing it into the enclosure.
-
Gently place the hard drive into the enclosure's hard drive slot.
-
While firmly holding the enclosure in place with one hand, use your other hand to press the hard drive into the enclosure connectors.
-
-
Este passo não foi traduzido. Ajude a traduzi-lo
-
Once the hard drive is snug, reinsert the plastic spacer while holding the hard drive against the bottom of the enclosure.
-
-
Este passo não foi traduzido. Ajude a traduzi-lo
-
Use two Phillips #1 screws to secure the drive to its enclosure.
-
-
Este passo não foi traduzido. Ajude a traduzi-lo
-
Attach the optical drive bracket to the new enclosure with two Phillips #0 screws.
-
Reconnect any cables you have removed from the original optical drive onto the optical bay enclosure.
-
-
Este passo não foi traduzido. Ajude a traduzi-lo
-
Align the cable's SATA connector with the drive's port and plug in securely.
-
Plug the USB connector into your laptop and your optical drive is ready for use.
-


Cancelar: não concluí este guia.
87 outras pessoas executaram este guia.


5 comentários
Thank you for this very comprehensive guide. I have been able to use it to add a 2nd 1TB Hard Drive to my smaller 13-inch, Aluminum, Late 2008 Macbook in lieu of its original SuperDrive. However, I am unable to see this 2nd drive on my desktop. This is despite the fact that I have checked “Hard disks” under the General tab in Preferences. I only see my 1st 500 Gb SSD boot drive. What can I do to have the 2nd Hard Drive show on my desktop as well?
Ok, I formatted the new HD and it can now be seen on my desktop!
Hi, I’m planning to do the 2nd disk op, however my idea is to add either a 2Tb SSD or 4TB SSD, leaving the OS and the std office tools (write, table, presentation) on original HDD. SSD would contain data and video/photo editing tools.
Does anyone know if the late2008 accepts, runs the above 1Tb drives (SSDs or HDDs)?
I’ve heard so many no/yes/hmmm/ney replies, seems that no one knows. Not even Apple Support team.
I would be grateful if somebody is able to give a solid advice on this matter.
One of the CDRom small screw got damage and it wont be unscrew is there away for me to remove the CD Rom? Help?
Richard Tirtadji: you can try to fix a “good” screw with a strong glue on the top of the defective one. There are how-to’s at youtube.