Introdução
There are many benefits to adding a second hard drive to your laptop such as improved speeds, greater storage space, and less heartache when installing new software. Use this guide to install one using our optical bay hard drive enclosure.
O que você precisa
-
-
Remove the following ten screws:
-
Three 14.4 mm Phillips #00 screws
-
Three 3.5 mm Phillips #00 screws
-
Four 3.5 mm shouldered Phillips #00 screws
-
-
-
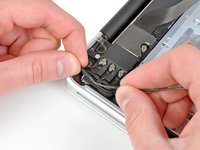
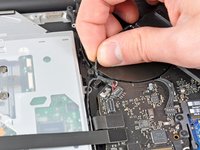
Use the edge of a spudger to pry the battery connector upwards from its socket on the logic board.
-
-
-
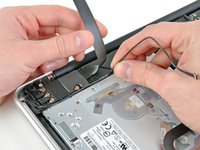
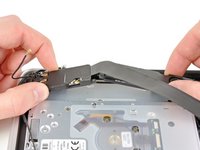
Use the flat end of a spudger to pry the AirPort/Bluetooth ribbon cable connector up from its socket on the logic board.
-
-
-
-
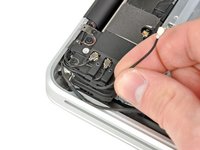
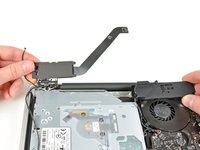
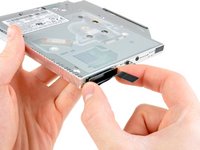
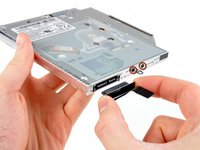
Pull the optical drive cable away from the optical drive.
-
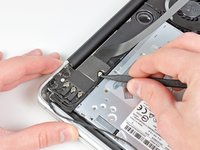
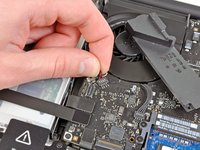
Remove the two black Phillips #0 screws securing the small metal mounting bracket. Transfer this bracket to your new optical drive or hard drive enclosure.
-
-
-
Remove the plastic spacer from the optical bay hard drive enclosure by pressing in on one of the clips on either side and lifting it up and out of the enclosure.
-
-
-
Make sure that the hard drive connectors are facing down before placing it into the enclosure.
-
Gently place the hard drive into the enclosure's hard drive slot.
-
While firmly holding the enclosure in place with one hand, use your other hand to press the hard drive into the enclosure connectors.
-


To reassemble your device, follow these instructions in reverse order.
To reassemble your device, follow these instructions in reverse order.
Cancelar: não concluí este guia.
188 outras pessoas executaram este guia.


9 comentários
I skipped the steps 6-11 minus just removing two of the screws on the Airport/ Bluetooth assembly and my installation was flawless. I had prior experience removing my Superdrive and there is enough wiggle room for you to pull out the Superdrive drive without damaging any cords or plugs that others seemed to damage. Also, my suggestion is that you clone your hard drive to the SSD and install the SSD in the original hard drive location. I installed the hdd in the Apple Drive Caddy. My computer ran awesome before with a SSD but now I have 500gb for space.
I did replaced my drive by a SSD really quickly ! However, since I've done that, my CPU goes crazy sometimes and the fans as well... I tried to install SSD Fan Control but it doesn't seems to work... Any solution ?
I upgraded my MacBook Pro early 2011 this weekend with a Samsung 850 Pro 512GB. I followed one of the many online guides that talk about Carboncopy to copy your configuration on your HHD to your new drive and then you just have to swap them.
After I did this, I noticed that the fan started to blow for anything that I started. Just opening a webpage was enough. I cleaned the fan and indeed found a bunch of dust collected behind the exhaust of the fan. That must be it, I thought. But after starting my computer, it started the fan again quite soon.
Then I restarted my macbook via the old HDD on usb. Silence as I was used to before.. no fan going nuts on anything I started. So I created a bootable USB stick for a clean install. I have not heard the fan ever since. Only in cases that are normal because it requests more of my MacBook.
I did it exactly as shown. Put a new SSD as primary drive, restored de backup, but can't access the HDD (the original, that I put as secondary, for file store). The HDD works fine with the SATA-USB cable, but not at the optical slot. What should I do now?