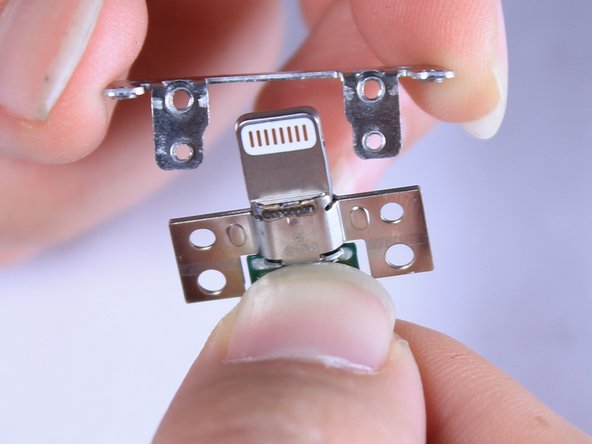
Ir para o conteúdo principal

Insignia NS-CLLT01 iPhone Dock Replacement

O que você precisa

  1. Insignia NS-CLLT01 iPhone Dock Replacement, Insignia NS-CLLT01 Top Casing Removal: passo 1, imagem 1 %32 Insignia NS-CLLT01 iPhone Dock Replacement, Insignia NS-CLLT01 Top Casing Removal: passo 1, imagem 2 %32
    • Lift the four adhesive covers on each of the corners on the bottom of the clock using a plastic opening tool or your fingernail.

  2. Insignia NS-CLLT01 iPhone Dock Replacement: passo 2, imagem 1 %32 Insignia NS-CLLT01 iPhone Dock Replacement: passo 2, imagem 2 %32 Insignia NS-CLLT01 iPhone Dock Replacement: passo 2, imagem 3 %32
    • On the bottom of the clock, use your fingernail to push the battery cover to the right.

    • Lift the battery cover up and to the right to reveal the batteries.

  3. Insignia NS-CLLT01 iPhone Dock Replacement: passo 3, imagem 1 %32
    • Remove the two AA batteries by pressing the end opposite of the spring towards that spring and lifting up.

    • Once the batteries are removed, close the cover.

  4. Insignia NS-CLLT01 iPhone Dock Replacement: passo 4, imagem 1 %32
    • Use a long Phillips #2 screwdriver to unscrew all six 10mm Phillips screws inside the bottom of the clock.

    • Turn over the device to allow the screws to fall out, being careful to catch them so that you do not lose any.

    • The screws may not come out of the bottom of the clock. As long as you have unscrewed them, the clock can still be opened.

  5. Insignia NS-CLLT01 iPhone Dock Replacement: passo 5, imagem 1 %32 Insignia NS-CLLT01 iPhone Dock Replacement: passo 5, imagem 2 %32 Insignia NS-CLLT01 iPhone Dock Replacement: passo 5, imagem 3 %32
    • Turn the clock back over.

    • Lift the top off of the clock by gripping the back of the iPhone dock and pulling straight up.

  6. Insignia NS-CLLT01 iPhone Dock Replacement, iPhone Dock: passo 6, imagem 1 %32 Insignia NS-CLLT01 iPhone Dock Replacement, iPhone Dock: passo 6, imagem 2 %32
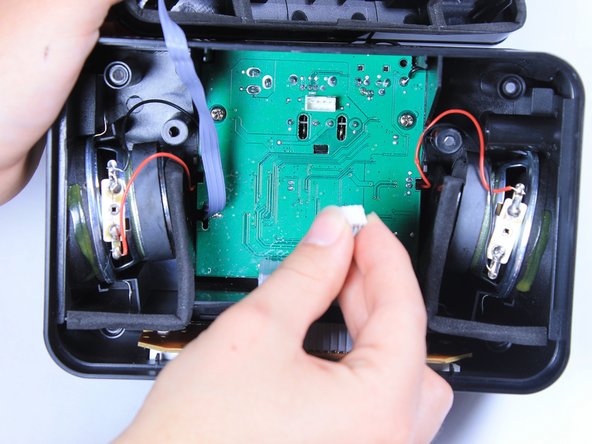
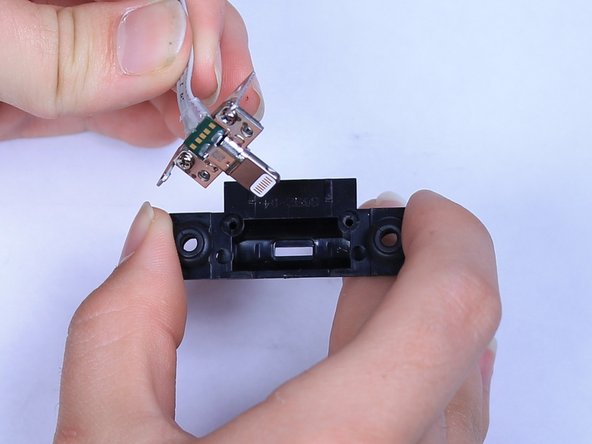
    • Grip the white ribbon cable connector that attaches the lightning cable to the middle of the central circuit board located in the bottom of the clock. Pinch and pull straight up to detach the cable.

  7. Insignia NS-CLLT01 iPhone Dock Replacement: passo 7, imagem 1 %32
    • Using a Phillips #1 screwdriver, unscrew the two 7mm Phillips screws that attach the iPhone dock to the top cover of the clock.

  8. Insignia NS-CLLT01 iPhone Dock Replacement: passo 8, imagem 1 %32 Insignia NS-CLLT01 iPhone Dock Replacement: passo 8, imagem 2 %32
    • Remove the plastic casing, which encases the Apple lightning connector, from the top cover of the clock.

  9. Insignia NS-CLLT01 iPhone Dock Replacement: passo 9, imagem 1 %32
    • Using a Phillips #1 screwdriver, unscrew the two 4mm Phillips screws that hold the metal frame around the lightning connector to the plastic casing.

  10. Insignia NS-CLLT01 iPhone Dock Replacement: passo 10, imagem 1 %32 Insignia NS-CLLT01 iPhone Dock Replacement: passo 10, imagem 2 %32
    • Remove the metal frame around the lightning connector from its plastic cover.

  11. Insignia NS-CLLT01 iPhone Dock Replacement: passo 11, imagem 1 %32
    • Using a Phillips #0 screwdriver, unscrew the two 3mm Phillips screws from the metal frame around the lightning cable.

  12. Insignia NS-CLLT01 iPhone Dock Replacement: passo 12, imagem 1 %32 Insignia NS-CLLT01 iPhone Dock Replacement: passo 12, imagem 2 %32
    • Remove the metal frame from around the lightning connector. This will allow you to replace the lightning connector with a new one.

Conclusão

To reassemble your device, follow these instructions in reverse order.

Morgan Mattingly

Membro desde: 09/22/15

301 Reputação

Autoria de 3 guias

Equipe

Baylor, Team 6-9, Williams Fall 2015 Membro de Baylor, Team 6-9, Williams Fall 2015

BU-WILLIAMS-F15S6G9

Membros da 3

Autoria de 6 guias

0 comentários

Adicione um comentário

Exibir estatísticas:

Últimas 24 horas: 0

Últimos 7 dias: 0

Últimos 30 dias: 0

Duração total: 143