Ir para o conteúdo principal

Insignia Flex 8 NS-P08A7100 Screen Replacement

O que você precisa

  1. Insignia Flex 8 NS-P08A7100 Screen Replacement, Screen: passo 1, imagem 1 %32 Insignia Flex 8 NS-P08A7100 Screen Replacement, Screen: passo 1, imagem 2 %32
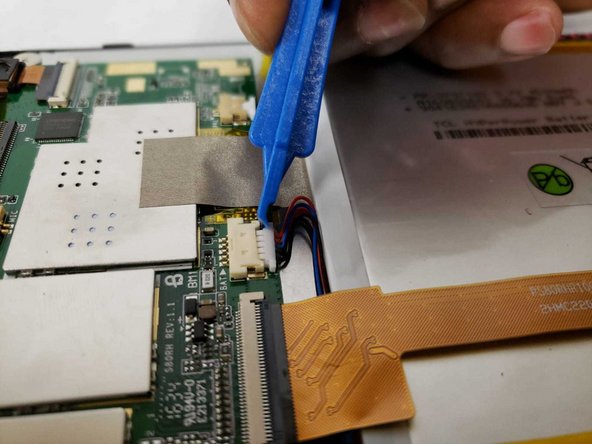
    • Begin by using the opening tool to pry open the back cover. Continue around the edge until the back cover pops off.

  2. Insignia Flex 8 NS-P08A7100 Screen Replacement: passo 2, imagem 1 %32 Insignia Flex 8 NS-P08A7100 Screen Replacement: passo 2, imagem 2 %32
    • Use the opening tool to flip the LCD flex circuit plug upwards. The flex circuit should now be loose. Remove flex circuit by pulling outwards.

  3. Insignia Flex 8 NS-P08A7100 Screen Replacement: passo 3, imagem 1 %32 Insignia Flex 8 NS-P08A7100 Screen Replacement: passo 3, imagem 2 %32
    • Use the opening tool to remove the battery cable from the circuit board.

  4. Insignia Flex 8 NS-P08A7100 Screen Replacement: passo 4, imagem 1 %32
    • Remove the adhesive tape from the bottom of the battery.

  5. Insignia Flex 8 NS-P08A7100 Screen Replacement: passo 5, imagem 1 %32
    • Remove plastic adhesive tape from the side of the battery.

  6. Insignia Flex 8 NS-P08A7100 Screen Replacement: passo 6, imagem 1 %32 Insignia Flex 8 NS-P08A7100 Screen Replacement: passo 6, imagem 2 %32
    • Pry the battery from the back of the LCD screen using the opening tool. Due to the strong adhesive between the battery and screen, this may take some time.

  7. Insignia Flex 8 NS-P08A7100 Screen Replacement: passo 7, imagem 1 %32
    • Begin removing the screws on the circuit board using the phillips-head bit driver. Start with the top left corner.

  8. Insignia Flex 8 NS-P08A7100 Screen Replacement: passo 8, imagem 1 %32
    • Remove the next screw to the right using the phillips-head bit driver.

  9. Insignia Flex 8 NS-P08A7100 Screen Replacement: passo 9, imagem 1 %32
    • Remove the next screw to the right using the phillips-head bit driver. This one is slightly hidden under the flex circuit of the camera.

  10. Insignia Flex 8 NS-P08A7100 Screen Replacement: passo 10, imagem 1 %32
    • Remove the next screw in the right top right using the phillips-head bit driver.

  11. Insignia Flex 8 NS-P08A7100 Screen Replacement: passo 11, imagem 1 %32
    • Remove the next screw in the bottomeright corner using the phillips-head bit driver.

  12. Insignia Flex 8 NS-P08A7100 Screen Replacement: passo 12, imagem 1 %32
    • Remove the next screw in the bottom left corner using the phillips-head bit driver.

  13. Insignia Flex 8 NS-P08A7100 Screen Replacement: passo 13, imagem 1 %32
    • Remove the flex circuit on the left side of the circuit board using the opening tool.

  14. Insignia Flex 8 NS-P08A7100 Screen Replacement: passo 14, imagem 1 %32
    • Remove the speaker cable from the circuit board using the opening tool.

  15. Insignia Flex 8 NS-P08A7100 Screen Replacement: passo 15, imagem 1 %32
    • Remove the camera cable from the circuit board using the opening tool.

  16. Insignia Flex 8 NS-P08A7100 Screen Replacement: passo 16, imagem 1 %32
    • Flip the camera flex circuit clip upwards using the opening tool. Detach the camera flex circuit from the circuit board

  17. Insignia Flex 8 NS-P08A7100 Screen Replacement: passo 17, imagem 1 %32
    • Remove the adhesive tape holding the circuit board to the LCD screen. The circuit should now be free.

  18. Insignia Flex 8 NS-P08A7100 Screen Replacement: passo 18, imagem 1 %32
    • Pull the circuit board forward for clearance and begin removing the screen with the opening tool.

Conclusão

To reassemble your device, follow these instructions in reverse order.

Marco Soto

Membro desde: 07/08/19

347 Reputação

Autoria de 1 guia

Equipe

IUPUI, Team S1-G1, Renguette Summer 2019 Membro de IUPUI, Team S1-G1, Renguette Summer 2019

IUPUI-RENGUETTE-SU19S1G1

Membros da 3

Autoria de 2 guias

0 comentários

Adicione um comentário

Exibir estatísticas:

Últimas 24 horas: 0

Últimos 7 dias: 1

Últimos 30 dias: 7

Duração total: 346