Ir para o conteúdo principal

Huawei P20 Daughterboard Replacement

Pré-requisito somente
Este guia destina-se apenas a ser usado como pré-requisito para outros guias. É incompleto por si só.

O que você precisa

  1. Huawei P20 Daughterboard Replacement, Rear Glass: passo 1, imagem 1 %32
    • Before you begin, switch off your phone.

    • Apply a heated iOpener to the back of the phone to loosen the adhesive beneath the back cover. Apply the iOpener for at least two minutes.

  2. Huawei P20 Daughterboard Replacement: passo 2, imagem 1 %32 Huawei P20 Daughterboard Replacement: passo 2, imagem 2 %32 Huawei P20 Daughterboard Replacement: passo 2, imagem 3 %32
    • Secure a suction handle to the bottom of the back cover, as close to the edge as possible.

    • If the phone's rear glass is cracked, the suction handle may not stick. Try lifting it with strong tape, or superglue the suction handle in place and allow it to cure so you can proceed.

    • Lift the back cover with the suction handle to create a small gap between the cover and the frame.

    • Insert an opening pick into the gap.

    • If you have trouble, apply more heat to further soften the adhesive. Follow the iOpener instructions to avoid overheating.

    • Slide the opening pick to the bottom right corner.

  3. Huawei P20 Daughterboard Replacement: passo 3, imagem 1 %32 Huawei P20 Daughterboard Replacement: passo 3, imagem 2 %32
    • Insert a second opening pick and slide it to the bottom left corner to cut the adhesive.

    • Leave the opening picks in place to prevent the adhesive from resealing.

  4. Huawei P20 Daughterboard Replacement: passo 4, imagem 1 %32 Huawei P20 Daughterboard Replacement: passo 4, imagem 2 %32 Huawei P20 Daughterboard Replacement: passo 4, imagem 3 %32
    • Insert a third opening pick at the bottom left corner.

    • In the next few steps whilst cutting around the power button and rear camera make sure you only use the tip of the opening pick to avoid cutting the cable, smearing the lens or damaging the camera.

    • Start to slide the tip of the opening pick from the bottom left corner along the side of the phone to cut the adhesive.

    • Leave the opening pick in its place at the top left corner to prevent the adhesive from resealing.

  5. Huawei P20 Daughterboard Replacement: passo 5, imagem 1 %32 Huawei P20 Daughterboard Replacement: passo 5, imagem 2 %32
    • If the adhesive becomes hard to cut it most likely cooled down. Use your iOpener to reheat it.

    • Insert a fourth opening pick under the top left corner of the back cover.

    • Slide the opening pick along the top edge of the phone to cut the adhesive.

    • Leave the opening pick in the top right corner to prevent the adhesive from resealing.

  6. Huawei P20 Daughterboard Replacement: passo 6, imagem 1 %32 Huawei P20 Daughterboard Replacement: passo 6, imagem 2 %32
    • Insert a fifth opening pick at the top right corner of the phone.

    • Slide the opening pick along the right side to cut the remaining adhesive.

  7. Huawei P20 Daughterboard Replacement: passo 7, imagem 1 %32 Huawei P20 Daughterboard Replacement: passo 7, imagem 2 %32
    • Lift and remove the back cover.

    • Before installing fresh adhesive and reassembling, remove any remaining adhesive from the phone, and clean the glued areas with isopropyl alcohol and a lint-free cloth.

  8. Huawei P20 Daughterboard Replacement, Motherboard Cover with NFC: passo 8, imagem 1 %32 Huawei P20 Daughterboard Replacement, Motherboard Cover with NFC: passo 8, imagem 2 %32
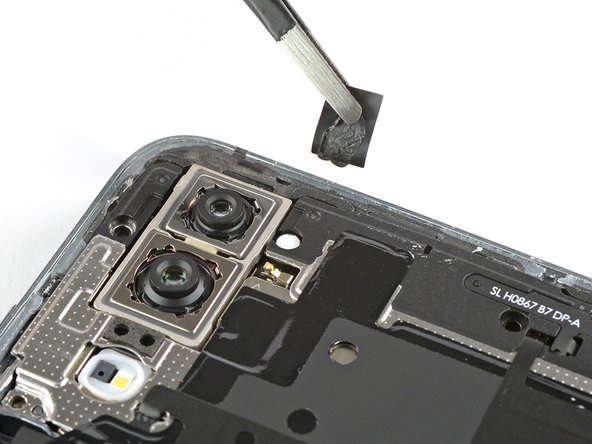
    • Use a pair of tweezers to peel the black tape next to the rear camera off the motherboard cover.

  9. Huawei P20 Daughterboard Replacement: passo 9, imagem 1 %32
    • Remove the eight Phillips #00 screws (3.1 mm length).

  10. Huawei P20 Daughterboard Replacement: passo 10, imagem 1 %32 Huawei P20 Daughterboard Replacement: passo 10, imagem 2 %32
    • Use a pair of tweezers to peel the black foil at the bottom end of the phone off the loudspeaker.

  11. Huawei P20 Daughterboard Replacement: passo 11, imagem 1 %32 Huawei P20 Daughterboard Replacement: passo 11, imagem 2 %32
    • Slide an opening pick under the right side of the motherboard cover.

    • Rotate the opening pick slightly to pry up the motherboard cover.

  12. Huawei P20 Daughterboard Replacement: passo 12, imagem 1 %32 Huawei P20 Daughterboard Replacement: passo 12, imagem 2 %32 Huawei P20 Daughterboard Replacement: passo 12, imagem 3 %32
    • Remove the motherboard cover with NFC.

  13. Huawei P20 Daughterboard Replacement, Battery Disconnect: passo 13, imagem 1 %32 Huawei P20 Daughterboard Replacement, Battery Disconnect: passo 13, imagem 2 %32
    • Use a spudger to pry up and disconnect the battery connector.

  14. Huawei P20 Daughterboard Replacement, Daughterboard Cover: passo 14, imagem 1 %32
    • Remove the three Phillips #00 screws (3.2 mm length).

  15. Huawei P20 Daughterboard Replacement: passo 15, imagem 1 %32 Huawei P20 Daughterboard Replacement: passo 15, imagem 2 %32 Huawei P20 Daughterboard Replacement: passo 15, imagem 3 %32
    • Use a pair of tweezers to remove the daughterboard cover.

  16. Huawei P20 Daughterboard Replacement, Charging Board with Main Flex: passo 16, imagem 1 %32
    • Remove the two Phillips #00 screws (3.2 mm length).

  17. Huawei P20 Daughterboard Replacement: passo 17, imagem 1 %32 Huawei P20 Daughterboard Replacement: passo 17, imagem 2 %32
    • Use a spudger to pry up and disconnect the main daughterboard connector from the daughterboard.

  18. Huawei P20 Daughterboard Replacement: passo 18, imagem 1 %32 Huawei P20 Daughterboard Replacement: passo 18, imagem 2 %32 Huawei P20 Daughterboard Replacement: passo 18, imagem 3 %32
    • Use a pair of tweezers to pry up and disconnect the connector of the white coax cable from the motherboard.

    • Unroute the white coax cable from the metal clips on the daughterboard and fold it to the side.

  19. Huawei P20 Daughterboard Replacement: passo 19, imagem 1 %32 Huawei P20 Daughterboard Replacement: passo 19, imagem 2 %32
    • Use a spudger to disconnect the main flex cable connector from the motherboard.

  20. Huawei P20 Daughterboard Replacement: passo 20, imagem 1 %32 Huawei P20 Daughterboard Replacement: passo 20, imagem 2 %32 Huawei P20 Daughterboard Replacement: passo 20, imagem 3 %32
    • Remove the charging port and main flex cable by lifting it upwards and then pulling it in the direction of the motherboard.

  21. Huawei P20 Daughterboard Replacement, Battery: passo 21, imagem 1 %32 Huawei P20 Daughterboard Replacement, Battery: passo 21, imagem 2 %32 Huawei P20 Daughterboard Replacement, Battery: passo 21, imagem 3 %32
    • Use a spudger to pry up and disconnect the power and volume button flex connector.

  22. Huawei P20 Daughterboard Replacement: passo 22, imagem 1 %32 Huawei P20 Daughterboard Replacement: passo 22, imagem 2 %32
    • Use a spudger to pry up and disconnect the display flex connector and fold the display cable out of your way to remove the battery.

  23. Huawei P20 Daughterboard Replacement: passo 23, imagem 1 %32
    • Apply a heated iOpener to the screen to loosen the adhesive beneath the battery. Apply the iOpener for at least two minutes.

    • Try your best not to deform the battery during the following removal process. Soft-shell lithium-ion batteries can leak dangerous chemicals, catch fire, or even explode if damaged. Do not use excessive force or pry at the battery with metal tools.

  24. Huawei P20 Daughterboard Replacement: passo 24, imagem 1 %32 Huawei P20 Daughterboard Replacement: passo 24, imagem 2 %32 Huawei P20 Daughterboard Replacement: passo 24, imagem 3 %32
    Ferramenta utilizada nesse passo:
    Plastic Cards
    $2.99
    Comprar
    • Start to slide a plastic card under the bottom right corner of the battery to cut the adhesive.

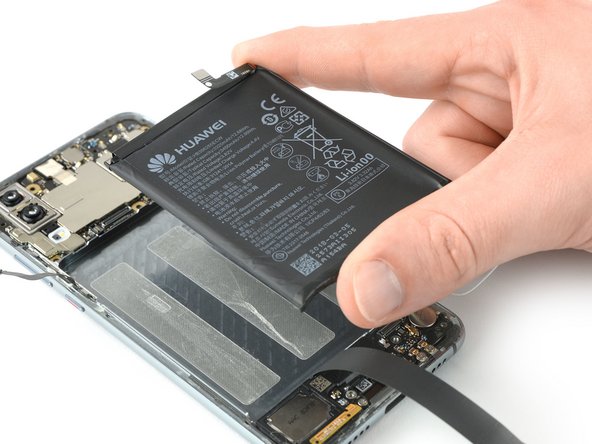
    • Slide the plastic card along the right side of the battery to further release the adhesive. Gently start to pry up the battery while doing so.

    • If you have trouble prying up the battery, the adhesive may not be loose enough. You can apply some isopropyl alcohol under each corner of the battery and allow it to penetrate for about two minutes to help weaken the adhesive.

  25. Huawei P20 Daughterboard Replacement: passo 25, imagem 1 %32 Huawei P20 Daughterboard Replacement: passo 25, imagem 2 %32 Huawei P20 Daughterboard Replacement: passo 25, imagem 3 %32
    • Slide the plastic card under the whole upper part of the battery and cut the adhesive with it.

    • Slide the plastic card down to the bottom end of the battery to cut the remaining adhesive.

    • Use the plastic card to pry up the battery.

  26. Huawei P20 Daughterboard Replacement: passo 26, imagem 1 %32 Huawei P20 Daughterboard Replacement: passo 26, imagem 2 %32
    Ferramenta utilizada nesse passo:
    Tesa 61395 Tape
    $5.99
    Comprar
  27. Huawei P20 Daughterboard Replacement, Daughterboard: passo 27, imagem 1 %32
    • Remove the two Phillips #00 screws (3.4 mm length).

  28. Huawei P20 Daughterboard Replacement: passo 28, imagem 1 %32 Huawei P20 Daughterboard Replacement: passo 28, imagem 2 %32
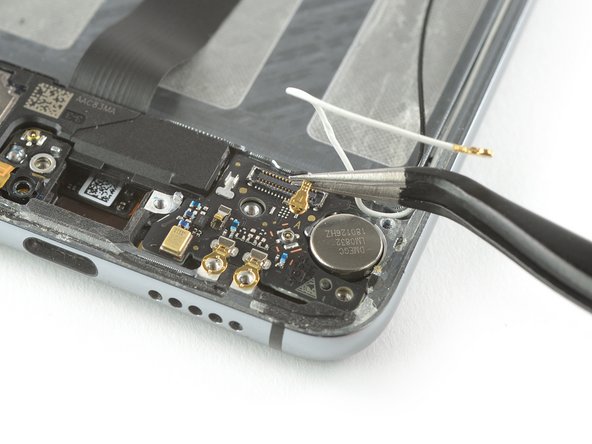
    • Use a pair of tweezers to disconnect the black coax cable and fold it out of your way.

  29. Huawei P20 Daughterboard Replacement: passo 29, imagem 1 %32 Huawei P20 Daughterboard Replacement: passo 29, imagem 2 %32
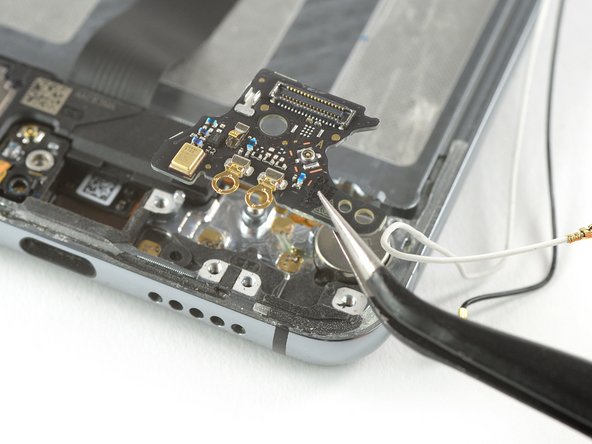
    • Use a pair of tweezers to remove the daughterboard.

Conclusão

To reassemble your device, follow these instructions in reverse order.

Dominik Schnabelrauch

Membro desde: 11/23/16

203.329 Reputação

Autoria de 682 guias

Equipe

iFixit Membro de iFixit

Staff

Membros da 135

Autoria de 16.817 guias

0 comentários

Adicione um comentário

Exibir estatísticas:

Últimas 24 horas: 0

Últimos 7 dias: 0

Últimos 30 dias: 0

Duração total: 22